Antipyretics for children are prescribed by a pediatrician. But there are situations of emergency care for fever, when the child needs to give the medicine immediately. Then the parents take responsibility and apply antipyretic drugs. What is allowed to give to infants? How can you bring down the temperature in older children? Which medications are the safest?
The decoration of the ceiling in modern repairs is no less distinguished by the adaptability of modern materials, as well as other elements of the apartment or house. However, such an old operation as whitewashing of the ceiling with chalk or lime still takes its place in repair. The reason for this is the simplicity and cheapness of this type of work.
Preparing for whitewashing with chalk
Chalk, like lime, is a natural material that guarantees environmental friendliness and is another plus in favor of their application.
In order to perform such simple work as chalking the ceiling with chalk with your hands, you need to have information about the following factors:
- Surface preparation technology
- Consumption
- Method of application
- Estimated cost
- Tools used
"Aware is, means, armed!" - says the saying, so the information is the task of this article.
Careful preparation of the surface will help to avoid some further troubles that may arise as a result of improper approach to finishing. Imagine, for example, that a technician is already installed in the room, there is heavy and expensive furniture, and there is a defect in the ceiling coating. It is hardly worth mentioning what efforts can be made to eliminate this shortcoming (move or take out furniture, cover it with a film, etc.)
The best option (albeit the most time consuming) is the complete removal of the old coating from the ceiling. This is done with a spatula or grinder. Preliminary surface is moistened to soften the finishing layer, and then it is removed with a spatula to the base. We will not dwell on this operation separately, it is described in another article on our website.
Removing the old whitewash spatula
If you want your eyes to climb up, do not cling to any shortcomings, you need to level the ceiling before applying the finish coat. The alignment procedure will include:
- Padding
- Elimination of rough surface defects (cracks, cracks between panels of overlapping, deep cracks)
- Shpatlevanie
- Grout
- Priming before whitewashing
The initial priming is done in order to create a film that will ensure adhesion of the plaster-putty layer. At large differences in the plane, you have to display the surface several times.

If the apartment (or room in the house) is on the top floor, and there is a risk of water leakage from the outer wall or roof, it is necessary to do that, which is often used for the insulation of ceilings on the upper floors. Also, if traces of a fungus are found on the ceiling, it is better to make antifungal impregnation of the floors.
The finishing layer of the putty is also primed, because it has a porous surface that absorbs moisture very much, which will lead to overflow of whitewash.
For priming, you can buy a ready-made primer of deep penetration, or prepare it yourself. For self-preparation of 10 liters of a priming composition, it is necessary to take about 3 kg of calcareous dough, drying oil "Oxol" (from 50 to 100 grams), and a bar of laundry soap. The soap is rubbed on a coarse grater and dissolved in three liters of hot water, and then, stirring, a drying oil is added to such a solution. To mix the lime, 4 liters of water are poured into it and mixed too. Then the resulting formulations are poured into a single container (volume not less than 11 liters), mixed and the output is finished primer, manufactured by hand.
The primer is applied with a brush or roller, and it must be left to dry completely - at least for a night or a day, and while it dries, you can start to prepare a chalky solution.
Reducing the cost overruns to a minimum is one of the most important requirements for repair. Accordingly, it is necessary to know the consumption for whitewashing of the ceiling with chalk, which is approximately 0.5 liters of ready solution per 1 square meter. This figure does not guarantee that you will not lose more material, as everything depends on the experience of the painter, the tool used and the quality of surface preparation.
- Chalk (ready-made powder or doughy) - 3 kg
- Joiner's glue - 0,1 kg
- Laundry soap - 50 grams
- Sinka - 10-15 grams
- Warm water - 4L
Knowing all the ingredients, it's easy to calculate the cost of whitewashing the ceiling with chalk.
If the chalk is purchased in powder, it must first be sifted through a sieve to remove lumps and other foreign inclusions - pebbles, etc. Sift better immediately in a container in which the whole composition will be mixed. Then add water, soap and pre-dissolved glue. In order not to be mistaken in the amount of blue, it can also be diluted in water, and then gradually add to the chalky solution.
The glue is necessary to ensure that when applying whitewash has a better adhesion to the surface of the ceiling. To better mix the finished mixture, it is worth using a special nozzle for the electric drill - this will help to achieve a uniform solution. However, even if the chalk was previously sieved, the ready-made mass must be filtered through gauze.
The more thoroughly and better the whitewash solution is prepared, the more comfortable and uniform it will be applied to the ceiling!
Whitewashing on the ceiling
To perform the whitening procedure directly, you will need the following tool (to choose from):
- Brush (wide, with a long natural pile, such as "maklovitsa")

Brush type "maklovitsa"
- Roller


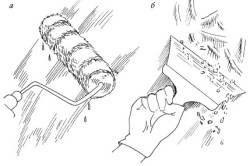
The most uniform and velvety coating is obtained by spraying. However, this is also the most "dirty" method, because the spray will fall on the walls and windows. In addition, this method assumes the availability of special equipment: either a vacuum cleaner with a spray nozzle and a return air function, or a compressor with a spray gun, or an electric spray gun.
Also, a uniform coating is obtained by a roller. Whitewashing with a brush is also a good option, here you need some skill and experience.
No matter which method of whitening is chosen, there are general principles applicable to each of them:
- The whitening is done in several layers (at least two)
- Before applying the subsequent layer, the previous one must completely dry
- To achieve a uniform coating, the next layer is applied perpendicular to the previous one (the cross-pasting method)
- During the drying of whitewash, it is necessary to exclude drafts and avoid direct exposure to sunlight
If the choice is made in favor of whitewash, it will be more convenient to do this with a long telescopic handle - the hands are not so tired, and the spray falls less on the painter.

Roller with telescopic handle
It is worth remembering that the whitewashing of the ceiling with chalk, as well as the preparation for it, are rather dirty construction works, so it is best if the room is completely freed from furniture, the doors are removed (or carefully closed with a film), the windows are also protected from dust and undercoating, as well as whitening solutions.
If the room is overhauled, it is best to go from the top down: first the ceiling, then the walls, and then the floor covering. Successful whitewashing!
When painting ceilings take into account the direction of light rays penetrating the windows. If they are working with a brush, then the last layer of whitewash is applied towards the light (to the window), and the previous one - vice versa, across. Otherwise, no matter how carefully the work is done, the marks from the brush will be visible on the ceiling. The brush is worked so that its strokes are uniform and whitewashing lies in thin, even layers. To make the surface smooth and clean, it is necessary not only to work correctly with a brush, but also to use the brush to correctly color the composition. It must be periodically shaken with a brush: this gives it uniformity, and a sediment does not form on the bottom. You can also thoroughly mix it with a stick from time to time.
Another option for applying whitewash is using a paint sprayer. They can be a normal vacuum cleaner, equipped with a special nozzle, which can be bought at a hardware store. When working with a paint sprayer, it is necessary to monitor the uniformity and purity of the solution: any small particle that has not dissolved in it can clog the sprayer opening and in some cases lead to its spoilage. For uniform whitening of the surface, the solution must be applied along two mutually perpendicular directions, that is, crossing the layers. The speed of moving should be uniform, you can not hold the jet whitewash in one place longer than the rest.
Whitewash with lime. For whitewash, so-called lime milk is used, which is obtained from 1 part of slaked lime and 3 parts of water. Lime milk is a strong disinfectant. It destroys bacteria and prevents the accumulation and reproduction of bedbugs in living quarters.
Crushed lime is spread in a large metal, enameled or wooden container, poured cold water and mixed with a wooden spatula to the density of sour cream. When quenching lime gives off a lot of heat and splashes, so you need to be careful.
Whitewash ceilings with a lime composition is produced over a slightly damp surface. The durability of the painting is increased if salt is added to the prepared solution (25-50 g per 5 l whitewash).
Whitewashing with chalk. The chalk solution is prepared in the same proportion as the calcareous solution. On 3 parts of water take 1 part chalk or finished chalk paste, available for sale. Use paste is much more convenient, as it will save you from the long and painstaking process of grinding and sifting chalk.
Chalk or paste put in a container and gradually add water to the correct amount, thoroughly mixing the solution. Then it is filtered through gauze. Large parts of the chalk remain on the gauze while increasing the consumption of material; this must be taken into account when buying chalk.
To avoid a yellowish shade of the ceiling, a bit of blue or ultramarine is added to the whitewash. However, it should be done with extreme caution, otherwise an unplanned effect of the "blue of the sky" can appear overhead.
To impart strength to the whitening layer, it is possible to introduce carpentry glue at the rate of 60-80 g per 3 liters of solution.
The ceiling can also be painted with colored inks, for which an aniline dye is added. At the same time, it is better to experiment with the finished one on any surface (for example, on a wall, also before the one assigned for repair).
Ready-made colorful compounds. Before use, the final whitewash is diluted with water and mixed. Apply with a brush, brush or paint sprayer in 1-3 layers, periodically drying for 2-3 hours. Consumption whitewash - 100 120 g per 1 m2. In addition to the fact that the finished whitewash does not require additional preparation before use, it has increased strength compared to the usual chalky.
- How to remove whitewash
- Removing stains from walls
- Fixing minor flaws and priming the surface
- Whitewashing the walls with chalk
To clean up the living quarters with minimal expenses will help whitewash. With its help, whitewash the surface of the ceiling and walls. The color mixture is prepared on the basis of chalk or lime. When preparing a new solution, use the same basic material as before.
How to remove whitewash
All finishing activities are accompanied by preparation of the surface for painting. First you need to free the wall surface from the old whitewash. To do this, you will need:
- water tank;
- foam rubber sponge or rag;
- scraper or spatula;
- ladder.
Remove the room from furniture in advance. If some objects can not be carried, you need to protect them with a special film. It will protect them from pollution. To release the walls from the old covering, you must start from the top, moving down.
In order for the chalk whitewash to be easily washed off, in a bucket of hot water, dissolve 1 kg of salt, cooked.
Removing the old whitewash from the walls: a - moistening with a roller; b - removing the whitewash layer with a spatula.
Allow the liquid to cool to 35-40 degrees and proceed to the treatment of the walls with the prepared solution. Do not use all water at once to prevent contamination. Gradually, cast the prepared liquid in another container, then you do not have to change the water frequently. Wipe the surface with a damp cloth. Repeat the procedure until the wall is clean.
To remove the layer of whitewash from lime, you need a wet sponge in a few tricks to walk along the plane. Then take a break 10 minutes, allowing the old whitewash to get wet. Using a spatula or scraper, remove the old coating layer. If in some places the whitewash is applied in a thick layer and is difficult to remove, tap it with a hammer and remove it with a spatula.
The simplest option for removing the whitewash will be the purchase of a special wash. It is applied using a brush or a sprayer. Dry the grout with a spatula or scraper. Having freed the walls from the old whitewash, wash them with water (a rough brush, a brush). After finishing all the procedures, allow the surface time to dry.
Back to contents
Removing stains from walls

Often, traces of different origins remain on the cleaned planes. They get rid of them. Otherwise, after a while they will make themselves felt on the newly whitewashed walls. If there are traces of rust, they should be washed using water. Process copper sulfate, diluted in water (for 1 liter of boiling water, take 50 g of vitriol). The mixture is applied by brush.
If a rusty stain of impressive size, prepare a primer based on copper sulfate. Consumption of vitriol 100-150 g per bucket of water (10 liters), 250 grams of laundry soap, animal glue 200 g, drying oil 30 g, chalk sifted 2-3 kg. In a liter of water dilute vitriol, in another container dissolve grated soap with glue and add linseed oil. In the third vessel, the chalk is combined with water. Finally, all the mixtures are mixed and a primer is obtained at the outlet.
From fatty traces get rid of a solution of soda calcined. In a liter of water (hot), 3 tbsp. l. soda. In a hot solution, a white, clean rag is wetted and applied to a greasy stain. Repeat the procedure until the trail is deleted. At 1 square. m is usually enough 1 liter of prepared alkali. The cleaned place is well wiped with a wet rag.
To remove soot from the walls apply 3% solution of hydrochloric acid. If mold is found, chlorine or a solution of copper sulfate can be used. Any of the ingredients are bred in water.
Back to contents
Fixing minor flaws and priming the surface
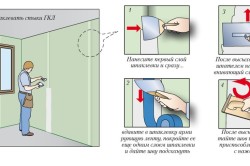
Cracks on the walls will require embedding. Remove all fragile particles so that they will not crumble again. Progruntuyte cracks and proceed to their putty. For puttying you will need:
- gypsum;
- joiner glue.
In a liter of water, 30-50 g of glue is bred. Add dry gypsum and chalk to this mixture. For correct preparation of putty, the consumption of ingredients is: 1 part of gypsum, 2 parts of chalk and the same amount of diluted glue. Combining all the ingredients, the mixture is thoroughly mixed until a dough-like mass is obtained. Prepared shpaklevkoi with a spatula fill up the cracks and cracks.
Having got rid of all minor defects, proceed to priming the working base under chalk whitewash. The primer mixture is prepared using:
- soaps of economic (40%) 200 g;
- drying oil 50-100 g;
- slaked lime 3 kg.
The soap is rubbed on a grater and diluted in hot water (3 liters). Then add the linseed oil. In a separate container, dilute the lime in water (4 liters). Mix the resulting compounds. In conclusion, dilute all with water to 10 liters. With a prepared mortar, primer the walls with a roller, brush or spray.