Antipyretics for children are prescribed by a pediatrician. But there are situations of emergency care for fever, when the child needs to give the medicine immediately. Then the parents take responsibility and apply antipyretic drugs. What is allowed to give to infants? How can you bring down the temperature in older children? Which medications are the safest?
Why many of us are attracted by the opportunity to make repairs, or at least part of it, independently? Probably, there are several reasons. This is also a pleasant satisfaction from the quality work done by oneself, which can be shown to the guests with special pride, and the opportunity to receive such a interior Design and the quality of the finish, which invited specialists can not do for some reason.
And most often - it's the desire to achieve the desired result with the least financial costs. Look at the ceiling - is not it time to put it in order?
If such work seems difficult for you because of the large level differences, the need for dirty washing and puttying processes, do not despair: there is a much simpler, faster and cheaper way to make the ceiling absolutely smooth and clean with your own hands.
The idea is to make quality repairs accessible to all materials using their non-trivial method.
Necessary materials and tools
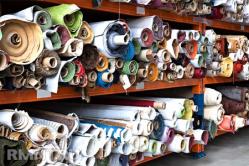
No, until we need a building supermarket - we go to the fabric store. That's right, because the ceiling we will make of the material for curtains. There are several important points:
- Fabrics for curtains have a standard height of 2.8 or 3 m. Most rooms have somewhat larger dimensions. Hence the conclusion - the cloth will have to be stitched. If you have a sewing machine - it's a matter of a couple of minutes, if not - in any atelier you will surely help. It is better to add two narrow stripes at the edges to be symmetrical, but in general the seams are almost invisible on the finished ceiling.
- The fabric can be any - matte or with a slight reflow, color, with pictures. This is especially true for children. But, if you have to make seams, choose a plain material.
- If you want to avoid stitches - around the perimeter of the room you have to build a structure of plasterboard, so that the width of the material is enough to cover the remaining area. If you dreamed of a two-level ceiling - this is a great chance to realize your dream.
- The length and width of the panel in the finished form should be approximately 20 cm more than the corresponding size of the room.

Material for stretching is bought - now it's time to take care of the fasteners. We need very little:
- Cable-channels plastic with a single lock, which are sold in any electrical shop. There are also plastic tubes for cable protection. We select cable channels and tubes of the same caliber, for example, 16 mm. The total length of each material is equal to the perimeter of the room.
- A bar with a section of 25x30 or 25x40 mm. They can be of another size, which depends on how many centimeters you need to lower the plane of the ceiling. The meter is also equal to the perimeter of the room.
- Screws for wood, small, for example, 16 or 19 mm, at the rate of 1 pc. for every 0.5 m of the perimeter.
- Plastic dowels and self-cutters to them, the length of which depends on the section of the bar. Quantity - 1 piece. per running meter of timber.
- To make the finished ceiling finished, conventional polyurethane foam bags are used. Their number is easy to calculate, based on the footage of other running materials.
- Painting tape (paper).
- Hook with thread for hanging lamp.

Of tools you will need: a drill, a screwdriver or a screwdriver, a wood hanger, a construction level, a tape measure and a cord for punching.
Mounting of fixing system
First you need to determine the location of the future ceiling. To do this, we use the building level and the dyeing cord to shoot straight lines.
To understand what the lowering of the ceiling level is, you need to perform simple calculations: a + b = c, where a - section of the beam, b - caliber of cable channels and tubes, from - height of the whole structure. For example, if we took a bar of 25x30 and cable ducts of 16 mm, the ceiling level will drop by 46 mm.
Almost always the geometry of our rooms is far from ideal, and the walls can differ from each other in height. To our ceiling was placed horizontally, we will have to measure the height of the walls, for this we measure each in several places. We find the point where the wall is the lowest - at this point we recede from the ceiling of 30 mm and we beat off a horizontal line through this point with the help of a dyeing cord. We check the horizon by building level.

To be sure of the correctness of the markup, we perform a check: cross-connect the corners of the room with cords attached to the line. If the cords are in contact in the center, everything is in order. If they are at a distance or are bent over each other - in the markup mistakes are made.
We prepare the bar: it must be attached to the walls by a broken line. Drill holes for the screws with a step of about 1 m, mark the points for drilling holes for dowels on the walls.
With the cable channels we remove the covers - we do not need them. We fix the box to the timber from below in the longitudinal direction, retreating from the edge 0.5-1 cm. At the corners we join them T-shaped, with a gap of 2-3 mm. Fastening is made by small self-tapping screws with a step of about 50 cm. Screws are screwed into the "crossbar" of the U-shaped box.
Do not forget about the lamp. Near the output of the electrical cable on the ceiling we attach a piece of timber, into which we screw the hook. Its bend should be about 2 cm below the level of the future ceiling. We pull two cords diagonally through the center of the room - we find the required level.
Stretch of the panel
To fasten it was more reliable, it is worthwhile to hold one more preparatory event. Plastic tubes are pasted with paper tape. Do not try to do it very carefully - the more folds and creases there are, the better.
At the moment we can say that the main part of the work is done - the simplest and most pleasant thing remains. Before stretching it is recommended to remove dust from the floor, walls and ceiling of the room well, so as not to stain the panel. It must be ironed to remove wrinkles. It will also be superfluous to lightly spray the fabric with antistatic to ensure that in future the dust that appears in each room does not settle on the ceiling.
Stretching is easiest to produce together, or the three of us, although one person with this job is quite manageable. The edge of the panel is thrown on the plastic tube, which, together with the cloth, is lightly pressed into the groove of the cable channel and jammed into it. Thus, all edges of the ceiling material are raised and fixed.

Now the fabric needs to be stretched - it's necessary to start from the middle of the wall and move gradually to the corners. With one hand the tube sticks in the groove, the other hand pulls the edge of the panel down and toward the corner to gradually pull all the folds there. It will be faster if you pull two opposite sides of the perimeter simultaneously. It is necessary to pull strongly, but that the tubes do not jump out of the grooves.
Before finally fixing the fabric, it is necessary to make a hole for the electrical cable and the hook. It is clearly visible from the bottom, since it stands out on the plane of the stretched fabric. The hole is made with any available device, for example, a cigarette lighter. So we "kill" two birds with one stone - we make a hole and fix its edges so that the "arrow" on the fabric does not run.
When the hole is ready, we remove the fabric from the fastener from one side of the room to the hook, carefully pass through the hole the cable and the hook, and then fix the fabric back. Later, the hole will be closed with a decorative lamp cover. If the hole is made in advance, before stretching, there is a danger of "missing", and it will be more difficult to adjust the hole to the hook. In addition, if you scorch the edges of the hole in an unstretched state, with stretching there is a possibility that the "arrow" on the fabric still appears.

Remained only the details. Once again carefully stretch the panel to remove all the wrinkles. It would be nice to moisten the cloth from the spray gun, so that when it dries it will stretch even more. To be sure of the reliability of the fastening, you can screw the screws right through the tube to prevent it from spinning under the tension of the fabric. The pitch of the screws is about 0.5 m.
Masking fasteners
It remains to hide the fasteners with polyurethane baguettes. They are cut and pasted on the wall in the same way as it is done during normal repairs, with the difference that they are not attached to the ceiling.
Before gluing, the hanging edge of the fabric needs to be rolled up and fixed to a bar, for example, with an adhesive tape or a stapler. It is better to use baguettes with symmetrical shoulders, that is, having in the cross section the shape of a corner with equal sides.

Painting of baguettes can be made in advance, and can be done after installation. Then the ceiling panel needs to be protected with a long spatula.
Why do we need all this
The ceiling is ready! Ideally smooth, beautiful and ... very inexpensive. The lion's share of its value is fabric. If you have previously made repairs, it is possible that you have extra scraps left building materials - You can use them and do not spend money on buying a bar. Screws and dowels are also sure to be found by every owner.
- The most inexpensive fabric for curtains costs about 200-300 rubles. We take 3.2 m, we spend 960 rubles.
- The cable channels and tubes cost about 10-12 rubles per meter. 11 meters will cost 132 rubles.
- Bar 25x30 offer at a price of about 20 rubles. for a three-meter interval. Thus, the sawnwood will cost us 80 rubles.
- Self-tapping screws can be bought for weight, a handful of these fasteners will not pull more than 100 rubles. The same applies to dowels.
- The usual baguette for the ceilings is about 100 rubles. for a length of 2 m. Accordingly, 6 shoulder straps - 600 rubles.
Counting? To bring the ceiling to an ideal state, we spent several hours and 1972 rubles. As they say, comments are superfluous ...
Of course, like most other ways of repairing the ceiling, this method also has its weaknesses. The main of them is the inability to wash the cloth without removing it. However, as you have already seen, this process is not very difficult. If the neighbors on the top will behave peacefully, your ceiling is not threatened!
Lyudmila Borodina, rmnt.ru
"It's incomprehensible to the mind! Just finished the repair! And she - "I want a new ceiling, something fabulous!" - Alexei was indignant. "On the Internet, a lot of ways to decorate the ceiling. Even the drapery of the ceiling with a cloth will add a twist "- I reassured my friend. "This requires a lot of money!" He did not stop. "Do not worry, we'll make a fabulous ceiling of cloth with our own hands!" He said - we'll have to help. Well, let's get started!
Ceiling from fabric
Choice of color and material
For decorating the ceiling, silk, synthetics, veil, and even velvet or satin perfectly suit. The choice of material dictates the result to us. Organza will make the room airy, and luxurious velvet will help create a cozy atmosphere.
What color to choose? Pink slightly reduces the height, adds a youth style. Orange will fill with a cheerful mood of the summer. Lilac relaxes and helps relieve stress and stress after a hard day. Delicate beige adds airiness.
It's time to go to the tissue store. To fabricate the fabric ceiling, we decided to use the organza of several colors of a calm lilac and gently beige color. So these colors were called a sweet girl-consultant. We, the peasants do not particularly understand where the gentle lilac, and where the beige is calmly. One thing is clear: coziness and fabulousness in the interior of the bedroom will add.

The ceiling of the fabric in the bedroom
Preparation
How to calculate the quantity? With a stretch ceiling everything is simple - you can measure the floor of the room, because the area of the ceiling and floor is the same. In our case 12 m2. But how to count with drapery? We decided that the fold step would be half the step between the folds. So in theory we need twice as much tissue as the ceiling area. And they did. According to the drawing, we will alternate lilac with beige not the same. Therefore, bought 14 meters of lilac and 10 beige fabrics.

Fabric stretch ceiling
Note. Counting strips you need with a small overlap. The width of our strip is 1.2 m. those. overlapping approximately 20 cm.
Now it's worth visiting the building store. What do we need. For the frame of our design along the perimeter of the walls, a bar of 4x5 cm with a total length of 50 meters (perimeter of 48 meters) and a piece of plywood 35x35 cm with a thickness of 1.5 cm. For fastening the bars of the dowel, 160 pieces, for the staple cloth there are several packs. Plywood is needed for the center. In the nearest carpentry workshop we cut a circle with a diameter of 35 cm.

In the nearest carpentry workshop we cut a circle
Instruments:
- Building stapler;
- Perforator for walls and ceiling. We took it at the box office. As I have a small household drill, but I can not overcome such a slab;
- Last (wallpaper trowel) in combination pattern;
- Construction knife and scissors;
- Level. The best laser is.
It is worth noting that making a fabric ceiling is better with an assistant.
Performance of works
We're falling for it. First, fix the bars on the walls around the perimeter of the room. If the height of the ceiling allows, you can experiment with the height. You can give extra air to the room. But, when the ceiling height of the standard panel is 2.6 m, there is no other option how to mount the frame at the very top. Centered on the first circle of plywood. As expected, the brick walls of the partitions surrendered without a fight, but the stove took away a lot of strength and sweat.

First, fix the bars on the walls around the perimeter of the room
The next step is to begin marking and cutting strips into pieces of 3 and 4 meters. It's simple. It is necessary to draw a circle into 14 parts. Lilac three-meter stripes turned 4, beige 2. A four-meter four in each color.
Finally, we are breaking the fastening of our bands. On the perimeter of the walls we stretch without folds, the ends of the strip are wrapped inside. Be sure to overlap about 10 centimeters, otherwise there will be lumbago. Then we start the fabric on its section of the circle, we make the assembly. We fasten all this matter with braces. The picture is as follows: in the corners of the lilac stripes. Inside - beige. There is one beige strip on the three-meter wall, two on the four-meter strip.

how to install tension ceilings
We managed to consolidate several bands. And then it dawned on me. If you fix the LED tape around the perimeter of the frame, you can get an original backlight. And now, we are already going to the construction hypermarket. The LED strip was connected in the junction box to one of the switch keys. From the adjustment of the light in the main fixture had to be abandoned.
Honestly, to fix the fabric on the bar is not difficult - one stretches, the other fastens. But with the circle had to "sweat". On the template, the marker was drawn to make sure that the drape waves were the same. In less than two hours, all the elements were fixed. The drapery of the ceiling with the cloth was a success!

If you fix the LED tape around the perimeter of the frame, you can get an original backlight
We fix the lamp on the plywood circle. It seems everything. But, something is missing. Exactly! There are no hidden staples on the perimeter. Another trip to the supermarket behind the polypropylene cornice. The plinth was bought with a coating, so as not to waste time on preliminary painting.
Council. Prepare the material for decorating the joint of the ceiling and the wall in advance. And you need to paint too in advance. Otherwise, a great risk of staining the fabric.
Glued to the wall only. Here, in fact, that's all. The fabric on the ceiling looks beautiful and truly fabulous, especially with lighting.

We solve the contentious issue: first the stretch ceiling or wallpaper The ceiling from the lining - a worthy symbiosis of price and quality Finishing the ceiling by yourself or professional builders
Hello!
I want to show how to make, in my opinion, a beautiful and not expensive ceiling of the house from the usual fabric for the curtains.
To start photo results, so if not in your taste then the process can not be read:
So the reason for the idea that has arisen: on a beautiful drywall - there is no money, a simple plain white - I hate, a stretch professional with a drawing - there is no money, a simple smooth one - I do not want it.
1) We have an even ceiling in a monolithic frame house. We ground and paint, so that nothing was spilled from it. I painted in white.
2) We buy a STRONG bar (in my case 30x30mm)
3) Drill the holes after about 40-50 cm:
4) We transfer the holes to the ceiling (this point is to whom it is convenient)
5) We apply to the bar the cheapest commercially available sealant, so that no insects get through.
6) We fix the bar to the ceiling along the perimeter (using not expensive Ukrainian dowels in bags 6x70 Hat VBOTAI) and according to the ceiling pattern. :
a) You will be limited to the factory fabric width of 2.8 m
b. I need to hide wires somewhere, I always have access to them.
c) Small space to pull easier)))
7) Cut off the flats flush and paint the bars.
8) We use a staple gun and staples for 6 mm, we exert effort so that the clamp can be easily picked up and removed, you will do understand)))
IMPORTANT: the bottom of the gun, that part as to the fabric, along the entire length pasted with paint tape. This is in order not to stain the fabric or make a tightening on it.
9) The fabric is called the Turkish header, hanging in department stores, synthetics, originally ornamentally crumpled, with light falling shines and shimmers, but not intrusively. Because of the wrinkles it works like a spring when stretching. I through the sellers found a supplier and bought from the warehouse IP for half the price, but took rolls.
It has a factory edge, it is flat and dense:
We shoot him first by sipping in length. Further on a circle or on convenience.
IMPORTANT: do not tighten strongly at once, this is fabric, you can get not beautiful stretch marks. Staples immediately beat centimeters in ten. Do not just have to tear off, somewhere to weaken, somewhere to pull up.
10) When at different lighting angles you will understand that you do not sag anywhere anywhere, do not frown, do not over-tighten, then pierce the staples more often, finish off the shackles with a hammer without fanaticism (so as not to tear the fabric) and glue the PVA glue, the glued part should not stand for the bar . This is so that the fabric does not conceive to shoot an arrow, as in pantyhose.
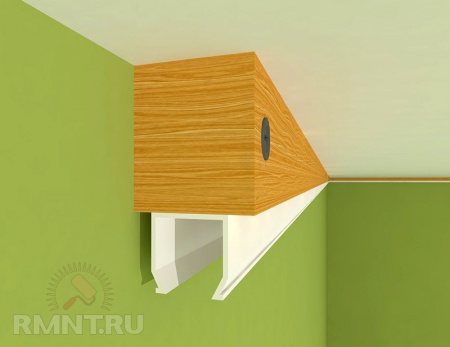
11) On the cut, we order falshbalki from chipboard 10 mm in color to taste (I have furniture), the width of my 20 cm, and the width of the frame is 18 cm. This is the reserve for the curvature of the bar. They fastened the chandeliers, firmly and all the connections of the wires are far from the fabric.
12) The perimeter is pasted with foam plinths CLEANED, glued to polyurethane glue, you can test it differently. While the plinth drips, nail it with a pin with a head, it will not leave a trace. The joints of the skirting boards are smeared with sanitary white silicone, do not putty or paint anything.
The result under different lighting conditions:
You can pull not the entire ceiling, but one or more elements.
Tip: If you want to repeat this, start with a small area, for example, a toilet:
Patience needs a lot!
Alexey Shamborskiy, September 11, 2014
At the stage of finishing the ceiling, you need to concentrate on finding the best, optimal for you from a variety of options. This choice may well be a fabric ceiling created by own hands. This modern alternative has many advantages, which justify its popularity.
How much can the fabric ceiling be practical?
This question is of concern to many. To understand the difference and the main advantages you need to know about it the main thing:
- it can withstand the temperature well;
- satisfactory strength;
- an uncomplicated installation that requires a minimum of time (see video);
- and, of course, an excellent appearance.
Types of installation of fabric ceiling
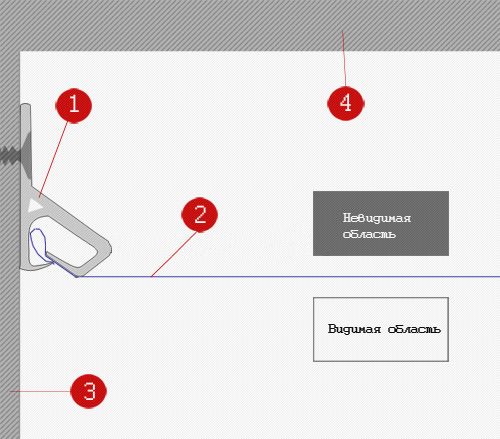
This is the important moment with which you should be careful. After choosing, the fabric stretch ceilings need to provide that you need to install them yourself. Therefore, you need to really evaluate and their capabilities. For example, the U-shaped profile is mounted much faster and easier than the clip-on profile. Here everything depends on the desire, abilities, talents.

If you decide on a simple option, then you will need:
- Stapik;
- Wedge;
- Decorative insert.

We must not forget that this type, although simple in installation, but it is not as durable and durable as the clip-on type.
If your choice has stopped on the second type of profile - consider that the structure and the system are different. In the photo materials, you can see the main differences between the two installation systems.
We pass directly to work
First of all, we proceed to the first task - determine the horizontal level. To do this, we use any type of special meter (laser / water level).

The next stage - we measure the corners of the room, for the exact installation of our clip-on profile system.
We fix the baguette and stretch the fabric according to the principle: from a fixed angle to the sides. Now proceed to install the second opposite corner. In this way you should get already fixed two points of the base, which, in fact, is half the work.

Then alternately and slowly attach the fabric between the insert and the profile. Thus, stretch the fabric base over the entire area of the ceiling. Its activities can be considered fulfilled, the only thing that remains is to fix the decorative elements, install the lighting fixtures. The practical part of our task can be considered fulfilled.
Essential points

During the installation of the fabric ceiling you will need an assistant who will be able to perform additional work in parallel with you (hold the fabric, fix the corners, stretch and fasten the canvas).
It should be noted that doing the work correctly, following all the tips and tips, literally in a couple of hours, your room will have an unrivaled appearance, which largely depends on the type of ceiling and its structure.
Video installation of fabric stretch ceiling with your own hands