Antipyretics for children are prescribed by a pediatrician. But there are situations of emergency care for fever, when the child needs to give the medicine immediately. Then the parents take responsibility and apply antipyretic drugs. What is allowed to give to infants? How can you bring down the temperature in older children? Which medications are the safest?
Accomplishment of private houses makes it possible to realize an unconventional approach and to make such a ceiling that it would complement and emphasize the style of the premises and landscape created by the owners. What is possible for private properties is impossible for apartments. Therefore, the modern owner always has a desire to escape from the standard solutions.
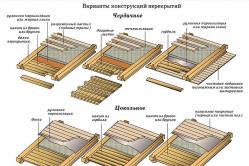
Variants of a ceiling device in a private house
- rough ceiling;
- vapor barrier;
- waterproofing;
- a heater (often simultaneously being a soundproofing device);
- a clean ceiling.


Regardless of what type of ceiling, wood or concrete, the ceiling installation is carried out in the same ways. The only difference in the method of joining materials. In the case of a concrete slab, preliminary drilling of holes and installation of dowels are necessary. With a wooden cover everything is much simpler: for fastening use screws and a screwdriver, nails and a hammer.
There are three options for a ceiling device in a private house:
- filing;
- grazing;
- panel.

Choosing the installation option, you need to decide whether the ceiling will be additionally lined with finishing material, or those that are guaranteed to provide aesthetic appeal will be used immediately. In the second case it is a question of a tree: boards, beams, rejki. It is able to emphasize the special color of the private house and is suitable for any type of overlap.

Choosing Wood
In the choice of wood should not be guided by the degree of its strength. Oak boards are good for flooring. For the ceiling, inexpensive conifers with beautiful texture are optimal. Other people will do likewise: birch, poplar, maple, ash. It is important to pay attention to the grade and class of wood.
- Class "A" or selected variety. Material without visible flaws, the surface is smooth and even, a small number of knots is permissible;
- Class "B" or 1st grade. Wood of this class has small, but visually noticeable defects: knots, cracks, grooves;
- Class "C" or grade 2. The surface is rough, knots up to 2 cm in diameter are available, cracks up to 1/3 of the lumber length are permissible;
- Class "D" or grade 3. The wood of this class is of poor quality and is not considered as a material for the ceiling device in a private house.


If there is a need to save, you can proceed as follows: to purchase wood of a lower grade (but not lower than the 2nd), apply several layers of antiseptic solution, cover it with a toning compound. This approach will increase the operational life of the timber, emphasize its texture and partially hide the shortcomings. The type and amount of lumber (boards, beams) is selected depending on what type of ceiling installation will be used.
| Type of wood | Tensile strength, MPa | Limits of compressive strength, MPa | Average density, (kg / m3) |
|---|---|---|---|
| Spruce | 125 | 44 | 550 |
| Larch | 120 | 62 | 660 |
| Pine | 110 | 48 | 500 |
| Birch | 125 | 55 | 630 |
| Beech | 130 | 56 | 670 |
| Oak | 130 | 68 | 700 |
| Aspen | 120 | 42 | 480 |
Ceiling ceiling make it easier and faster than the flooring and paneling. For devices of this design, boards and timber will be required. The latter will act in the role of beams, which will be attached to a set-up finishing ceiling. The wider the boards, the brutal the ceiling will look. Knots and natural projections of wood will give the room a special "village" color.

For an economical version of the file, an edging board with a width of 25-30 cm is suitable. Such a sawn timber will not sag even if the step between the beams is more than 2 m. Any wood tends to accumulate moisture, which inevitably increases the weight of the binder. This is taken into account when choosing lumber and do not buy planks thicker than 4 cm.

The cross-section of the beam is selected depending on what is above the floor: an attic, a residential attic or a room.
The decisive factor is the need for warming. If the unheated attic space is above the ceiling, for regions with cold winters, a layer of insulation is required of at least 20 cm. For the southern regions, 10 cm is sufficient.

As a heat insulator, it is customary to choose a mineral wool or a styrofoam. Loose materials are not suitable for a ceiling device from within a living room. Expanded clay, sawdust, polystyrene granules can be used only if the insulation of the floor is carried out from the attic side. But the technology of the device of a false ceiling does not provide such actions.

Instead of boards you can use moisture-proof plywood or OSB slabs. However, such a ceiling will cost more, as it will require the purchase of finishing materials.


Installation rules for false ceilings
- Beams can be a component of a wooden top overlap or be installed on an already formed surface. In the second case, the beam is secured using metal corners, studs and staples.


- The optimum step between the beams is 2 m.

- The boards are alternately fastened to the beam with the help of long nails or wood screws.
- Fixing elements are installed "in the raspor": at an angle of 45 ° to the edge of the board.


- Insulation is laid in the openings between the beams on the laid layer of vapor barrier.
- After laying the heater, pull the vapor barrier membrane and fix it with the help of staples and a construction stapler.


The gap between the insulation and waterproofing will improve the characteristics of the "pie" of insulation
- If over the top overlapping attic, it is recommended to use a vapor barrier with a foil layer: "Penofol", "Armofol", "Alucraft". These materials provide the effect of reflecting heat and returning it back to a dwelling.
If the boards are laid on top of the joists, the beam will remain visible. This is a spectacular, often used method of decorating a ceiling in a private house. In this room there is a special color of a solid and stylish structure. This design fully corresponds to the styles of rustic, hunting or Scandinavian.


Arrangement of a ceiling
Flooring ceilings are suitable for the improvement of small rooms. The reason for the design features, the bearing elements of which are fixed not to the upper ceiling, but to the walls of the room. Since the supporting frame is not provided, there are restrictions of the distance between the supporting beams not more than 2.5 m. Therefore, the ceiling ceilings are the best choice for the improvement of baths, ancillary rooms, small living rooms.


"Cake" of the ceiling (from top to bottom):
- The rough ceiling.
- Heat insulator (mineral wool or polystyrene).
- The foamed vapor barrier.
- Clean ceiling.
Important point: if two-layer polypropylene vapor-vapor-insulating membranes of the Isospan V or Ondutis type are used, these films are laid before laying the heat insulator. When installing the vapor barrier, you pay attention to which side to apply it. The front side is always indicated on the membranes. You can distinguish it by the sign that it is smoother.

Which side do you need to fix Isospan?
Ceiling Mounting Technology
First of all, the supporting elements of the structure are installed: the beams. Since they are the main load, they carefully choose the lumber. Beams not less than 5 cm thick or 10/10 cm, 10/5 cm, 10/15 cm can be used as beams. Metal corners are required for fixing to the walls. In addition to the above, the following materials will be needed:
- a vapor barrier (for small spaces, aluminum foil on a paper basis, kraft paper impregnated with linseed paper);
- mounting tape, with which will glue the places of connection of the foams of the vapor barrier;
- heat insulator: fibrous materials (Ursa, Rockwool, Knauf, Izover, Uteplit, Ecowata, etc.) or foam;
- rails;
- nails, self-tapping screws.
Stages of work on the installation of a ceiling

Instead of boards with the device of a laying ceiling often use a wooden lining. Thus, a beautiful modern interior decoration is obtained.
Video - Flooring from unedged boards
Panel ceiling in a private house
Panel ceiling - a universal design, which is suitable for the improvement of premises of any type. The name "panel" does not presuppose the installation of plastic or other panels, but the installation of preassembled boards of boards. Stowed next to each other, they make up the base of the finishing ceiling. Such designs have a second name: "shield".
Prepare the lumber before starting work. Each bar and board is inspected for rot, treated with an antiseptic and dried well. If there are cracks, they are covered with shpatlevkoj for woodwork.
Shield ceilings are often draft and subject to finishing. To such constructions one requirement is put: the surface of boards from outside of premises should be equal. Shields are collected in any convenient place, but most often on the beams of the ceiling during the construction of the house.

In this arrangement of the ceiling, rectangular cross-section beams are used as floor beams, cranial bars having a section of 4/4 cm or 4/5 cm are nailed to the underside of the ceiling. The thickness of the board must correspond to the size of one side of the bar. Each panel is a series of boards, the length of which is equal to the distance between the cranial bars. In the upper part of the shield perpendicular to the direction of the boards nailed more thin bars. The lower part of the panel remains smooth and smooth.
Each shield is laid in the openings between the beams so that the cranium bars are the support for it. If viewed from above, such a ceiling is a series of cells, the grooves of which are filled with heat-insulating material. It can be expanded clay, mineral wool, polystyrene, sawdust.
Before laying the heat insulator, all the resulting "boxes" are covered with a vapor barrier material so that the floor beams are closed. At the same time, the film webs (membranes) overlap 10-15 cm.
If the overlap is interstorey, over the beams are sewn boards, which form a rough floor. If the overlapping attic type, most often use a backfill thermal insulator and can leave it open. The thickness of the backfill depends on how severe the climatic conditions of the region of residence. Shield ceilings are built not only in private houses, but also in bathhouses, utility rooms, cottages.
Video - How and what to insulate the ceiling in a private house
Video - The device of a ceiling in the private house
("config" :( "idpartner": 29 "," siteId ": 162))
Comments:
- What may be required
- The process of creating overlapping
- Skinning process: features
- Basic fixing methods
Building a house with your own hands, at a certain moment there is a need to build ceiling slabs. If the dwelling is built of bricks, then in this case we need reinforced concrete slabs, which are purchased at special plants. But the weight of such material is very large, so a crane will be needed. Renting such a service is not cheap. Accordingly, it is quite problematic to create such an overlap.
Monolithic ceiling overlap is very strong, durable, resistant to aggressive external environment.
The second solution to this issue is a monolithic ceiling overlap, which will be based on the formwork, concrete and fittings. It has its own peculiarity: if you walk around the attic, this construction will play a lot. Plus, you should think over additional warming.
The third option, the most optimal for private houses, the overlap of a wooden beam. The ease of material allows you to do it yourself, besides, the cost of construction will cost a lot less than in previous versions. Such a ceiling overlap allows you to work not only in a private house made of bricks, but also made of wood.
What may be required
To install the ceilings of the ceiling with your own hands in a private house you will need the following materials and tools:

- building level;
- cant;
- ruberoid;
- antiseptic for wood;
- self-tapping screws;
- polyethylene film;
- scotch;
- electro-cutters;
- boards;
- vapor barrier film;
- heat-insulating material;
- sand;
- sawdust;
- lining;
- building stapler.
The ceiling system is in many respects similar to the floor covering technology. It is best to harvest timber from larch or pine.
Back to contents
The process of creating overlapping
The work is as follows. First of all, it is necessary to take care of the preservation of wood materials, that is, to cover them with an antiseptic. This is done to ensure that the tree is not rotted and is not afraid of wood pests. From each end of the beam turn into a ruberoid in two layers.

Next is the installation of horizontal beams, which will be located from the edges. In this case, you should use the building level, so that later there are no distortions. After that, to make it easier to orientate, a string is stretched between them and intermediate elements are already laid along it.
To create a more interesting ceiling model, you can use false beams that will create a sense of overlap visibility. And you can treat it with an electric gun, then cover it with varnish. This option in a private house will look very interesting.
Once the work with the installation of the bar is completed, you can move on. After this, the cranes are screwed with screws, on top of which the rough floor is laid. Its main task is to serve as a support for the future insulation. I would like to note at once that, if created, the thermal insulation material between the beams is not laid. Specialists recommend replacing it with sand, which is laid by a 5-cm layer. This creates additional sound insulation. If you make such a coating, then before it is poured, the base should be well covered with a film that is connected with adhesive tape.

The next moment is the vapor barrier. To insulate the insulation is not susceptible to moisture, first lay a vapor barrier film. It is covered from above with a heater, laying it in the space between the beams. This creates a double protection.
On top of the vapor barrier film, planking is made of boards. If it is a floor-to-ceiling ceiling, it is recommended to make the flooring from the pile boards of the 1st category. In the case where there is only a roof on top, you can stop on the third category of boards. If the house is located in a climatic zone, where it is often cold, it is not superfluous to take care of additional insulation. For this purpose, the sawdust layer is laid on the flooring, but the main thing is that they are dry, otherwise moisture will cause rotting of wood materials.
Back to contents
Skinning process: features
It is best for such cases suitable vagonka. The very fastening system is very simple, as this material has paso-crest ends that, when combining the lamellas with each other, give a perfectly even joint, without any gaps.
For today, the lining is produced in three types: wooden, plastic and MDF panels. Optimal option is the first type, since the tree always remains a natural material, therefore, it does not cause any harm to human health, of course, if the tree did not grow in the radioactive zone. Therefore, it is better to give preference to wooden panels, especially if it concerns residential premises.
The best options are lime and pine lamellas.

Before you start working with the skin, you should check the evenness of the beams, just how straight their horizontal position with respect to the surface. In the case of any curvature, the use of a lining will become difficult. To eliminate this drawback, bars are fixed to the beams and leveling of the surface occurs at the expense of the building level. Also, this procedure can be performed with the help of plastic wedges, which are driven between bars and beams. They can be purchased at any construction store. The bars should be located strictly perpendicular to the elements of the floor.
To align the frame under the lining can be used and another method. The board is screwed to the sides of the beams using screws. But the main thing is that it should be flat, since it is on it that the cladding material will be fastened.
It is important to buy the right material. The lining must be well dried, otherwise, once it is mounted, it will begin to dry out, and this will lead to the formation of cracks on the ceiling surface.
Correctly arranged ceiling ceiling is not only a guarantee of safe operation of the house, but also a pledge of comfortable living in it. The ceiling of a single-storey house is the boundary separating the inner space from the attic space. The heat loss and sound insulation of the ceiling depend on the heat loss and the penetration of external noise inside the house. The following requirements are imposed on ceiling ceilings:
- The bearing capacity of the overlap must correspond to the operational loads, which take into account its full mass, including the main structural elements and insulating materials.
- The upper limit of loads should not affect the rigidity of the overlap, the rigidity should completely eliminate the deflection and deformation of the overlap.
- Heat and sound insulation should be performed taking into account the indices of the lowest temperatures and noise loads from the street and from the roof. The arrangement of the soundproofing of the attic must also be carried out.
- Overlapping should be fire-resistant, and in the case of a flue duct, a number of additional requirements must be taken into account.
Stacking of wooden beams
Beam ceiling is the most popular type of flooring at the moment, this is because the material is relatively inexpensive and the works themselves are not too laborious. The wood itself has excellent thermal and acoustic properties, so the possibility of its conductivity of noise and cold is completely excluded. When installing the beam flooring, no special equipment is required. Overlapping of wooden beams can be performed by two adult strong men with experience of construction.
The choice of beams - this is a key moment in the arrangement of the ceiling ceiling, so it is necessary to approach it with the utmost responsibility. On how well you choose materials, depends on the long-term operation of the future house. The load on the ceiling is assumed equal to the weight of the structure itself, which, depending on the filler, can be from 250 to 300 kg per square meter + a temporary load equal to 100 kg per square meter of area. A total of 350 or 400 kg / m2 is obtained. As a rule, together with the filler, a load of 350 kg / m2 of area is calculated. With a span length of 4.5 meters, the cross-section of the beam must be at least 10 x 22 cm. Beams with a moisture content of not more than 20% can be chosen as beams of the ceiling. This means that, prepared from fresh coniferous wood, the beam had to lie in a dry place for at least 1 year. Ideal option are recognized wooden beams 3 years ago, they should not be knotty, oblique and with a muddled silt. Beams from coniferous trees must be necessarily antiseptized and have fireproof impregnation. Deciduous tree species are not used for making beams of ceilings.
Wooden beams can be used with a maximum span length of 6 meters, the optimal option is a length of 4.5 meters. Modern wooden houses, as a rule, have a length of one side of 9 meters. In the middle of such a house, another load-bearing wall is being erected, the overlap is made solid, with the support of the beams on two adjacent bearing walls. The beam, individually and in relation to others, must be located in a strictly horizontal plane, all beams must be located on the same level. For this, they are leveled by the method of placing the remains of tarred boards under the ends, it is impossible to shackle the beam itself.
Beams are usually laid on the short side of the log with a step of 50 - 100 cm, the optimal distance is considered to be 60 cm. The beams, if possible, are parallel to each other, the long side of the beam section should be placed vertically. The ends of the beams are supported in the nests provided for in advance, they are wrapped with two layers of roofing felt or roofing felt (except for the ends) or are burned. Neutralize the sound vibrations, which can later be transmitted to the ceiling, can be done by placing the ends of the beams on soundproofing pads made from antiseptic impregnated felt or thick rubber. The ends of the beams should be inserted into the nests to a depth of 15 cm. Each second beam is fixed to the bearing wall with steel staples, thereby ensuring the rigidity of the structure not only of the overlap itself, but also of the structure as a whole. To equip the opening for the chimney, an additional bolt is installed, which serves as a support for the beams.
Arrangement of the opening for the chimney pipe must be given special attention, thereby ensuring the fire safety of its home. Wooden elements should be located from the chimney at a distance of 35 cm. The chimneys themselves at the places of passage through the floors have a cutting, i.e. its walls in these places are thicker than 1 brick. If the conditions do not allow to leave a gap of 35 cm, then it is permissible to reduce it to 30 cm, but in this case it is necessary to additionally insulate the pipe from an asbestos cardboard with a thickness of 3 mm or felt impregnated with clay mortar.
The wooden beam structure is a beam of overlapping, supported by a transversely fixed beam, by means of cuttings or metal clamps. Only 1 bolt can be located on 1 beam, and only 1 beam can be fixed on 1 bolt.
When calculating the step of the beams, you must immediately take into account the location of the chimney and, according to it, lay the beams and arrange the bolt.

The device of a board - a ceiling
In a single-story house, where the attic is planned to be used for its intended purpose, it does not provide for the installation of a vibration isolation layer and separate rolling. Perform immediately filing of sheeted boards, which serves as both a basis for insulation and the basis for the ceiling. Planks for the ceiling should be the same size and one grade, when they are installed, the first board must be grooved to the wall. Eaves boards from ceilings from coniferous trees should have a thickness of 25 mm, they are hemmed with nails 70 mm with hats to the beams. Each board should be nailed to each beam with a hammer using two nails, with the direction selected obliquely, about 450. The distance from the edge of the board to the nail head is about 1 cm.
Heat and sound insulation
Before laying the filler between the beams, the vapor barrier of the floor is obligatory. As a material, you can use polymer membranes, foil insulation or vapor barrier film. Steam insulation is laid between the beams for the entire length and width of the span, while the material must cover the beam to its full height. Strengthen the material with a construction stapler or with the help of thin wooden slats, which are fastened to the top of the vertical edge of the beam.
As insulation materials apply keramzit, minvat, ecowool, glass wool or foam. Each of these materials is suitable for insulation and sound insulation. The choice may be due to personal preference: some materials are the cheapest, some are most convenient for laying. All these materials in some way have moisture permeability and can lose their properties due to waterlogging. Therefore, any of the materials on top must also be insulated with a vapor barrier material.
At the top of the preparation lay a shield of roughing boards, on which another layer of dense wood-containing slabs is laid.
The insulation for the opening between the pipe and the wooden flooring is carried out as follows: for 1 part of the sawdust, take 4 parts of clay, 1/3 of the cement and mix it all 2 or slightly more with water. Using the shape of the bars make the insulation elements and dry it under a canopy to a humidity of 20%. Then these blanks are laid around the chimney and fixed with a solution of identical composition.
Ceiling unit
From the inside of the room, the ceiling can be made of gypsum board or fibreboard slabs, and it can also be plastered. The layer of the plaster layer is applied to shingles from thin rails, which are packed over the whole surface of the ceiling. Today, the market offers many options for ceiling coverings, so the plaster is not as relevant as before.
Share an article on social networksThe ceiling plays a key role in the design of the room. Considering the various options for its finish, do not forget that high-quality installation of ceiling overlap will provide an excellent final result.
Before we make a ceiling with our own hands, we recommend you read this article.
Requirements
Overlapping the ceiling, regardless of what material was used for their manufacture, must meet the accepted standards:
- Overlapping is required to withstand the operational loads that you calculated in advance. The design load includes the weight of the floor beams and the ceiling material chosen by you;
- The rigidity of a structure must withstand all anticipated loads, and it must not be deformed;
- It is also necessary to provide the ceiling with sufficient sound and thermal insulation characteristics.
- One of the main characteristics of a ceiling ceiling should be its fire resistance.
There are two types of ceiling slabs: slab and beam.
Beam ceiling

This kind of overlap is very popular with individual construction. Building your house, study the method of construction wood joist.
Wooden beams, resting on the bearing walls of the building, form the basis of the beam ceiling. Calculate their cross-section according to the length of the step between them and the distance between the bearing walls, covered by beams and, of course, from the assumed load on the ceiling.

Be serious about choosing wood for beams. When building a ceiling, remember that beams can be made from different types of trees. The main thing is that they are well dried for 100 days. This largely determines their quality. Before starting work on the construction of the floor, check the beams. Check whether there is rot, cracks or other damage to the wood on them. Do not use deflected beams in construction.

- Lay the beams on the walls and level them on the plane. Do this with the help of pads made of tarred boards of various thicknesses. Never use to perform this work, wedges made from untreated wood.
- To strengthen the joints of the beams on the inner walls, fix them with metal clips and clamps. Instead, you can use wooden plates made of boards with a thickness of at least 40 mm.
- According to the fire safety rules, the floor beams can not be placed closer to the chimney than 400 mm.
- The ends of the beams, which are embedded in the bearing walls, must be treated with antiseptic, tarred and wrapped with a ruberoid. These measures will protect the wooden beams from the appearance and development of rot.
- To make the overlap of the stiffness of each second beam, fix the metal fastener to the masonry.
- To make a rough ceiling, prepare cranium bars, then attach them to the side faces of the beams. To the bars attach the material selected by you, forming a rough ceiling.
Overlapping of slabs

Basically, slab overlap is used for erecting multi-apartment buildings.
When building their own houses this kind of overlap is in demand less often. Plates are characterized by a large own weight, which means that when installing them, special equipment will be required, and this is due to an increase in cash costs.
Note! Plate floors are an undeniable advantage. They do not burn, they are characterized by high strength and durability.
If you made the installation of the ceiling from the slabs, according to the existing rules, you will eventually get a flat ceiling surface that does not require additional alignment and grinding.
For the production of slabs use heavy and lightweight concrete, they can be solid or hollow inside.
Note! When building a private house, it is better to use hollow slabs. They are characterized by excellent heat and sound insulation parameters. In addition, their weight is much less.

There are two types of flooring from slabs: monolithic and prefabricated.
When installing slabs from slabs, they are laid on the load-bearing walls of the building, for greater reliability of the construction erected with a thickness of not less than 150 mm. Bearing walls must be 3 m apart. If it exceeds this value, then you will need to mount a transverse beam, this will make your construction more expensive.
![]()
When you start building a private house, you have to determine exactly which ceiling overlap - slab or beam - is most appropriate in your particular case. Remember that the final result is greatly influenced by the quality of the materials used and compliance with all technological requirements for the installation of ceilings. If you do it right, you will get the result you expect.
Video
Look at how you can fill the monolithic overlap:
Overlapping is a horizontal structure that divides vertical spaces in height. Conditionally, all floors are divided into socle, interstorey, attic and attic. As a material for overlapping can use reinforced concrete slabs, metal and wood. Ceiling overlapping ceilings will depend on the design features of the room.
Ceiling without beams: views and features
Bezobalkovye overlapping is a design that is made of solid reinforced concrete tiles.
There are 3 types of beams:
- Monolithic.
- National team
- Prefabricated-monolithic.
In order to install a bezel, you need to pre-install the formwork. This can be done with waterproof plywood. The design is recommended to be treated with a special compound that will counteract the adhesion of the material.

After the formwork has been installed, it is necessary to support the frame of the ceiling and attach the reinforcement net. From above you need to fill the structure with concrete.
Choose the ceiling of the ceiling in a wooden house
During the repair of a wooden house, beams are usually used. The basis of such finishing are wooden beams, which are supported by the bearing walls of the structure.
If you decide to use a joist, pay attention to the material of the tree. It is desirable to use deciduous or coniferous raw materials. The material must be well dried.
When installing beams in a wooden house, take into account such nuances:
- The distance from the beam to the chimney should be more than 50 centimeters.
- Wood must be treated with a special antiseptic to avoid the appearance of fungus.
- Each second beam must be attached to the wall using a steel anchor. This technique will increase the strength of the structure.

To finish the wooden house suitable tiled floors. They are used much less often, since they have a high mass. The advantages of tile floors include durability, fire resistance and high mechanical strength.
What should be the length at ceiling ceiling
In order for the structure at the overlap to have high strength, it is necessary to make a preliminary calculation. To do this, you need to take into account the length of the span using a roulette.
If your house is made of blocks, the beams need to be embedded in nests to a depth of at least 100-150 mm. In houses with brick walls, the length of the span is similar.
If your house is made of wood, then you need to lay the beams to a depth of more than 70 mm.
Installation of joists in a wooden house (video)
What material is used to cover the ceiling
If you started repairing the ceilings in the house, you need to find the right material. The ceiling can be blocked with wooden, metal and concrete ceilings.
Wooden timber is rationally used in a wooden house, since it does not weight the structure. In addition, such material is unpretentious and has high strength. The advantages of wooden floors can also be attributed to the low cost of material and the lack of the use of special construction equipment.
Metal floors are used less frequently, as they are prone to corrosion at high room humidity. This material is durable and easy to clean. The advantages of metal floors can also be attributed to the possibility of repairing a larger area of the span.

To install a metal ceiling you will need:
- Channel.
- Plaster mesh.
- Waterproofing material.
- Plaster.
- Flooring of boards.
As you can see, you will need a large amount of materials to perform the installation. That's why overlapping the ceiling with a metal structure is inappropriate, if you have a limited budget.
Reinforced concrete floors are used very rarely in private houses. This is due to the fact that such a design has a large specific weight. In addition, when installing concrete flooring, specialized construction equipment is needed.
Schemes of installation of wooden ceilings of ceilings
Before starting the installation, you need to prepare the materials. To carry out the work you will need a drill, saw, ax, hammer, nails, level, fasteners. When selecting wood, pay attention to its quality. It should be well dried and not have defects.

When installing a wooden floor, you need:
- Treat the wood with antiseptic solution. If the beams will rest on a wall that is made of concrete, wrap them in several layers of roofing material.
- Make a nest under the beam. Fill the empty space with the mounting foam.
- On the frame walls of beams install additional racks.
- Put a layer of heat-insulating material on the fixed roll. Excellent mineral wool. This material is durable and has a low cost. It should be noted that there should not be even the slightest gaps between the lags and the insulator.
If you are installing a floor covering, do not forget to roll it. To do this, along the lateral edge of the beam, you need to nail a special cranial bar.