Antipyretics for children are prescribed by a pediatrician. But there are situations of emergency care for fever, when the child needs to give the medicine immediately. Then the parents take responsibility and apply antipyretic drugs. What is allowed to give to infants? How can you bring down the temperature in older children? Which medications are the safest?
Lighting suspended ceilings in any case has many options, but the very translucent structure of the vinyl sheet significantly increases these possibilities. P with LED backlight, in turn, can be illuminated by a flexible conductor bar with LEDs on it, or these lighting elements are located on a transparent tape.
Installation of tension ceilings with LEDs
First of all, if you decided to mount such a device as LED lighting yourself, then you should know something about both the ways of fixing the vinyl sheet, and about the lighting device itself. Below we will consider this in more detail.
Choice of fixing design

- The lock for a cloth in a baguette with a cam fastening consists of two cams, one of which is fixed, and the other, pressing, acts as a rigid spring. The fabric is pushed between them by a spatula or a special blade and when the vinyl is tensioned, the movable cam is self-clamping, which is possible due to the adhesion of the web to the surface of the movable spring.
- Such a device is very convenient for small areas of PVC installation, since when the size of PVC is more than 20m 2, wrinkles appear on the mirror, since the clamp does not withstand the weight of the panel, and it begins to sag. In such situations, usually use an additional mount - it's a chandelier in the center of the ceiling, which can also serve as an additional lock.

- with LED illumination, installed wedge-shaped, at the moment is, perhaps, the most popular method of mounting such a device. The principle of fixation is as follows: polyvinyl chloride is pushed into the groove of the baguette, and then jammed with a special strip.
- A wedge-shaped baguette can be mounted not only on the wall, but also on the ceiling, only then the main ceiling should be level, since the suspension device will repeat its shape. After mounting the baguette, the bottom is covered with a decorative strip.

- If you decide to make tension ceilings by yourself, in a harpoon way, then you will not get anything, because the fixing harpoon can be welded to PVC only in the factory, on a pattern made on the size and configuration of the ceiling. The lock on the baguette is therefore called the harpoon, because it acts on the principle of a harpoon or a fishing hook - enters the groove, it is unclenched and fixed for protrusions.
- Despite the high cost and waiting time for the order, the harpoon method is considered the best and most reliable. Cloth, fixed in this way can be removed to replace the wiring or to dry, if you flooded the neighbors. The vinyl sheet itself will not suffer.
Mounting of LED strip
Council. To select a power supply, you need to know the voltage of the LED strip and the power of one meter of the lighting device. For example, a five-meter tape at 12V has a power of 7.2 W / m, which means that 5 × 7.2 = 36W. In this case, you should take into account the safety factor of 1.25. That means 1.25 × 36 = 45W. That is, for a five-meter tape with such parameters, you need a 45W power supply.

- If the LED lighting installed on the ceiling will have several colors, then you need a controller, and if you want to adjust the brightness, you can add another dimmer.
- LED strips are usually connected in series, but with a length limitation of up to 12 m, but when buying a lighting device, you better check with the seller, as there may be some changes.

- Mark the ceiling and cut the ribbon to the required length, while you should pay attention that the duralight has special marks in the form of scissors - and there should be a cut. Then, on the back of the device, remove the protective film and glue it to the main ceiling. Note that the surface of the ceiling must be degreased or primed - otherwise the tape will not hold.
- LED backlight does not tolerate sharp bends, so when mounting a tape it is better to work with an assistant. For the connection, you can use a connector, or short-term soldering, but do not forget about the polarity.

- After all the installation of the duralight has been completed, connect it to the power supply and, if necessary, muffle the controller and then plug it into the network. If everything is fine, then you can proceed with the installation of PVC ceiling.
Council. Although you have become familiar with the methods of mounting a PVC sheet, it is still better to provide this part of the work to specialists and this is not because you can not cope with such work, but because you do not have the necessary equipment, or rather, a gas-powered gas gun, which is compulsory used for installation. Your task should be to ensure that the LED backlight is installed correctly, and also you can choose the way to mount the canvas.
Conclusion
If you are installing diode-backlit ceilings, then you should take into account the fact that only harpoon fastening of the canvas allows you to dismantle, and then install the PVC back. Therefore, seriously consider the installation of duralight, so that later there is no force majeure.
The use of multi-colored lighting for the design of stretch ceilings is an excellent way to emphasize the deep individuality of the home interior. The illumination of the perimeter of the stretch ceiling can visually increase the space of the room and give a sensation of a large depth of space.
Now few people can be surprised by smooth, perfectly flat ceilings. Using plasterboard, stretch ceilings and a variety of building mixtures allows you to create a nice and beautiful surface. But it will not be easy to achieve a special originality.
It is quite another matter when colorful multicolored diode lamps are used to decorate space, which are illuminated by a pleasant even light, or the whole perimeter of the stretch ceiling, or several of its parts. Together with the backlight we usually use gypsum plasterboard constructions, which allow us to use several levels of illumination. Each of them can be highlighted separately, in addition, inside the gypsum cardboard boxes are well placed wires and the inside of the LED lamps.
The task of our article is to tell in detail about what kinds of highlights there are and how technically it can be organized around the perimeter of the stretch ceiling.
Kinds of light sources
To illuminate the ceiling contour around the perimeter most often use LED cords. They are printed ribbon boards of different lengths with LEDs. They are attached to special niches in a gypsum board profile or in a different level construction.
At the location of the illumination is divided into the following types:
- lED backlighting around the perimeter;
- illumination in the form of figures of various shapes and colors (figured constructions from light-emitting diodes are laid out on the draft ceiling);
- ceilings on the basis of structures with a uniform distribution of light.
Kinds of lighting devices
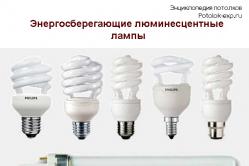
Fluorescent lamps - a classic lighting element that has been used for a long time. Since when the ceiling had only one level, and for its finishing used whitewash or paint. Now fluorescent lamps mainly illuminate individual surfaces and are used as elements of hidden or open backlighting.

Despite the widespread use of such lamps, they have many shortcomings that do not allow them to be widely used.
- Operation is possible only on the main circuit, as additional light elements.
- Despite the fact that they are not very hot, they will have to be changed regularly - the service life of fluorescent lamps is low. To replace them you have to remove the entire ceiling, and then re-stretch, which entails large financial or temporary expenses.
- You can not adjust the brightness of the lighting.
- At low temperatures, these lamps do not work well.
- Inside fluorescent lamps - mercury, which is not environmentally friendly and unsafe for others.
- never used as the main source of light, because they do not burn very brightly. But they have other advantages - a large number of bright colors, which are convenient to use for design. Neon lamps well decorate individual elements of the ceiling, supplement or shade the main light sources.
Important! Unfortunately, neon consumes a lot of electricity, and its service life is short. Therefore, for the illumination of stretch ceilings, it is used less and less.

- the best source of light for the design of the ceiling tension lighting. Consider the advantages of such tapes.
- Very long service life of the diode elements, which will rarely replace them. In the case of a stretch ceiling, whose dismantling is rather complicated, this is critically important.
- LED strip is flexible, which allows you to create on the ceiling a smooth light lines and shapes. It can be used in ceiling structures of different types - from straight to curvilinear and multi-level.
- Uniform adjustable light. LED lamps can be natural white or colorful - choosing the right option is not difficult.
- Diodes are almost not heated - an invaluable quality for the elastic surface of vinyl ceilings. They also use a small amount of electricity.
- The brightness of the lighting is adjustable - together with the tape in the set there is a remote control, power supply and control unit.

Cord Duralight has a flexible structure, which makes it possible to use it for the same functional tasks as for diode tapes. But Duralight has a number of drawbacks - the light is not as uniform as that of diodes; Another cord consumes more energy and requires a fairly frequent replacement.

Important! As the best material for the ceiling equipment, the multicolored backlight is made of vinyl (PVC) stretch ceilings with harpoon fastening mechanism. Such a mechanism makes it easy to remove the ceiling cover to replace the lamps, and then return it to its place.

Video - Soaring ceiling
Use of gypsum board with backlighting
The combination of gypsum board profile and stretch vinyl (or fabric) fabric is a good solution for mounting the original backlight. This is a ceiling with two (sometimes three or more) levels, where the top part is a ceiling cloth, on which light falls. The lower tier is represented by the GCR surface, under which the light sources are hidden.
The shape of the gypsum board box is different - from simple dropping around the perimeter of the room to boxes with several levels, steps or figure elements inside the main profile. Three methods of illumination using gypsum cardboard are used: illumination along the perimeter of the ceiling, spotlighting around the perimeter and illumination with tapes hidden under the canvas.
Backlit LED cords around the perimeter requires that on the sides of the gypsum board contour special niches for installing light devices are made.
Features of the GCR circuit with LED backlight are shown below.
- A good visual effect - it seems that the light on the ceiling panel falls from nowhere.
- Simplicity and versatility of the design. Backlight can be done with any version of the device gipsokartonnogo box.
- The main disadvantage is the settling of a large amount of dust on the inner surface of the GCR circuit, from where the light comes. To remove dust from there - the occupation is not the simplest.
- When spotlighting around the perimeter, not light-emitting diodes, but dot elements of light are installed. Because of this, the light becomes less uniform, but the danger of a large accumulation of dust in the GCR box is excluded, since the sides will be tightly covered.

If we use option with LEDs hidden under the tensioning cloth, then the need for using a drywall outline disappears. This version of the illumination along the perimeter is the cheapest, but it has the most drawbacks.
LED lamps located in the interstitial space, highlight not only the canvas, but everything that is above it - wires, ventilation, communication lines. All the garbage that has settled on the canvas is illuminated, and the joints are sealed. To eliminate this effect, you need to install special false ceilings (which in itself is not cheap) and use high-quality seamless PVC material.

Installation and installation of a stretch ceiling with illumination around the perimeter
When installing a box of gypsum board, you should follow a few simple rules.
- Installation of the frame is done in increments of 60 - 70 cm, and it itself is covered with plasterboard on the outside.
- In the place where the tensioning sheet will come into contact with the GKL box, additional fixing elements - mortgages should be installed. Without this, the fabric can easily break off due to the high tension force.
- Joints of the GKK skeleton are closed with bandage bands, cover and shpatlyuyut.
Installation of plasterboard with inner open niche, in which the vinyl sheet will be stretched, looks like this.
Step 1. The design is attached to the walls and ceiling along the perimeter of the room.
Step 2. The lower edge of the structure should have a small vertical protrusion (no more than 10 cm), from which another one goes up (to a height of 5-7 cm). This creates a niche for light sources. From the ceiling surface to the edge of the vertical protrusion there must remain not less than 100 millimeters - a gap for tension of the ceiling cloth;
Step 3. To the vertical part of the profile a baguette is fixed, which will fix the stretch ceiling, after which the web is stretched.
Step 4. In the niche made, an LED cord or other light sources are mounted, which are then connected to the electrical network.

GKL box installation with concealed niche for LED lampsused for the installation of glossy ceilings. Gloss well reflects objects on itself, as in a mirror, so the LED elements installed in the open niche will be clearly visible. A hidden niche completely removes the light sources from the field of view and creates beautiful uniform light. But its installation will be more difficult to compare with the option oktrytym.
Consider how the installation is performed.
Step 1. Gypsum plasterboard is installed in the same way as in the above described variant.
Step 2. On the sides of the GKL profile, PVC linen is installed.
Step 3. To special niches, light sources (tapes) are attached and connected to the network.
Step 4. To completely close the upper side of the niche, thin stripes of plasterboard with holes for light are cut out. As a result, we have a deafly closed GKL profile with holes from above for uniform illumination of the ceiling surface. These holes will no longer reflect on the gloss and will not spoil the visual impression.
Important! A hidden niche allows not only to defeat the characteristics of the glossy cloth, but also to protect the plasterboard box from the penetration of a large amount of dust. This is especially important for children's rooms or kitchens.
Backlight without GCL profile settingis performed either in the interstitial space or inside the plinth. When using this type of lighting, you need to set the LEDs so that they shine in the rough ceiling, and from there the light gently reflected on the surface of the vinyl sheet. It turns out beautiful and uniform light.
The illumination under the canvas shows itself well in rest rooms, bars or a bedroom, as bright illumination in these places is not required. The light will be too diffuse and mild. The method is bad and for large rooms - in the center will be formed unlighted area.
Rules for installing lighting without using a GCR profile
- On the perimeter of the room set the LED cords.
- Slightly lower, at a distance of not less than 5 - 6 cm, baguettes are fastened. This is necessary to ensure that the heat from the lights and LED lamps are not deformed the surface of the canvas.
- The installation of the vinyl sheet to the baguette, the edges of the ceiling is covered with a beautiful plinth.

Option for rooms with a low ceiling, in which it is impossible to set the backlight using several ceiling levels.
- At the required height, the ceiling fabric is stretched.
- Below the surface of the stretch ceiling (at a distance of not less than 5 cm) on the walls is attached LED tape.
- Bottom of the lighting elements are decorated in some way (for example, wide ceiling skirting boards are installed).
This method combines the principle of gypsum cardboard boxes with hidden niches for an LED lamp, but without the use of the GCR itself.
The rules of mounting LED strips
LED cords are usually sold in the form of coils, on which tapes with a length of no more than 5 meters are wound. They can be cut into several separate lengths of different lengths. To decorate the ceiling lighting, do not use a tape that is too long.
Usually for one power source is enough 15 meters. If there is a need to increase the lighting area, then for the next segment of 15 meters should be a separate food. Too long ribbons will consume a lot of energy, which will shorten the life of their belts.

Mounting Features
- The most popular way of fixing tapes - grooves between the ceiling skirting and the ceiling cloth, which allows you to completely hide the light source.
- From the distance between the tape and the surface of the ceiling depends on the light effect - the underlining of individual perimeter circuits (or GKL boxes) or soft illumination of a large surface of the upper tier.
- If the ceiling is translucent, easily transmissive light, then correctly placed lighting can create an interesting effect of a glass semi-transparent roof.
- When creating curved backlight sections, do not bend the ribbon too much. Bending with a radius of less than 2 cm can damage or break it.
- Install the tape neatly and do not allow it to be mechanically damaged - this can damage conductive elements.
- Correctly connect the tape - observe the polarity rule. Do not connect the tape directly to the mains, first connect the supplied controller
- Stick the LED strip on a flat, non-greasy surface. If the tape is not self-adhesive, then use a quality double-sided adhesive tape. Another option for fixing is dowels or screws. This will allow you to remove the tape if necessary, without damaging the finish.
- Observe the electrical safety requirements for installation, the power supply margin should not be less than 25%. If the LED strip is attached to the metal base, then under it an electrical insulation should be placed.
Instead of LED tapes now often use LED tubes. With their help you can make an interesting island illumination of the ceiling. No less popular is the combined lighting, when in the center of the ceiling a chandelier is installed, and at the edges - LED elements. In multi-tier ceilings this option is able to create fanciful light combinations.
Table. Sources of light for the decoration of the suspended ceiling.
| Light source | For what purposes is it used | Installation Rules |
|---|---|---|
| The cable contains many glass or plastic cores, through which light passes. It does not dissipate beyond the fibers. Point lighting. | First, a projector and diodes are installed on the rough ceiling, and a ceiling sheet with a star image is drawn below. Then in the canvas, small holes (2 mm) are made by the special tool, where the light fibers are passed. |
| The second part of the light design for the decoration of the ceiling is of the "starry sky" type. They are equipped with good light-scattering elements. Installed on the ceiling with a fiber optic cable, in small holes on the canvas. Light comes through the cable and then dissipates in a mini light. | Lamps in the established order are mounted in the ceiling together with the fibers of the optical fiber. Fibers symbolize small asterisks, while diode mini lights are large. |
| Neon cord (cold neon) works when a high-voltage current is applied to its contacts that forms an electric field. In this case, the phosphor, located between the copper terminals, begins to emit a pleasant uniform light. | It is connected either to the mains or to the batteries. To obtain the required voltage, a special current inverter is used. Neon cord well outlines the perimeter of the ceiling or plasterboard box, and is used for internal illumination of the vinyl sheet. |
| LED strips are printed circuit boards up to 5 m long, which are wound around small coils. On the tape at different intervals there are diodes. They can be monochrome or colorful depending on the preferences of the buyer. Some tapes can change the intensity of the glow on different segments. | The most popular light source for lighting the stretch ceiling. It is easy to assemble - most tapes have an adhesive element on one side with a protective film. Widely used for lighting on the contour, including the entire perimeter of the ceiling. |


Lighting on the principle of "starry sky"
Ceiling lighting on the entire surface can be a very interesting solution, especially when the sky painting and constellations are depicted on the ceiling. To create the effect of stars under the suspended ceiling, fiber optic cables and mini diodes are installed, and small holes are made on the surface of the canvas, from which "starlight" will go.

Stretch ceiling "Starry Sky"
There are 2 ways to make the ceiling "starry."
- Using an Optical Cable. To do this, on the draft ceiling, the fibers are connected to a common light source, and then attached to the inner surface of the tension web. In this way, luminous points are formed, which in the daytime will be completely invisible. With the help of fibers, it is possible to form patterns and constellations from light points;
- Two-layer "starry sky". For him, a two-sided canvas is used, the upper part of which is incapable of transmitting light. In the canvas, holes are made on the principle of scattered stars or beautiful constellation patterns. Light passes through the holes on the lower, translucent layer, forming a light pattern of the sky.
When using ceiling sheets of different colors and patterns, you can achieve a strikingly beautiful effect. If desired, highlighting the sky can make it change the color and even pour into the rhythm of the included music. But such installation will not be easy for a layman to do.
Video - Stretch ceiling "Starry Sky"
Decorative lighting
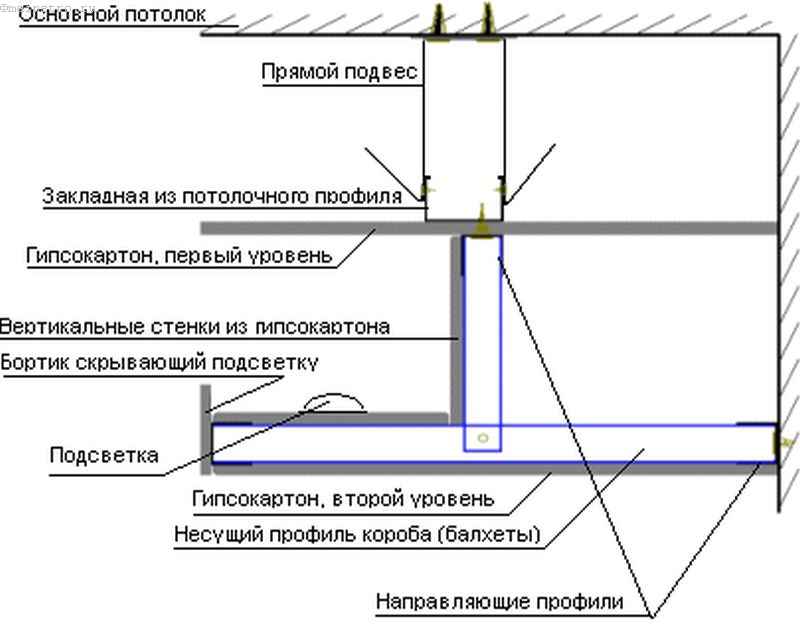
In this case, a ribbon with LEDs is installed on the inner underside of this box (it is parallel to the main ceiling). The width of the lower side can reach 50 centimeters. The height of the box usually does not exceed 20 centimeters.
In order for the light from the diodes to fall on the PVC film only, a narrow bar is attached to the inner underside of the box, which covers the LED strip itself and is parallel to the wall. Above the light source (LED) is a PVC sheet.
As a result, we get a two-level ceiling tension type, in which the LED strip lights the canvas from below. The first level is created by the canvas itself.
The second level creates a drywall on which the LED tape is located. A feature of such LED lighting is that only the ceiling edges are highlighted. The central part can not be highlighted.
When you need to highlight the central part of the ceiling tension type, then the tape should be installed above it. In this case, the LEDs are attached to the surface of the main ceiling, and they shine from the top down.
You can create different shapes using LEDs, emphasizing the geometry of the room, ceiling or changing the design in this way.
Also, the light source can be attached to the walls. It should be noted that the very fabric of the ceiling tension type should be partially transparent.
These two methods differ only in the location of the ribbon with LEDs. The principles of organizing LED lighting are the same.
Required components
In order to organize such lighting you need to stock up:
- lED strip;
- power supply unit;
- the controller;
- RGB-amplifiers;
- connector;
- soldering iron, whose power can be from 25 to 40 watts;
- a cable that will be used to connect to the mains;
- wires with a cross section of no more than 0.5 square meters. mm.
Select the desired LED strip
Its use can enhance the beauty of the interior, but the preferred option will be the use of colored LEDs. In this case, the backlight will be characterized by different color tones and they can be selected depending on the mood.
The most common types of LED-tapes are:
- SMD 3528;
- SMD 5050.
The main difference between them lies in the size and quantity of monochrome crystals in a single diode. The first is smaller and is characterized by the presence of one crystal in the diode. The second has three crystals in a diode.
Each of these types has several varieties, which depend on the density of diodes per running meter, as well as the power of these LEDs.
If we talk about SMD 3528, then it can have as many LEDs per running meter:
- 60 (their capacity is 4.8 watts).
- 120 (they are 7.2 watt).
- 240 (power - 16 watts).
As for the SMD 5050, it can have either 30 (they have 7.2 watt), or 60 (are 14 watt), or 120 (are 25 watt) LEDs.
For our illumination, you need to choose SMD 3528 with 60 diodes or SMD 5050 with thirty diodes.
Helpful hint: more powerful LED strips that can deliver light to the ceiling of the tension type should not be chosen, as they can overheat. Especially it concerns those cases when they will be installed above the ceiling, which is called tension. The air above the PVC canvas can be hot and this will definitely lead to overheating and burning of the LEDs.
The peculiarity of each LED tape is that it needs a low voltage, which can be equal to 12, 24, 36 and 64 volts. To supply such voltage, it is necessary to buy a unit that provides low-voltage power.
When choosing a power supply, you need to know its maximum power level. It should be 25 percent greater than the power of all connected tapes.
To calculate this characteristic of LED lighting, it is necessary to determine the total length and multiply the number of meters by one meter. The last value should be indicated on the tape itself.
For example, you chose the LED strip SMD 3528 with 60 diodes and its maximum length should be four meters. Its total power will be 60х4,8х4 = 1 152 watt.
Here, 60 is the number of diodes, and 4.8 is the power of each LED.
Useful advice: in the event that the total length of the tape is more than five meters, you will need to buy additional nutrient blocks.
Experts recommend using one unit for 5 meters of tape. If one powerful power supply is used, the first diodes will overheat, and the latter will emit less light. In order not to make a mistake in calculating the total length, a project or plan should be drawn up.
As for the controller, it is used to select a particular color, or to dynamically apply light of different colors.
Next, we will consider the process of creating LED lighting, the features of which will be the placement of a light source above the stretch ceiling.
Installation of LED tape
After preparing all the necessary components, it is necessary to prepare a place to which the LED strip will be attached. Its installation is very simple, since a double tape is placed on the back.
With it, it is attached to the ceiling or wall. Sections of the ceiling or walls in which the process of adhesion will occur, it is necessary to degrease and primed. Thanks to this, it is possible to provide a reliable fastening.
Useful advice: a more reliable option is to use your glue, or PVC corner. In this case, you will be able to protect yourself in case of buying a tape for LED lighting with poor-quality tape.
In the event that a luminous image on the ceiling of the tension type is made, it will consist of several pieces of tape with LEDs. In this case, the connection of these pieces is done either by means of special connectors, or by soldering intermediate wires to pieces.
If the second option is used, soldering is best done before the process of fixing the LED strip on the ceiling or wall. The main rule when soldering is to observe the polarity. Otherwise, the LEDs will not light up.
The soldering of wires is carried out to the contact pads. They are in the place where the line of the ribbon cut is. As you know, cutting into parts is permissible only in certain places.
These places are designated by a line and a scissors sign. Wires for soldering should have a section that does not exceed 0.5 square millimeters.
Useful advice: the place of soldering is the most unreliable place, therefore it is necessary to address with it very cautiously. With this in mind, it is recommended that you take an assistant when securing the tape.
Connections of all lightening components
After when the LED tape will illuminate the stretch ceiling, it is glued, it is connected to the controller and power unit. It should be borne in mind that every five meters of the tape should have its own power supply.
Connection of two parts of five meters is carried out in parallel.
In other words, connect the connectors to the cable that will be included in the network. They are connected to two power supplies. The controller is connected to the first power supply unit. Next to the controller connect the first five meters of the LED-tape.
The color LED ribbon at both ends has four wires. These wires are black, green, red and blue. The black wire is connected to that connector of the controller, which is designated V +. Green wire is connected to connector G, red - with connector R, blue - with connector B.
The second end of the first part of the tape, called the LED, is connected to an RGB amplifier. The connection is the same as for the controller.
This amplifier is connected to the second power supply, and also to the second part of the LED strip, which will illuminate another stretch ceiling section.
Here it is worth noting that both the power supply unit and the controller can fail. Therefore, they are best placed in places where they will be easily accessible.
This place must be under the PVC film. Some experts recommend installing these elements on the wall over the floor skirting.
The cable itself, which will connect the LED strips, controller and power supply, can be tightened with plaster, or hidden behind the cabinet. At the end, check the operation of all lighting.
When all work on the installation of the LED strip is completed, then proceed to install the most tension ceiling.
Here one must observe one condition. The distance between a natural and a suspended ceiling must be at least three centimeters. In this case, the ribbon for LED lighting does not overheat.
In the event that the LED strip will be installed in the gypsum board, the controller and power supply can be placed in this box. As a result, access to them will not be very easy.
Video. Installing an LED ribbon with your own hands
This article should help the average user to choose the kit for creating the LED backlight stretch ceilings. We tried to talk about the key technical and consumer properties of various LED sources, and also highlighted a dozen current issues regarding installation.

Tensioning systems can be used in combination with any lighting. Chandeliers and spotlights work as the main light of the room, but there is another option - LED backlighting. In this case, the task is: to make the stretch ceilings even more expressive, to give some mystery to the interior, a special charm.
Light-emitting diodes in tapes are perfectly suited for work in tension structures, as they are:
- are compact;
- little weigh;
- do not overheat the cloth;
- reliable;
- easy to manage;
- can change the color of the glow;
- convenient for installation;
- are economical;
- are safe.

How to choose an LED strip for lighting stretch ceilings
Design: duralight or LED strip
Two types of backlighting are used: duralights and tapes. Both variants are similar only in that they are molded products in which the LEDs are fixed at a given distance from each other - according to the principle of a garland.
Duralight is a transparent flexible cord made of PVC, inside of which there are LEDs, and they are completely filled with polymer. It can be round and flat section, in different colors and sizes. The main advantages of duralight:
- high strength;
- good flexibility in different directions;
- water resistance.

LED strip is flat (width 10-20 mm, and thickness about 2-3 mm) printed circuit board on which single LEDs and resistors are installed. The tape on the reverse side has a sticky layer for mounting. There are advantages to this light source in comparison with duralight:
- the section size is more modest at times;
- less weight;
- simply fastened;
- gives more light.

The disadvantages include the following:
- well bends only in one plane;
- more vulnerable to mechanical damage;
- often there is no resistance to moisture.
How to know the type of LEDs
In tapes for stretch ceiling usually use LEDs made on technology SMD. For us, it may be important how large the crystals are, so look at the numerical index. If the 3528 is 3.5x2.8 mm. Also popular are LEDs with a chip size 5x5 mm.
Number of LEDs
LEDs are located on tapes and in duralight with a certain density. From this indicator will depend on the total power consumption, as well as the intensity of lighting. Variants in 30, 60, 120, 240 pieces on a running meter are possible. Large LEDs are usually put less often, smaller, respectively - more often.
Power of light source
Know the power of each running meter of the tape is necessary to properly select the power supply. For example, if each LED consumes 0.04 watts, then with a density of 60 pieces per meter, we have 2.4 watts, which is 24 watts for a 10 meter loop.
Voltage
Almost all such sources operate at a constant current of 12 volts, there are powerful 24-volt devices. In either case, it is necessary to use a step-down transformer in the circuit.
Color Solutions
Most tapes for the stretch ceiling give a white glow. However, you can apply and devices with colored LEDs. Some ribbons allow you to choose the color solutions of the backlight - there are simultaneously installed semiconductors of several colors.

Stretch Ceiling Light Control
Using special controllers in the circuit, it is possible to change the lighting characteristics remotely (infrared remote control, mobile phone). For example, we get the ability to change the brightness and colors. Some RGB tapes allow you to include them intermittently (as a color music), for some given scenario.

How the tape is protected
For rooms with high humidity it is necessary to choose lED Strip Light , which have high IP values. Better for these purposes is duralight, but there are also protected tapes in a silicone shell.
How to use LED ceiling tension lighting
Because of high reliability and durability, LED strips are used not only from the outside, but also in the interstitial space of the stretch ceiling.
To illuminate the ceiling from the inside, the tapes are installed on the carrier floor or on the walls under the main ceiling. As a stretcher, this technology uses translucent films and fabrics, which allows you to get the effect of a floating ceiling. Depending on the location of the LED sources, you can highlight only the perimeter or a certain area, including creating luminous figures and ornaments. Sometimes with a uniform arrangement of tapes and maximum transparency of the canvas (up to 70%) perform a general lighting small rooms such as bathrooms.

By a similar technology (LED tape behind the stretch ceiling) reproduce the effect of "starry sky." The only difference is that the canvas does not let light through at all. The asterisks are obtained solely due to the perforation of the tension ceiling (through the micro-holes we see the penetrating light).
Outdoor lighting can be used with any type of fabric. Here the light source is located on the front side, and transparency is not needed. In this technology, the ceiling is highlighted solely around the perimeter. In order to hide the tape, use special polymeric cornices or collect boxes of gypsum board.

- Controllers and power supplies of the tapes located behind the sheet must be installed in an accessible place for possible replacement.
- Before gluing the LED tape with a sticky layer, the surfaces must be degreased or primed.
- You can mount LED sources not only on horizontal planes, sometimes it is more convenient to fix them on the wall.
- It is necessary to very carefully bend the device, since the minimum radius is limited.
- Cut the tapes exclusively according to the manufacturer's labels.
- Gently decorate the boxes and cornices from the inside. On the glossy ceilings, the interior space can be reflected. Cables and fasteners can give an ugly picture. Sometimes the tape in the box or cornice is covered with a transparent matte plexiglass.
- Making a box from the GCR, or mounting the cornice (before stretching the canvas), please note that installers will need a place for the assembly of the ceiling. The minimum between the draft ceiling and the box should remain 12 centimeters.
- When assembling the circuit, always pay attention to the polarity.
- Do not place the LED strip for a stretch ceiling near other light sources.
- Observe the recommended length of the tape for serial connection. In large premises, the perimeter is likely to be assembled from several lines.
Turischev Anton, rmnt.ru
Stretch ceiling with LED lighting looks unusual and attractive.
Now, for lighting the ceiling, use not light fixtures, but LED strip or LED cord.
This is an inexpensive device, and even an amateur will cope with its installation. The tape installation takes a little time and does not require a special tool.
There are several ways to decorate the ceiling with an LED cord - you will learn about them from the article.
LEDs as main lighting
Make of the LED tape the source of the main lighting - the idea is unusual and very interesting. Its implementation will require financial investments, but the result is a very impressive ceiling.
To create such a ceiling, a conventional fabric or PVC film can not be used. The surface of the ceiling must be made of translucent material such as Transparent.
Translucent linen began to produce French company Clipso. They pass the light rays emitted by the LED lamps well.
This is achieved due to the smaller thickness of the web and special light-scattering properties. Lighting devices are placed above the sheet, and the surface of the ceiling remains perfectly flat.
A layer of light, making its way through the canvas, gives an unusual appearance to the entire room (see photo).


Translucent ceilings became possible due to the appearance of LED lamps. It is these lighting devices used in such designs.
LEDs serve exceptionally long - up to 70,000 hours. Therefore, LED lamps can be installed in places where they will not be accessed, for example, over a web of tension construction.
Translucent fabric - the second component of transparent ceiling structures.
It can be applied to images using the photographic method, it holds water well and is resistant to mechanical damage.
When the lamps are not lit, the ceiling of the translucent fabric looks like an ordinary tensioning structure, because the overlap and the luminaires do not appear through it. But it's worth turning on the backlight, how the space at the top is changing.
Instead of a proprietary and therefore, alas, an expensive translucent fabric Clipso company can use a translucent PVC film for stretch ceilings.
Polyvinyl chloride film reacts negatively to heating. From heat it sags and stretches.

LED backlight does not heat the film at all, so it has no alternative in creating translucent ceilings from PVC film.
Translucent stretch ceilings are taken from the room up to 40 centimeters high, but the end result is worth the effort.
Backlighting around the perimeter - "soaring" ceiling
Soaring ceilings are now in the trend. The term "floating ceiling" refers to a design where an LED backlight is installed around the perimeter.
This allows you to achieve an amazing effect. The ceiling is optically separated from the walls and begins to soar.
Until recently, soaring ceilings were installed only in five-star hotels and elite restaurants.
Those who do not happen in such places could only admire the photos of unusual interiors decorated with floating ceiling structures.
Today, this technology has become available to most people. The floating ceiling can be made in your apartment or in the house.
To do this, you only need to purchase a special profile with a perimeter clearance for the LED strip.
For floating ceilings, you can use any quality and color fabric - no matter whether it is matte or glossy. It is more difficult to choose the color of the backlight.
The classic option - white LEDs, in addition, they give more light than multi-colored. When choosing an LED strip, you need to pay attention to the warmth of light.
For residential premises it is better to use LED lighting with warm light.
In any interior luxuriously looks a two-level soaring ceiling - such as in the photo in magazines.
To make such a design, it is necessary to collect an additional level on a separate frame and to provide for the possibility of installing one of the levels of LED illumination along the perimeter.

Two-level ceilings are a huge field for experiments. In such constructions it is possible to use translucent and perforated cloths, as well as their combinations, gypsum plasterboard niches and boxes, colorful coatings, mirrors, applications, photo printing.
Such a variety of opportunities carries some danger. Elements can be incongruous, and as a result of experiments, the interior will suffer.
Therefore, when designing a ceiling design with lighting and other decorative elements, it is better to trust a professional designer.
The specialist will be able to pre-simulate on the screen of the monitor how this or that "masterpiece" will look in reality.
LED strip pattern
If you fix the LED tape or fixtures directly above the canvas, from the "reverse side" of the ceiling in the form of a geometric pattern, you will get a very impressive design in terms of design.
This design looks beautiful and unusual. In the off state, the backlight is completely invisible, and the ceiling looks like a standard, unremarkable stretch construction.
But if the soul asks for a holiday or visitors come to the house, if it is necessary to celebrate the anniversary, New Year, birthday, or you just have a party, then it's enough to turn on the backlight as a normal room will be transformed.
Lighting devices are fixed on a tension cloth in the right places. So you can draw whole pictures of light bulbs of different colors.
In this case, it is possible to connect several modules separately, which allows you to change the color and outline of the backlight.

For a patterned backlight, not every canvas is suitable. It is necessary that it can transmit light rays.
This ability is not possessed by glossy films, since they are not completely transparent, but matte canvas can be used.
In addition to the requirements for the quality of the ceiling, there are wishes for installing the decor itself.
If the illumination is carried out with the help of LED fixtures, the distance between them and the web should be not less than 15 centimeters.
Otherwise, the lamps will be highlighted with color spots on the ceiling surface. Due to the fact that the LED lights take away from the room part of the height, the room will appear lower.
The LED strip can become an exit from the situation. It can be stretched only two to three centimeters from the surface of the canvas.
It is light, conveniently fixed, does not heat up and does not damage the fabric. Theoretically, the LED strip can serve forever.
Simply over time, its light dims, while the white LEDs fade faster (after about 10,000 hours). Red, blue, green and yellow LEDs last three times longer.
One of the options for using LED backlighting is the "Starry Sky" ceiling. LED light bulbs are located pointwise above the stretch ceiling very close to its surface.
When you turn on the backlight part of the ceiling will remain dark, only the LEDs will shine through the canvas, giving the impression that there is a starry sky above.
And finally, it is worth noting that the LED ribbon is not the only way to decorate the stretch ceiling decoratively. For the same purpose, you can use flexible neon tubes and a cord duralight.