Antipyretics for children are prescribed by a pediatrician. But there are situations of emergency care for fever, when the child needs to give the medicine immediately. Then the parents take responsibility and apply antipyretic drugs. What is allowed to give to infants? How can you bring down the temperature in older children? Which medications are the safest?
When erecting a private house with their own hands, the owner faces the question: to make a concrete floor or a wooden one. The latter is more environmentally friendly, easy to install and does not require thermal insulation. But if necessary, to arrange the floor directly on the ground, the best solution will be concreting. Advantages of this option include: long life, perfectly flat surface, resistant to mechanical damage, affordable material price. The concreted floor will serve as a reliable basis for any finish finishing. The minuses are high thermal conductivity (an average of 1.4 W / (m * K)) and labor-intensive installation.
Before you start pouring concrete floor in a private house, determine the level of groundwater table. If the plans do not include unnecessary costs, the calculation can be done by yourself. For this, wells are drilled in several places. Their depth is calculated as follows: the thickness of the concrete cover + 2 m. If the distance from groundwater to the floor is less than 50 cm, trenches or a drainage system are required, otherwise the house will have high humidity.
Preparation
To ask the question: how correctly to pour concrete floors, it follows, when the walls and roof are already ready. The sequence of actions is as follows:
- the definition of a zero floor level;
- preparation of soil (if necessary - deepening);
- pouring the pillow out of gravel (rubble) and sand;
- laying of hydro- and heat-insulating layers;
- fabrication of reinforcing frame and installation of guides;
- concreting of the rough floor;
- the organization of the final leveling screed;
- cutting of expansion joints.
1. Definition of the zero level.
In the final version, the concrete floor coincides in height with the bottom of the doorway, so start marking the room from the threshold. From it up the wall measure 1 m and put a point. After this, using the building level or level at a given height, mark the entire perimeter, drive nails and pull a bright cord over them. It is laid down 1 m, the resulting line is selected with a different color. This will be the level of the finishing floor.
2. Preparation of the substrate.
Filling concrete floors on the ground in a private house, you need to make sure that it is planned to heat in winter. Otherwise, the load on the foundation due to freezing will be too high, which will lead to its deformation. The ground is leveled and taken out to the required depth, its value in each case is calculated individually, depending on the total thickness of the floor (usually 30-35 cm). After that, the surface is carefully tamped to avoid shrinkage, which can lead to cracking of the floor, align and clean.

Stages of work
1. Filling the pillow.
On the prepared base, the pegs of the required height are driven in the level, they serve as a guide for each layer. First gravel (5-15 cm) is poured in, which prevents soil subsidence and makes the floor more durable, and also prevents capillary penetration of moisture. After alignment, the pegs are removed. Then the surface is watered and tampered. If the soil is dry enough, sometimes clay is used instead of gravel, which although less resistant, but has a low thermal conductivity (0.1-018 W / (m * K)), depending on the density.
The second layer of the pillow is quarry or river sand, 10-15 cm thick. It serves as drainage and prevents soil punching during freezing. To make the floor firmer, as a third layer, gravel is sometimes poured (do not use sedimentary rocks that give a significant shrinkage), the thickness is the same. At the end, the surface is covered with a small amount of sand. Each layer is watered and carefully rammed and leveled: the base for the concrete floor should be smooth.

2. Hydro and thermal insulation.
To protect against moisture, a special material is laid on the prepared surface. The most commonly used polyethylene film (with a density of at least 200 microns), roofing paper or modern waterproofing membranes. They are overlapped (20 cm), the edges are removed to the walls (5 cm above the final floor level), the fastening is carried out with the help of an adhesive tape. Due to waterproofing, concrete is better gaining strength, as the cement "milk" does not go into the ground.
To choose the right insulation for the floor, are guided by the basic indicator - high compressive strength. The thickness is calculated depending on the temperature conditions: in the southern latitudes, 5 cm is sufficient, in the regions of the Far North - about 15. Popular materials are extruded polystyrene foam and polystyrene, density C-35, minvata, foam glass, perlite and expanded clay. If the surface after pouring the pillow is not even enough, before the insulation works a layer of liquid concrete (about 4 cm) is poured, it will serve as a reliable base.


3. Fittings and guides.
Arranging the floor in a private house with your own hands, you need to ensure that it is so strong that it can withstand any stresses. Therefore, before concreting a mandatory item is the reinforcing base, which will also reduce the amount of cement expended. If a ready-made road net is used (usually 100x100x5 mm in size), it is stretched on the pegs hammered at a height of 2-3 cm above the surface so that it is in the middle of the fill layer. In the case where significant load is assumed on the floor, the reinforcing frame can be made by hand, welding rods 8-18 mm thick, or binding them with a strong metal wire.
To make it more convenient to adhere to the zero level, it is necessary to correctly prepare the base for concreting: guides and formwork. For this, wooden bars or boards are laid every 2 m, sometimes smooth metal pipes are used. Their height should coincide with the zero mark along the entire length. Between the guides set a formwork of boards or plywood, which divides the room into compartments. This work will allow concreting as accurately as possible. To easily remove the guiding and formwork from the coating, they are pre-lubricated with a special oil.

4. Rough floor pouring.
The simplest option is to order a ready-made concrete solution, but it's cheaper to make it yourself: from cement, sand and water, using a concrete mixer. Begin work from the corner of the room far from the door. To achieve a monolithic coating, concreting is carried out in 1-2 sets. The cement mixture is poured into the compartments to a height of 10 cm and is leveled by a shovel. Next, the concreted layer is compacted with a deep vibrator and smoothed with a rule, after which the solution is given strength for 3-4 weeks.
5. Finishing screed and suture cutting.
After the hardening of the base, the finishing layer is poured, for this purpose the self-leveling mixture is the best option. It will hide all the existing unevenness of the concrete cover. From a special dry mixture, prepare the solution using a drill with a nozzle-mixer, apply it to the roughing floor in 2 cm and level with a brush. Using a needle roller, air bubbles are removed.
When the coupler grasps, the last stage begins - slicing shrinkage joints. They prevent cracking of the floor. Cross seams are provided by placing metal plates in the concrete mass for half an hour, and longitudinal seams by means of boards smeared with bitumen. When the coating hardens, they are removed. The furrows remaining in the concrete are filled with a special solution. Now you can make additional insulation of the concrete floor on the first floor in a private house, and the base for the decorative covering is ready.
The arrangement of the floors of the ground floor in a country house depends on the type of structure. If a monolithic reinforced concrete ceiling is made in a country house for the floors of the ground floor, then the device of the floors on such a foundation can be made similarly to the arrangement of the floors of multi-storey houses.
If the country house does not have a monolithic reinforced concrete foundation for the floor of the ground floor, then the device of the floors of the ground floor can be made according to one of the following options:
- on the beams sealed (resting) on the walls of the building;
- on the beams that do not rest on the walls of the building (on pillars).
Fixing of wooden beams
The sealing of beams into the walls of a log house can be done both during the construction of walls and after their erection. It is better to fix the beams during the installation of the frame. Installation of beams in the assembled frame is a more laborious task.
If the log house is on a continuous base (ribbon foundation), which reliably supports the first row of logs along the entire perimeter, then the beams are cut between the first and second rows (rows of logs) of the log house.
The figure shows the embedding of a wooden beam in the first log frame, which lies on a continuous basement of a brick. The installation of the frame on the ribbon foundation and the closing of the beams between the first and second ring does not lead to an increase in the underground space and gives a warm underground.
If the log house is on a columnar foundation, then the cutting of the beams is best done between the second and third wreaths.  This is done so that the first crown of the frame is not weakened by cutting, which, when mounted on a columnar foundation, carries the greatest load.
The figure shows one of the pillars of the foundation, made of concrete, and the embedding of the beam in this case is made between the second and third wreaths of the frame.
It can be seen from the figure that such an embedding, with the same basement height, leads to an increase in the underground space, but it must be remembered that it can be lost in the height of the room.
The beams must be well dried before installation. The drier the beams, the greater their strength and the less they bend under the load. It is recommended that the beams be treated with an antiseptic and dried again before installation.
Beams are installed with a distance of 80-120 cm between the rows. If the foundation is columnar, then it is desirable to place the sites of the beams above the supporting columns.  The ends of the beams cut into the walls of the log are necessarily cut off - they are made with spikes, which prevent any displacements of the beams. The shape of the studs when cutting, as shown in the figure, can be the most diverse form.
Fixing of wooden beams in stone, concrete and brick walls is best done during masonry. In the masonry, special niches are performed, the beams are closed and only  after this they continue laying and make overlapping of these niches.
The length of the supporting ends of the beams should be not less than 12-15 cm. The ends of the beams are polished or wrapped with ruberoid, but in no case are the ends of the beams treated.
Around the girder a niche is filled with a heater. Beams do not have their ends to reach the walls by 2-3 cm. Between the wall and the end of the beam, you can put pieces of felt.
Selection of wooden beams
Beams can be either of logs or of beams. A round log withstands a greater load than a hewn beam, but it is less durable for bending. The strongest on the bend is the beam with the proportions of the sides 7: 5 - by 7 units of height should be 5 units of width. For example, at 15 cm wide the beam should be 21 cm in height.
Beams and logs used for beams must be of the selected material and must not have defects that affect their strength.
To select the section of the beams, the value of the total distributed load per square meter of floor space is used, which is usually taken to be 250-450 kg. This value includes the weight of the structure of the overlap itself. When laying beams in steps of 1 m and a known width of the span, the cross-section of the beam can be selected from the table.
Table. Minimum cross-section of beams (height / width), cm
When choosing the design of the house, it should be remembered that the optimal width of the span for wooden beams is 3-4 m. As can be seen from the table, with beam gaps of 4-5 m, the cross-section of beams sharply increases, and the overlap with such a span becomes unstable.
If the design of the house allows the installation of beams in steps of 40-60 cm, then for the construction of girder cover you can apply boards 5-6 cm thick and 15-18 cm wide by placing them on the edge. This design is very economical in terms of wood consumption and can be used for floors 1 and 2, as well as for attic floors. The width of the span of such ceilings should not exceed 4 m.
In order to increase the service life, as well as for large span widths and high  the values of the total distributed load instead of wooden beams are installed metal from the I-beam or two connected with each other by bolts of U-shaped profiles - channels.
The ends of the metal beams are treated with an anticorrosive compound, primed, painted or smoothed and installed as well as wooden ones. The ends of the metal beams should not rest against the walls of the niches, the gap should be 2-3 cm. In this case, this condition is even more severe than for wooden beams. Non-observance of the gap can lead to the destruction of the masonry in the niche area. The opening of the niches around the beams is closed with a solution.
The device of beams on poles
 Floors on the pillars are made when the beams are not laid in the construction of the building walls. The floors in this case are not connected with the walls and therefore they are sometimes called "floating".
Before the installation of poles, the natural soil is taken from the underground by a depth of 40-50 cm and it is covered with sand, gravel or gravel.
The filling for compacting is spilled several times with water and carefully compacted.
The level of underground backfilling should be no less than 15-20 cm above the level of soil around the house.
The installation of support pillars begins with their installation along the perimeter of the house. All poles are verified by level. Then the pillars are installed inside the house in steps of 70-100 cm from each other. The step between the poles is selected depending on the constructive solution of the floor (see below).
When installing poles inside the house, the level between all posts is constantly monitored.
Sometimes they do not install pillars inside the house, but place them only along the perimeter of the house. Then the cross-sections of the beams must correspond to the width of the span between the posts. Determine the cross-sections of the beams by the table (see above).
The higher the supporting poles, the greater their stability, the greater their cross-section.  When the height of the brick column is up to 250 mm, it is recommended to put it "one and a half" or "two bricks", at high altitudes "two bricks". If the pillars are concrete, then they are made with sides of the column 400x400, 450x450 or 500x500 mm.
Over the pillars lay 2-3 layers of waterproofing from the roofing material and lay the beams. The beams should lie tightly on the poles. For the tight fit of the beams to the posts, and also for their installation according to the level, wooden wedges and gaskets are used. After the installation of the beams, the position of the wedges and gaskets is fixed with nails.
Floors on supporting poles are undesirable to do in houses with seasonal living. In the absence of heating in winter, the ground beneath the floor freezes, which leads to an uneven displacement of the poles, even on non-sooty soils. One of the measures to protect against such a shift is the maximum possible rise in the level of padding and the use of large-fraction materials for its upper layer - gravel or gravel.
Single plank floor
For light summer houses make the simplest single floors. To get warmer rooms make double floors and warm floors - double floors with a heater.
Floors are laid on beams or logs. The necessity of laying on log joists - wooden bars with a section of 5x5 or 6x6 cm - is determined by the thickness of the floorboards. Thus, grooved boards with a thickness of 2.8 cm allow the distance between the axes of the beams not to exceed 50 cm. With a thickness of 3.8 cm, this distance increases to 60 cm.
If the embedding of the beams in the walls is done, in almost all cases, due to the large distance between the beams, lags must be laid on top of them.
If the beams are arranged on the supporting poles, then the step between them can be selected from the following recommendations: for beams with a section of 10x10 cm, the distance between the supporting poles is up to 80 cm, for beams of 12x12 cm section the distance between poles is up to 100 cm.
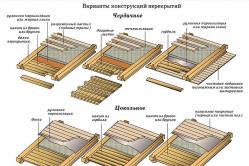
 The first variant of the solution
There is a material: beams with a section of 12x12 cm and plank boards with a thickness of 3.8 cm.
Then: a step of installation of columns under beams - 1 m; step between the rows of beams (step in rows of columns) - 60 cm.
Mounted pillars and over the resulting beam structure make the flooring of the floorboards. This option requires more frequent installation of pillars.
The second variant of the solution
For the same conditions for the presence of material, we take the same step between  pillars under the beams, as well as between the rows of beams equal to 1 m. This option requires laying over the beams of the log. The distance between the rows of logs is determined by the thickness of the board, in this case for boards with a thickness of 3.8 cm, the distance between the rows of the log will be 60 cm.
It should be noted that in this case the direction of laying the floorboards will change by 90 °.
Over the board floor in the cottage house it is advisable to make linoleum flooring.
Many developers are keen to make warmer floors. For this, the bottom  the side of the beams is filled with cranial bars and the flooring is laid on them.
Then the variant of laying the floor of the log on the beams in cross section will look like it is shown in the figure.
For the rough floor, boards with a thickness of 1.5 to 5 cm are used. Often, slabs and boards of reduced grade, but only of coniferous species, are used for the rough floor.
The boards should be tightly fitted to each other. The ideal material for the rough floor is the grooved boards. The boards must be treated with an antiseptic.
Rough flooring can be covered with a sheet warmer. In its absence - a layer of a mixture of clay and sawdust 3-5 cm thick. For this, the clay is soaked in water and sawdust is added. Laying boards only after the mixture dries completely.
It is also possible to perform bulk insulation, for example, claydite filling with a layer thickness of 4-8 cm. At the same time, it is necessary to take into account the loading of the embankment onto the rough layer and the boards.
Insulated floor
Often developers want to get an even warmer floor. For this, the inner cavity of the double floor is filled with a thick layer of thermal insulation.
Along with a large number of modern insulating materials made in the form of cotton wool or mats, you can specify a few of the traditional. Among them - dry foliage and wood shavings.
Above the layer of thermal insulation there should always be a gap of at least 1.5-5 cm for  free movement of air in the underground space.
Both double and insulated floors require the ventilation of the underground space.
To do this, holes are made in the corners of the rooms with a diameter of 5-6 cm. The openings are covered with decorative grids raised above the floor to avoid water ingress.
Another way to ventilate the underground space - holes are made not in the floor, but in the skirting.
Underground space
The underground space of a country house, often called the underground, is one of the  the most important and most vulnerable elements of a country house.
The underground forms the microclimate of the entire first floor of the country house.
The dry underground guarantees a comfortable atmosphere throughout the house and, conversely, the wet underground creates an uncomfortable and unpleasant microclimate.
The underground must be dry and ventilated. To ensure the ventilation of the underground, all types of foundations must have some constructive solutions.
As a rule, these are several openings along the perimeter of the socle, which allow one to get a natural ventilation of the underground, regardless of the change in the direction of the winds.
The conclusion about the presence of moisture in the underground can be made during the first spring visits to the country house.
If the bed linen left in the house, during the following arrivals, you  find it wet, then the underground is wet.
Moisture in the underground contributes to the formation of mold, and subsequently the fungal damage of the floor and the floor of the first floor.
None of the antiseptics provides full and long-term protection of wooden materials in such conditions.
Repair of the floors of the first floor, and even more so the replacement of the folding crown of a wooden house - is a very laborious task. Therefore, the underground needs regular seasonal supervision and care, and a good condition of underground space is a guarantee of longevity at home or economic construction.
Caring for the underground
First of all, the underground needs reliable ventilation. To do this, all the holes along the perimeter of the socle - blowing - during the entire summer period should be open for free movement of air.
They are not allowed to be blocked by any objects or the overlapping of weeds by weeds.  If there is still confidence in the presence of moisture in the underground, then you can apply two solutions - temporary and permanent.
The temporary solution consists in connecting for the period of residence 2-3 "window" fans, fixed on the holes of the blasts, which after the end of the season are dismantled. This solution gives a more intense but not constant air exchange.
A permanent solution can be the installation of 1-3 ventilating boxes located on the most blown sides of the house or building.
The height of such a box is arbitrary, but it should be remembered that the higher it is, the greater the pull. The box itself can be made of tin or plastic pipe, but regardless of this, it must be reliably protected from precipitation.
Caring for the underground in autumn
In the autumn, as soon as the night temperatures begin to approach 00C or go below this mark, the invasion of mice-voles begins on all out-of-town buildings.
This name they received for the fact that they spend the entire summer period "in the field", and by autumn they are looking for a warmer shelter. However, if the populations of mice in this season are large, they do not leave the country houses alone in the summer.
The mass nature of such an invasion depends on many factors and varies from season to season. It often happens that the mice turned the interior of one house into nothing in the winter and did not go into any of the neighboring houses at all.
In addition to the troubles associated with the destruction of clothing, linen, damage to the finish of the house and furniture, mice often bring unpleasant and deadly diseases.
Here are copies of only two messages. One is about the mass illnesses from the "Nizhny Novgorod News", and the second about the same diseases in Bashkiria and several areas of neighboring Tatarstan.
One of the ways of penetration of mice into a solidly built house - through prodigies  underground, and then through the floors of the first floor - in the living quarters.
Heat that persists underground even during frosts makes this path for mice the most simple and attractive.
We strongly recommend that we do everything possible to ensure that the underground is not a convenient route for mouse invasion.
For this purpose, metal grills with a cell of 5-8 mm are installed on the blast-holes.
You can make grids yourself, and this does not require special skills.
Of the tin stripes are cut in widths of 55-65 mm, marking and notches are made on them, as shown in the figure. Then the strips are bent into a U-shaped profile and folded into corners, by inserting a lattice inside. After giving the frame the right shape, it is gradually taped with a hammer.
The frames are made of such a size that the windows of the grating correspond to the size of the window of the air.
Then the grilles are installed on all the blasts along the perimeter of the structure. For this it is sufficient to make two holes for a dowel 5-6 mm. Fastening with dowels and  screws is preferable if a close shutdown of the blowdowns is planned for the winter period (see below).
After completing the closure of the air, there should be a mousetrap in the house for several weeks. It is possible that the underground has already been chosen by mice and they are now simply forced to look for paths to the living quarters.
For those who for a variety of reasons can not afford the use of conventional mousetrap, you can suggest the installation of more humane devices. In the sale appeared mousetraps in the form of plastic pencil cases, the covers of which are closed when the mouse reaches the bait.
For several days the mouse will be alive in this pencil case and it can be released into the forest without committing murder and without interfering with natural processes.
Arranging the mousetraps and checking them for several weeks, you should make sure that the house for the winter is left without such unpleasant and dangerous rodents.
Strongly do not recommend the use of any poison - sooner or later, its presence will affect domestic animals, birds and other  living creatures.
With the onset of the predominance of negative temperatures, the underground warm house is recommended to be closed tightly. This ensures the preservation of heat released from the ground, and a significant decrease in the depth of freezing of the soil, which will positively affect the winter mode of operation of the foundation.
Closure of air can be done in several ways - cover with clay, install pieces of brick on clay, but it is most convenient to put wooden plugs. If measures were taken against mice and grills were installed, then a wooden cork should be placed immediately on the place of the grid to be removed, leaving it for a minute without supervision.
Caring for the underground in the spring
 It is very important not to allow the penetration of water into the underground during the melting of snow.
The figure shows the way of penetration of thawed water into the underground due to the melting of snow, which fell from the roof of the house, through the air in the brick basement.
Such penetration is most likely if the winter season's supplies were not blocked by traffic jams. Experience shows that meltwater can get into the underground and in the event that the airs were closed by traffic jams.
Therefore, during the thawing of snow, it is necessary to leave the countryside and, if possible, to dump snow from the roof of the house. Then you need to clear the area around the house for at least 1.5 m.
In addition to eliminating the danger of penetration of underground water, the removal of drifts will also contribute to a more even thawing of the foundation of the house.
With the onset of warm weather with the predominance of plus temperatures, it is necessary to remove plugs from the air if they were installed for the winter.
If, after all, the moisture is detected in the underground, install two or three window fans on the air vent holes so that they work on extracting the air. Do not spare time and money to fight against moisture underground.
Do not let stagnant moisture in the underground and the appearance of mold!
An important part of the design of the house can be considered sex. In addition to performing the basic functions, it should fit as much as possible into the overall interior. Depending on the purpose of the room, different types of flooring can be used. Their assortment has a very wide variety on the market, so the owner of the house faces a big choice.
Regardless of the type of floor covering to be applied, the following requirements must be met:
- resistance to moisture;
- resistance to mechanical stress;
- sufficiently high abrasion resistance;
- ease of care and cleaning.
In addition, the floor should be well combined with other elements of the interior. You can also state that today you can choose a floor covering for any style of the most original color palette.
Design features
The arrangement of floors in a country house can not be significantly different, but there is some difference. To get ready-made flooring, it is necessary to perform a number of works. In fact, it is laying several layers that will reliably protect the room from moisture penetration and keep the heat. Among them we can distinguish:
- underlying;
- waterproofing;
- cement strainer;
- interlayer;
- flooring.

Underlayment acts as the main bearing element touching the ground. For this, concrete can be used or simply crushed stone, sand, gravel or clay-concrete. Depending on the material used, the underlying layer can be rigid or not rigid.
For styling waterproofing layer sheet or roll materials can be used. It is only leather or polyisobutylene. In the case of a high level of groundwater, more reliable protection is needed. In such cases it is necessary to make a layer of rubble and impregnate it with tar or bitumen. As an option, it is possible to purchase ready-made asphalt concrete or tar.
The floor screed in the country house is the next forming layer. It can be of two types:
- monolithic;
- national team.
For the first use concretes, cement-sand mortars, gypsum concrete or cement fiberboard. To perform such work, significant labor costs are required. The second category is characterized by the use of ready-made plates from gypsum-fiber sheets, fiberboard or chipboard. Laying such materials is less time consuming. The main requirement for this layer is a perfectly flat surface.
Between the screed and the floor covering, you must also make an intermediate layer. The so-called interlayer is designed to bind the upper part of the floor with a lower layer or overlap. To do this, apply a variety of mastics, putties, mortars or concretes. In addition, this layer can act as an elastic bed for overlapping. In this case, the main material is sand. This allows you to evenly distribute the load of the floor covering to the underlying layer.
The top layer is laid floor covering. Features of this process depend on the type of material used. As a rule, it is better to involve professionals for this stage of work, because certain skills are needed.
When choosing a classic wooden floor for a country house, the design is less complicated. If this is the first floor and there is no basement under the premise, then a pillow of rubble or gravel is needed. It will be installed lags, the step between which should be at least 40 cm and not more than 70 cm. In the case where the floor needs to be laid on the second floor is still easier. It is necessary to install the lags on the concrete overlap and fix them with anchors or long screws. Such work can be done by yourself. You just need to have a household electric tool. After that, you need to lay plywood on top, which will allow to get a flat surface. At the final stage, a wooden floor is laid.
The board floor is easy to install and in most cases the work is done without the involvement of specialists. This is the main advantage of such a floor covering. Also positive is the fact that in the countryside it is easy to produce insulation of such floor . It is advisable to provide this in advance, so that there is enough space to accommodate the insulation.
Types of floor coverings
Sex in the country house should complement the overall picture of coziness. To realize this idea, you need to choose the most suitable floor covering. Among them, several most popular:
- parquet board;
- parquet;
- cork floor;
- laminate;
- carpet;
- glass;
- linoleum;
- tile.
Parquet board is made of three layers of different wood species. Typically, the two lower of the coniferous species, and the third of the valuable wood. It can be a nut, an oak or even a merbau and a tick. The glued product is sold in the form of boards of a certain size with grooves, which ensure that there are no large gaps in the assembly. The top layer gives the necessary strength and durability.
The most prestigious and common floor covering is parquet. The main advantage of it can be considered natural, and the disadvantage is the high cost. Given that high-quality parquet is longevity, then such a price is fully justified. It can be looped several times, which is very practical.
The cost of preparation and laying of parquet is also quite expensive. Given that this is a natural tree, you need a reliable paint and varnish. Modern varnishes can significantly increase the wear resistance of parquet.
Cork flooring itself is very well recommended. Its main advantages can be considered excellent noise insulation and heat preservation. It is soft, yet durable, and also absorbs vibrations very well. A wide range of colors allows you to choose the right color for the interior of the house.
The most optimal in the ratio of price and quality is laminate. High performance and a variety of finishes allow it to be used in any interior. After a long time, it will not lose its original appearance. The only drawback is the harmful effect of moisture on it. Therefore, to ensure that the laminate remains in perfect condition, a reliable waterproofing is necessary. There are several classes of this material, which differ in terms of strength.
Carpet as a floor covering is also a well-grounded solution. The affordable price and ease of installation can be attributed to its advantages. A variety of drawings and bright colors will decorate almost any interior. The only minus - carpet needs regular cleaning. In this case, not always using a dry cleaning can get the desired result. Sometimes wet cleaning is necessary. At the same time, if there is even a small through hole on the surface, the moisture can stagnate for a long time.
Another important point to consider is the color of the carpet. Household carpet has a wide color range, but it is less durable than the industrial one. And the last one is very meager in colors. Therefore, there is a situation that you have to choose between color and quality.
If there is a financial opportunity, then you can use the glass flooring completely or partially. This is a relatively new solution for country houses. The main strengths are strength, durability and not susceptibility to moisture. The high cost of the coating itself and its installation, as well as the need for constant cleaning and polishing, are the negative aspects of this material. Nevertheless, with the help of such a floor covering, you can give originality to the interior.
Linoleum is also very often used. But you can see that it is more suitable for an apartment or office. Nevertheless, in a private house, for example, in the hallway or in the kitchen, it will be very handy. A variety of colors with different patterns allows you to choose linoleum for almost any interior. The main disadvantage is that this is an artificial material. It also has two kinds of carpet. Household with a wider range of colors, and the industrial one is almost monophonic, but it is much stronger and more wear-resistant. This coating is not recommended in the bedroom or the nursery.
You can also use a floor tile, for example, in a kitchen or bathroom. It is sturdy and easily cleaned with dirt. The main disadvantage is that this material is cold. It is not advisable to walk on such a surface barefoot. Here comes to the rescue "warm floor" . This technology has already been implemented in many homes and it will be discussed further.
Achieving Comfort
To the floor was comfortable walking, even barefoot, using modern technology. Nowadays, warm floors and tiles are very popular in country houses as floor coverings.
Despite the fact that such comfort requires financial costs, the owners are increasingly considering such a solution. If we consider the positive and negative sides, then the first is greater. Disadvantages can be considered only the high cost of the necessary materials and no less expensive installation. If there are such funds, then in the future they will pay off.
You can consider comfort and comfort as positive arguments. On such a floor of the tile will be more pleasant to walk than on any other. Plus everything is hidden under the tile, and temperature control is provided. Therefore, it is possible to make the most comfortable conditions, not to mention saving money on heating.
Is it possible to save money?
The installation of a floor in a country house is very labor-intensive, for which, besides, the skills of the builder are necessary. But with certainty it can be said that you can accomplish some of the steps yourself. They include the first 1-2 stages: padding the pillow from the rubble or laying the lag. Next, you need accuracy, knowledge of the features and properties of the material that will be used.
Separately, you can highlight the work on laying a laminate or parquet. Here, no specialist can not do without. Especially it concerns the laminate - at the slightest inaccuracy and the appearance of backlash between the bands in time, almost all will be spoiled. Therefore, if there is no experience of doing such work or the certainty that everything will be at the proper level - it is not worth the risk. It is better to pay and know that the flooring will serve for many years. In this case, the best savings are attracting high-quality specialists, which in future will avoid the cost of repairing the floor in a country house.
Finally, we suggest you get acquainted with modern technology of self-leveling floors with a very interesting 3D effect: