Antipyretics for children are prescribed by a pediatrician. But there are situations of emergency care for fever, when the child needs to give the medicine immediately. Then the parents take responsibility and apply antipyretic drugs. What is allowed to give to infants? How can you bring down the temperature in older children? Which medications are the safest?
It is still popular among construction companies. Usually to such houses it would be desirable to erect additional buildings that would emphasize the individuality of the structure. A frame extension to a wooden house can be erected in principle and independently, but for this it is necessary to have construction skills and follow the rules and order of execution of work.
In order to avoid further unpleasant surprises with an extension, it is necessary to consider several issues when constructing it:
- Selecting the material for the extension
The most optimal option - a metal frame, then trimmed with wood. It is also necessary to immediately think out which tree (color) will be used to make the veranda cover so that it is combined with the general style of the house.
- Foundation
In general, extensions are erected after the completion of the entire house, so it is necessary not only to erect a foundation for the veranda, it is also desirable to achieve a solidity of both foundations.
- Drawing up an extension project
You can not start erecting a veranda without a project plan, as it can then not only spoil the external image of the entire house, but also affect the lifetime of the veranda. It is necessary to think over the planning, dismantle, if old buildings are needed, to provide a good approach to the construction site, to think through, and so on.
Warming of the veranda of a wooden house with your own hands
Since the veranda will be the place where noisy companies will be gathered, family conversations will be conducted during tea drinking, etc., it is necessary to think how to ensure the preservation of heat inside the premises during the cold season.
The first step in the process of warming the veranda is. The most popular and popular type of insulation are foam plastic and mineral wool.
IMPORTANT: To ensure that the insulation effect is as tangible as possible, a layer of foam should be laid between the walls of the verandah and the layer of insulation.
Since, the frame extension to a wooden house usually has a plank floor, it is necessary to insulate it without fail.
Warming of the veranda floor
The floor must be plastered and painted with frost-resistant additives. After painting, the flooring layer of foam foam is laid on the floor, and on top is a layer of insulation material. The floor insulation can be made of natural (cork, granulated insulation, cellulose) and artificial materials.
The floor can be insulated with bulk materials (expanded clay, slag, foamed glass), sprayed (ECOvata, penoizol), bulk (polymer mixes), roll (mineral wool, linoleum) or tiled (foam glass, glass wool, gypsum fiber sheets).
Since the floor in the verandas is usually made of lags, to which the boards are attached, it is necessary to ensure the laying of the heater between the lags. To do this, carefully remove the boards from the floor, spread out between the lags, lay a vapor barrier layer, and then nail down the boards.

IMPORTANT: The heater must fit as closely as possible to the lags. The height of the insulation must be below the floor level by a few millimeters. This gap will ensure air circulation so that moisture does not stay inside (this will protect the floor from fungus and decay).
Warming of the walls of the veranda
To warm the walls of the veranda from the inside, you can use not ordinary insulation (foam plastic, mineral wool), but sheets of drywall. Their installation is very simple, it fastens fast, especially its cost is low.
Since the warming of the veranda in a wooden house with drywall sheets implies the construction of a lath, its base can be not only a metal frame, but also a wooden frame. Between the bridges is laid insulation (foam plastic, glass wool), and the sheets of gypsum cardboard are fastened with conventional screws to the profiles of the crate.
If you insulate the veranda with only one mineral wool, then it must be processed from above with foam foam to ensure the required level of vapor barrier.

Another simple material for warming the veranda can be PENOPLEX. Such sheets are glued to the walls with the help of glue. If you use PENOPLEX, then the vapor barrier is not necessary, because the material already has good water resistance characteristics. At the top of the heater, a thin layer of plaster is applied, which is pasted with wallpaper or simply painted in the right color.
Outside, the walls of the verandas are warmed in a similar way: a crate is fastened, the cavities between the profiles of the crate are filled with a moisture insulator and a heater, after which the cladding materials are fastened. A frame extension to a wooden house is usually arranged outside with decorative panels or siding.

Rarely, when the construction of the house is not made its insulation. Even if the insulation is not used at the time of the construction, the possibility of warming the walls inside the house, and ...
The construction of houses from wood is gaining more and more popularity for a number of specific reasons. If some people are interested in wooden houses because of the aesthetic ...
Modern houses made of natural materials, despite their high cost, are quite popular because they have a number of advantages in comparison with their counterparts ....
Everyone who has a country house, no matter whether it's a simple country house or a respectable cottage, eventually visits the idea that it would not be bad to increase its useful area a little. Someone needs a garage, someone is ripe to the bath, well, someone just does not have enough square meters for the device in front of the entrance to the house of a small vestibule. The goals are different for everyone. But here's the way to achieve these goals, in the vast majority of cases, one: this is the erection of a small one-story extension, closely adjacent to the main structure.
And, which is very surprising, but, nevertheless, is a fact - all the owners of houses want to make this extension as quickly as possible (until the summer is over). And all as one in a hurry allow the same mistakes. One of the most common mistakes, or rather, a non-admission is the device of poor-quality thermal insulation of the attached building. This error is indeed of a mass nature, and it is explained very simply. Not all summer residents and gardeners, by virtue of their profession, are associated with construction, and therefore forgetting about the necessity of warming the walls of the premises for them is a trifle. The most interesting thing is that everyone who for some reason did not insulate the walls of the wooden extension during construction is bound to do it sooner or later, and therefore it will take time to collect and study the relevant information. Therefore, if you feel that the construction of your extension is just around the corner - spend a couple of minutes and read this article to the end.
So, we learn to insulate the premises of an already built extension.
First of all, it is necessary to determine how the room will be insulated - from the outside or from the inside. Modern building materials and technologies allow you to do both, and so on. However, with respect to the dacha sector, the most simple and economical option is internal insulation. On that and we will decide - we will warm our outhouse from the inside.
The next step is choosing a heater. For an extension, a sufficient thickness of the insulation is 50-75 mm. The most popular type of insulation for gardeners is mineral wool slabs. I will not waste my and your precious time on a detailed review of the relevant segment of the domestic market of building materials, but I will immediately point out those producers that produce the best thermal insulation materials based on mineral wool (from the point of view of the "price-quality ratio"):
- "ISOVER";
- "Rockwool";
- "URSA";
- "Izorok".
The price for 1 square. m. mineral wool insulation from the above producers lies in the range of 65-90 rubles.
With a heater have understood. But one insulation is not enough. Here is a list of other materials that will be needed for internal insulation of our extension:
- Wooden bars (racks) of rectangular cross-section measuring 5х2 cm;
- Okaechnaya waterproofing (film or membrane), necessary to protect the heater from getting wet on it. The cost of waterproofing is about 20-40 rubles per 1 sq. Km. m;
- Gypsum plasterboard sheets (GKL) with a thickness of 9.5-12.5 mm for the outer finish of the insulated walls. The average cost is 70-80 rubles. for 1 sq.m .;
- Profiled and fastening metal elements (for making the frame and fixing sheets GKL);
- A bit of putty for sealing joints between drywall sheets.
Materials are completed. All that's left is to properly mount them. The order of works on competent warming of the extension looks as follows:
- The device of the battens: we nail wooden blocks or boards (see item 1 of the list of materials) to the inner surface of the walls and ceilings of our room in steps of 50-75 cm (the step size is equal to the width of our heat-insulating panels);
- Installation of insulation: on the crate of wooden bars lay mineral wool plates (both on walls and on the ceiling);
- The device of waterproofing: the surface of the mounted plates of a heater on all area is pasted by a waterproofing (see item 2 of the list of materials);
- Mounting of the frame for GKL (see item 4 of the list of materials): above the waterproofing covering of walls and ceilings, we install horizontal and vertical metal profiles, on which the external drywall plating will later be kept;
- Sheeting of walls and ceilings with sheets GKL (see item 3 of the list of materials);
- Fixing joints between sheets of gypsum board with putty, followed by stripping;
- Finishing of the internal surface of walls and ceilings (not necessarily): painting, tiling or any other type of decoration to your taste.
That's all! The total cost of materials for warming the premises of a wooden extension of 3x4 m and a height of 2.7 m is approximately 8-10 thousand rubles.
Owning a chic cottage, does not stop the owner from thinking about expanding their useful square meters. And what can I say about me - the average homeowner is not a very big house? So I had a plan to insulate my extension to the house. If she had previously arranged for me as an alternative to the sents or the summer verandah, then not long ago I decided - the outhouse to be warm! These insulated meters will increase our living space, allow us to organize an entrance hall there, removing cabinets and hangers from the house. There, too, will move and the pots of flowers that my spouse loves, cherishes.
So, as a result, the floor of the extension was insulated. Between the heater and the rough floor was laid hydro-vapor barrier film. Its task is not to let the moisture of groundwater pass, but not to prevent the regulation of moisture in the form of fumes from the layer of ecowool. We decided to stay at the heat-insulating layer of 20 cm, it is optimal for the climatic conditions of St. Petersburg. The insulation of the ecowool in the closed cavity under pressure was laid by the method of dry filling between lags. The density recommended by professionals for floor insulation was 45 kg / m 3, which is somewhat less than for walls and roofs. Light windproof film from above was not necessary, but here I did not save, because the finishing floor of the boards did not guarantee 100% of the absence of cracks, and cleaning by a vacuum cleaner and a wet rag was not canceled in our house.
Warming of the walls of the annexe
 The outer covering of the extension has already been finished, and with the arrangement of a ventilated gap. I decided to warm myself from the inside. An additional level of comfort in this case is the communication hidden in the wall. For vertical surfaces it is possible to produce in different ways:
- Dry method for closed surfaces when the cavity is filled with fluffy dry ecowool under controlled pressure. This ensures that even hard-to-reach voids are filled in the communication nodes or in complex internal configurations;
- Wet or wet-glue method. It allows to spray slightly moistened ecowool on a heatable surface. Finishing works are done after the layer dries completely. This layer has an excellent adhesion to the surface (it is adhered to it), the natural lignin forms a protective film on the other side of the layer.
The walls of my extension were insulated in a second way. And this is the sandwich:
- Exterior finish;
- Ventilated gap;
- External (wooden) carcass plating (plywood);
- Ecowool layer (20cm);
- Steam insulation;
- Wooden lining, in the form of interior decoration.
Such warming can be called correct in my case. There is no conflict of materials, there are no cracks and voids, the steam-protective film will not stop breathing walls. But each structure bears individual traits, is built on different technologies and from various materials. Or calling a specialist to the place will greatly simplify the task and will avoid mistakes. Incorrect warming can provoke, inside the floors, and this is inevitable: dampness, mold, destruction of structures.
About Sibarit, pleasures and the company Teploservis
 Conclusion - you want to live comfortably and beautifully, do everything right and right away. Trust your zone of comfort to professionals, but be interested in new technologies, materials market, to protect yourself from tyap-lap masters. But this is my conclusion, I like it when it's cozy and comfortable around of me, and although luxury is not my destiny, but I know the pleasures of pleasures, it's not for nothing that I'm Sybarit C. I warm the extension with the help of the masters of Teploservice company, it's to save yourself from unnecessary troubles and extra costs.
It is necessary to be able to distinguish a veranda from a terrace.
Most often for the construction of country houses and villas use a tree. Buildings made of wood are very easy and quick to assemble. If such a structure is well and properly insulated, then living in it will be very comfortable even in winter.
Very often the owners in their own power to the house build a veranda on which you can relax on a warm evening or hide from the scorching sun during the day.
But in cold and damp weather this additional structure is practically not used.
To make the room more comfortable even in the winter, you need to think about how to properly insulate the completed veranda from the inside with your own hands.
People sometimes confuse a veranda with a terrace, let's make a small digression and consider what is what.
The terrace is an open area, because it does not make sense to insulate. The veranda is an additional glazed building, so do not confuse it with the terrace.
The verandah, like the terrace, is not heated, because the air temperature in it differs little from the temperature on the street.
How to perform the floor insulation on the veranda
If you are preparing a plan for building your house, it is better to provide a place under the veranda immediately.

The thermal insulation of the floor on the veranda is one of the main stages of the whole process. Click on the photo to enlarge.
Of course, nothing prevents the veranda from attaching later to the finished house.
But with the first option it is possible to provide in advance a built-in verandah and it will be part of your house. And the attached veranda will be located outside the house. Warming, of course, you need both options.
Warming of the veranda from the inside is worth starting from the floor. In wooden houses, it is most often made of lags laid on the ground, to which the boards are attached.
To insulate the floor correctly, you need to remove the boards first.
Between the logs, place the blocks of wood and fasten them with screws. And now we put warming material between the bars.
It is best to use in the form of a heater mineral wool, foam or polystyrene foam.
It is very important that the heater is densely filled with all the spaces between the lags.
Foam sheets are very easy to fit for any size of lag, as this material is very easily cut with a knife.
Mineral cotton wool must be insulated with polyethylene or foil before laying. This is to ensure that the insulation does not deteriorate from moisture.
All empty places need to be filled with special mounting foam.
The height of your insulation structure should be several millimeters below the floor itself.
Through this gap, there will always be a movement of air, which helps to remove moisture, ventilating the space, and you can avoid wetting and decaying the floor elements.
At the very end, we lay a polyethylene film on the heat insulation plate, the edges of which are fixed with a metallized tape. Only now can you floor the floorboards and move on to the insulation of other elements of the veranda.
Warming of the walls and ceiling of the veranda
How to insulate the veranda with your own hands, if it is inside the building? In this case, only the external walls are insulated. The walls that connect the veranda with other rooms, no longer need to insulate.

Structure of the thermal insulation of the walls of verandas. Click on the photo to enlarge.
Let us now consider the technique of warming such an option.
Initially, all walls must be covered with waterproof material. Strips of polyethylene or foil are glued with horizontal lines. All the joints are closed with adhesive tape, so that there are no gaps for air.
Then, given the size of slabs of cotton or foam insulation, you need to fill the wooden bars on the walls. And now between them we place a heater, for example, such as mineral wool. Polyfoam can be simply glued to the surface of the wall with a special glue.
Thermal insulation with polyurethane foam
And the easiest way is to insulate the walls with liquid foam, which is called polyurethane foam. This heater is ideally protected from the cold and will last you several decades.
It has the property of filling all flaws and cracks by itself, creating an even layer of coverage. But, it is worth noting that it is not cheap, because it is very rarely used for private buildings.
The plates of the heater must be wrapped in foamed polyethylene. And if you use a heat-reflecting material, you need to place its metal surface inside.
Above this construction, it is possible to attach a finishing material, such as a lining and the like.
How to insulate the veranda from the inside so that the room can store heat longer? For this, it will be necessary to insulate the ceiling as well. Everyone already knows that warm air rises. And without meeting a good barrier, he will leave the premises unhindered. If you insulate the ceiling, then most of the heat supplied to the veranda will be stored indoors.
The ceiling of the veranda is insulated in the same way as the walls. Insulator is insulated from moisture, wooden strips are stuffed to fix the heater, bubbles are blown out with special mounting foam and all this is sewed with lining or other finishing material.
If you have a large part of the window in the veranda, we recommend that you install a structure of triple frames. Because heat loss mostly goes through the windows.
Before you begin to warm the veranda, you need to take care of fire safety. For insulation it is worth choosing non-combustible materials, such as mineral wool. If there is a fire, your veranda, which is not protected by refractory materials, will flash at the slightest fire and light up in a very short time. Thus, during a fire, the veranda can become a real obstacle for the exit of the tenants.
Gone are the days when electricity and gas were very cheap. To heat a house without thinking about the costs in our time is already an inadmissible luxury. And given the cold climate and the long harsh winters, we have to think about how to keep precious heat inside with the maximum effect.
The fact that a huge number of houses is built of wood is not a secret for anyone, because the material is available and relatively inexpensive. But about the fact that both log and paved housing can and should be insulated in addition, many of its owners do not think. How and what to insulate the wooden house, and why it is needed - the theme of our article.
Why warm the house
The tree holds the heat very well, everyone knows this. But is it good enough to feel comfortable inside your house? Yes, it is one of the most popular materials, and many make a choice in its favor.
Ecological compatibility, long service life, reasonable price and easy handling are some of the advantages of wood.
Note!
But precipitation, wind and temperature changes affect it not in the best way.
Antiseptic treatment, of course, partially protect, but does not create complete certainty that the material will last long.
Mold, fungus, decay will destroy the house before it would be desirable.
And as a consequence - quick repairs or a complete alteration of the dwelling.
- If you do not additionally insulate the walls of a wooden house, there will not be enough heat inside. We will have to install additional heaters, spend extra money and energy for heating.
In the cracks will blow, and all efforts to keep warm will be in vain. Everyone knows the severity of our winters, in a severe frost even such solid material as a tree will not cope with the task to the full. - Having spent once on materials and work for insulation, you will feel a significant saving of money for heating. The cost will pay off quickly, and the house will stand without repair much longer.
In many developed countries, even with a milder climate, great attention is paid to energy saving. And a great contribution to this is done by private homeowners. - Often tenants complain about the increased level of noise, penetrating literally into all the cracks, and not giving rest. After you make the decoration of the walls with a heater, the noise background will drop much, and it will be very noticeable.
After all, finishing the house will create a barrier not only for the cold, water and wind, but will also soundproof protection. Inside will be not only warm, but quiet.
Ways of thermal insulation
At the moment, insulation works can be divided into two categories - internal and external. During the construction, the homeowner usually insulates the floors, roof and walls from inside the premises. After the final finishing works are already underway.
But the external finish is thought much less often. And how to properly insulate a wooden house is not known to everyone, and rarely pay attention to it.
Exterior decoration can be done both at the construction stage, and much later, even when the house is completely ready, and even obzhit masters. In this - another advantage, because you do not have to endure the inconvenience associated with the repair work inside.
And, even if you think that you have wisely and thoroughly insulated the walls in the rooms, still pay attention to the exterior finish. This will extend your life to home, and for yourself you will gain comfort and tranquility.
At the moment, materials suitable for work can be divided into three main categories.
Organic thermal insulators
These include various slabs made entirely of wood, vegetable fibers or with the addition of wood waste. In the same category can be attributed from animal hair.
Durability and efficiency of such insulation is not the highest, as they are exposed to moisture. Therefore, installation, as the instruction says, requires special attention and subtleties.
Mixed heaters
Modern materials, very effective and in demand today. Glass wool, cellular concrete and foam glass gradually replaced by a more modern material - mineral wool.
Fibers, produced from basalt rocks, are pressed into soft elastic mats. They are perfectly transported, mounted and have a number of remarkable characteristics. That is why Minvat became the leader in the market of construction materials used for insulation work.
Synthetic materials
To them, we can safely include foam plastic, extruded polystyrene foam, materials. In fact, the foam is a closed cellular structure of bubbles filled with air. Since there are no gaps between them, there is no possibility of moisture invading space.
Note!
So, even if you do not know how to insulate an old wooden house, the material itself will prompt you to choose it.
Rotten logs, long before they need to be replaced, can be sheathed with polystyrene foam. This way you will secure the walls for at least a decade.
Fairly damp wood will slow down its destruction. As a result, repairs can be postponed.
There is another interesting, modern way of warming. This - the treatment of walls, both outside and inside polyurethane foam. This method is the application of foam on the walls or floor, when the layer frozen for several hours forms a monolithic protection, requiring only a final, decorative finish.
Fans of doing everything by themselves will have to invite a worker equipped with a special apparatus that applies this foam. But you will save on mounting the frame, which in this case is optional.
Coupling with any surface is guaranteed, so you can safely apply foam on the walls, both from wood, and from brick and concrete. Surfaces inside and outside can be insulated in a matter of hours with this innovative material.
Thermal insulation work
The process of warming the walls inside and outside, in fact, is the same.
Warming walls

- After all the insulator is laid, it should be covered with a waterproofing film. It is necessary to leave a small gap between the heater and moisture insulation.
This is to ensure that the insulation layer does not get wet and rot away from the condensate that collects inside.
- Finally decorate the walls with decorative material. It can be anything, from vagonki to special tiles. If necessary, the frame is enlarged, and then the finish is fixed on it.
Warming of the floor, ceilings and attic
It is necessary to pay special attention to the thermal insulation of the floors, ceiling or attic floor. The windows along the perimeter are processed, and if necessary, are siding. Floor insulate preferably at the construction stage, before the external coating is laid. Otherwise you will have to remove boards or laminate to make the insulation.
Before you warm the wooden extension or terrace, it is advisable to do all the basic work, having issued walls and an attic.
As the heated air rises, a large part of the heat is lost through the ceilings. By isolating floors, you will save up to 20% of the cost of heating the house. Moreover, a well-designed attic will last much longer, and the noise from the rain falling on the roof will not bother you.
You can use both mineral wool, and polystyrene or extruded polystyrene foam.
The order of installation work should look like this.
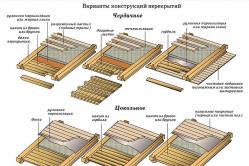
- If the ceilings have wooden beams, then the bridged bridge bridges are executed, then wood bars, a vapor barrier layer, a warming layer, floor beams and rolling boards are made.
- For a house with an attic, the order of the layers is as follows: interior decoration, insulation, rafters, wooden crate, roofing.
If you have a balcony or loggia, you need to make wall protection also. Since the annexes, as a rule, have thin walls, the insulation of the loggia will keep a comfortable atmosphere in the house and your expenses for additional heating.
Conclusion
Not only for the sake of monetary savings, but also to maintain comfort and comfort in the house, it is necessary to maximally insulate it. Even such solid material as a tree can not cope with the cold without additional protection. Having equipped your home, you will forget about repairs for decades, but inside it will always be dry and warm.
In the video in this article you will find additional information on this topic.