Antipyretics for children are prescribed by a pediatrician. But there are situations of emergency care for fever, when the child needs to give the medicine immediately. Then the parents take responsibility and apply antipyretic drugs. What is allowed to give to infants? How can you bring down the temperature in older children? Which medications are the safest?
- an excellent option of finishing for any kitchen, because this cladding is practical, durable and aesthetic. And it is natural that everyone who makes a choice in its favor, is interested in the question - how to install the ceiling with your own hands? And is it real? The answer is unequivocal - yes, the stretch can be installed without the help of professionals. The main thing is to know the technology and understand all the stages of the work. Next, we suggest that you learn about these rules, as well as look at the accompanying photo and video editing, which will greatly facilitate your task of transforming the kitchen.
Mounting Tools
To install a stretch ceiling in the kitchen, you will need the following tools:
- heat gun;
- building level;
- perforator;
- a gas cylinder for the gun;
- ladder;
- self-tapping screws and dowels;
- screwdriver Set;
- a hammer
- locking locks;
- knife with a set of blades of different formats;
- scapula.
After preparing the necessary tools, proceed to the selection of materials. First, calculate the area and perimeter of the kitchen ceiling, and then go buy baguettes, ceiling linen and soundproof materials.
Baguettes are plastic or aluminum strips, which together form a fixing profile. If you want the ceiling in the kitchen to please its functionality as long as possible, do not skimp on it and choose an aluminum profile - it's stronger and more reliable than plastic.
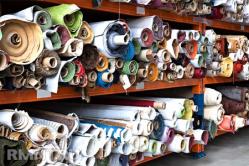
A ceiling fabric is a fabric or vinyl material that will be stretched on the profile. For the kitchen, vinyl is better, since it is more practical.
Soundproof materials are mineral wool or slabs that will protect you from noise from the neighboring upper apartment. It should be noted that sound insulation is only a matter of comfort, as without it ceilings will successfully cope with their immediate functions.
Preparatory work
The second stage of arranging the stretch ceiling in the kitchen is draft procedures. First you need to vacate the room from furniture and appliances that will not withstand the impact of the heat gun. Then it is necessary to clean the ceiling of the old coating and various kinds of contaminants.
If there are interlacing seams, they should be filled with foam. The entire surface of the ceiling overlay must be treated with a primer - it protects the surface from fungus and mold. If the ceiling is too deformed, it is better to dry it with gypsum board - so you will get a perfectly flat base for the stretch fabric.
At this stage, sound and heat insulation are also installed, if necessary, and air ducts for ventilation and other communications are equipped.
Council. Determine in advance where and how the ceiling fixtures will be fixed-it is important for them to install mortgages at the stage of roughing procedures, so that later there are no problems with the installation of the lighting fixtures themselves.
Set profile
The third stage is the installation of baguettes. You can install them in two ways: to the wall or to the ceiling. We recommend that you choose a wall mount, as in the ceiling you can not hide the necessary kitchen communications and wiring under the tensioning structure.

The procedure for installing the baguettes includes the following works:
- determine the height of the future ceiling and, using the building level, make a marking on the walls along the entire perimeter of the room;
- on the finished marking, attach the first baguette to the surface of the wall and drill holes in it for self-tapping;
- install the dowels in the finished holes and fix the bar with screws;
- the second baguette should be installed to the first end and also fixed with screws;
- similarly, install all subsequent slats.
Council. To ensure that the ends of the slats fit together as tightly as possible, pre-cut them at a slight angle - about 30 degrees. And the ends of the angled baguettes need to be cut at 45 degrees.
Ceiling mounting
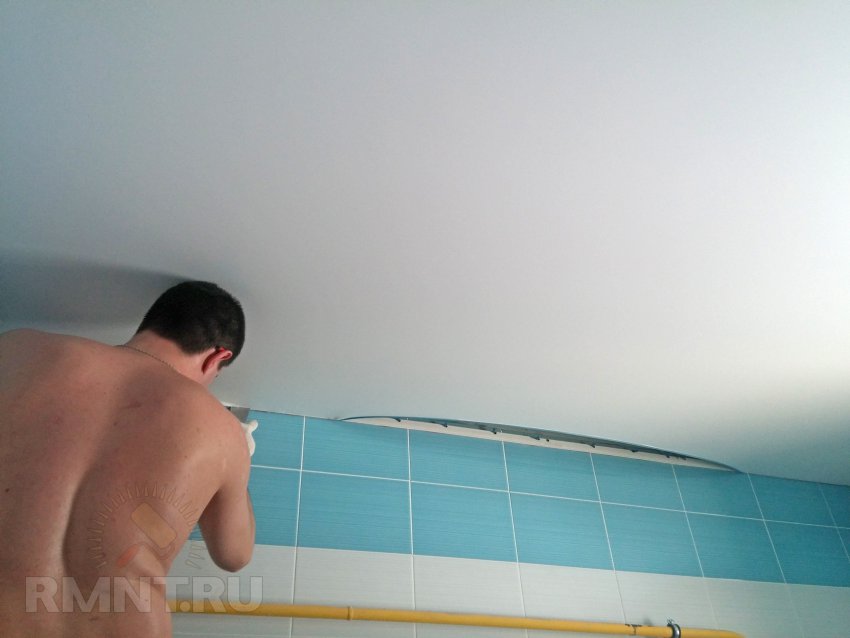
The fourth stage of work is the direct tension of the canvas. Before starting the procedure, warm up the room with a heat gun to 40 ° C. Then the work is done in this order:
- Unpack and straighten the material. Warm the canvas with a gun.
Attention! If you use a fabric, and not a traditional PVC linen, it can not be heated!
- Secure the first base angle using "crocodiles" - special clamps covered with soft matter, which prevents deformation of the fabric. Which exactly the ceiling angle is the base one is indicated in the instructions to the tension ceiling. In the kit, clamps must go to it.
- Fix the second angle - the opposite of the base angle.
- Secure the third and fourth corners.
- Again, gently warm the canvas. Remove the clamp from the base corner. Insert the blade into the sheath of the web through a special groove. Begin slowly to put the cloth in a baguette and fasten it with locking locks. Similarly, insert the webs in the profile at all other corners.
- Fix the canvas in the profile along the straight sections using the same locks and shovel.
- Spread out the canvas and check all the fasteners.
- Install the fixtures: in the right places, where the mortgages are prepared, carefully cut the holes and mount the instruments.
As you can see, installing suspended ceilings in the kitchen with your own hands is not an easy task, but absolutely feasible. Adhere to the proven technology and do not neglect the installation rules - only so you can get a quality result that compensates for the effort, money and time.
Stretched ceiling installation: video
Stretch ceiling with your hands: photo


Even if the room is made with perfect repair, the best quality / stylish finishing materials are used, the presence of a cracked ceiling will reduce the assessment of the work done to zero. And in order not to perebelivat ceilings annually, experts recommend using a modern solution to this problem - it's about stretch ceilings.
Table of contents: - - - -Advantages of stretch ceilings
This kind of coverage solves several questions at once:
- hides small errors on the surface of the ceiling;
- provides an ideal appearance;
- does not require repair and replacement for a long time;
- allows the use of various decorative "chips".
Many are confused by the need to involve masters in the installation of stretch ceiling, but if strictly follow the instructions, step by step perform all the manipulations, then it is quite possible to install the tension ceiling with your own hands.
Preparatory work
The installation of a stretcher is a painstaking and scrupulous business, which does not endure fuss. Therefore, before laying out / fixing the canvas, it is necessary to carry out all the preparatory work. This process is reduced to the following tasks:

- We work with the wiring. Here it needs to be attached to the existing ceiling surface reliably - do not let the wires come in contact with the stretch ceiling.

- Warm up the room. This is the final stage of the preparatory work - the room in which the stretch ceiling is supposed to be installed should be heated to 40-50 degrees. Specialists recommend paying special attention to plastic windows (if there are such in the room) - they need to remove the sloping corners.
All the preparatory work is finished, it's time to start directly installing the stretch ceiling with your own hands. But be sure to check the availability of the necessary tools and accessories. These include:
- roulette;
- perforator;
- screwdriver;
- two small scapulae - straight and angular;
- a building hair dryer or a heat gun - any powerful heating device.
Naturally, pre-ordered and delivered the actual stretch ceilings and profiles to which it will be attached. The profiles used for fixing the tension ceiling differ in the way they are fastened:
- harpoon, glazed (wedge) - used in working with a film cloth;
- clips - designed to work with a fabric ceiling.

It is believed that it is more practical and more reliable to implement the harpoon method of fastening the tension ceiling. With this method (harpoon), a hook of identical material is welded on the edge of the cloth (along the perimeter), as the ceiling hook itself - the hook is inserted into the profile (a click is heard) and the web is stretched.
Many prefer prefabricated method of installing a stretch ceiling because of its cheapness, but do not forget about the disadvantages of this type of ceiling ceiling mounting:
- dismantling of the structure is practically impossible (but with the harpoon method it is possible to partially dismantle the stretch ceiling);
- when the glazing method is very difficult to make multi-level ceilings;
- without a harpoon it is problematic to stretch the canvas - the bead-like method guarantees the formation of sagging;
- the wooden beads are drying up (this is a natural process) and can simply fall out of the profile - in the case of the harpoon this is excluded;
- the bevel method means the installation of the cloth "by eye" - this leads to uneven seams.
Do not forget about additional components - if you need special clamps-clothespins in any case, then different decorative elements and retainers are selected individually. If you plan to install chandeliers on a stretch ceiling, then be sure to purchase plastic rings under the lamps.

Stages of installation of a stretch ceiling with a harpoon method
There is nothing complicated in the process of assembling the finishing material in question - it is enough to get acquainted with the instructions and step-by-step recommendations to do everything yourself. But the cost of decorative coatings will almost halve - so it's worth trying, even if there are no building and repair skills at all.
Step one
Using a roulette and a plumb line, we mark the ceiling in the places where the profiles are to be fastened. This should be absolutely straight lines along the entire perimeter of the surface. The profile itself needs to be drilled in several places - for example, every 30-40 cm, which will mean the place of fixing it to the ceiling.
Further we make a marking on the lines taken to understand the locations of the profile fixing - these points should coincide in the distance to those holes that were drilled earlier in the profile. And now, on the marking, we make holes in the ceiling with the help of a perforator - the diameter of the drill is 6 mm. It remains only to fix the profiles along the perimeter of the ceiling, fix them with screws.
Note: experts recommend that when buying a profile, give preference to aluminum samples - they are as light as possible and have a long service life.
Step Two
Unpack the film. This can be done already in the heated room, that is, in the preparatory works the point of heating the room to 40-50 degrees can be skipped, but this should be done immediately after installing the profiles along the perimeter of the ceiling surface.
Note: next to the place of unpacking the film ceiling there should be no sharp corners - they can easily cut the cover, which will lead to the need to order a new one or repair.
There is no need to worry if, when unpacking, creases were found on the canvas - in a short time, when the stretch ceiling is already installed, everything will be smoothed out. The purchased stretch fabric already has the exact dimensions (they are indicated at the time of ordering) and the base angle - the whole installation process starts from it. We hang the canvas on the suspension-clamps, which were installed at the corners of the ceiling in advance.
Note: it is important not to let the blade break / damage the sharp edges of the clips - you can wrap them with something soft.
As a result of this step, during the installation of the stretch ceiling with our own hands, we will get a cornered canvas with a sag.
Step Three
 Using a heat gun in which air is heated to 70-80 degrees, we make the canvas more elastic, supple. To do this, simply direct the jet of hot air to the already suspended cover.
Now you can start final fixing the corners of the stretch ceiling to the profile - remove the clamps and, helping yourself with a shovel, fill the corners of the stretch ceiling in the profile. The edge of the ceiling has a special profile - harpoon. It is the harpoon with a spatula and refills in the grooves of the profile until a characteristic click. Do this carefully, without damaging the material. If you felt that pulling it and insert it into the profile is difficult, then interrupt the work and warm the tension ceiling more forcefully.

Ideally, this step is performed quite quickly - a well-heated film itself "jumps" into the profile, without any effort on the part of the master.
Step Four
Only after clearly fixing the corners of the blade to the profile can you begin to install straight sections of the web. To simplify the process, follow the instructions:
- first, the canvas is sealed in the profile of the joints;
- then the remaining freely hanging space is mentally divided into two or three fragments and alternately attached to the profile.
All this time, follow the constant heating of the cloth and maintaining the temperature in the room within 50 degrees.
 Note: if you felt at some point that the tension of the ceiling and the attachment of the canvas to the profile is given with difficulty, then again you interrupt the work for a few seconds and direct air from the heat gun to the place of work. In no case should you pull, apply physical efforts to achieve a result - this will damage the stretch ceiling.
Actually, the installation of the stretch ceiling is finished by hand. It remains only to insert a decorative rubber insert in the profile to hide the places of attachment of the fabric or use foam plastic baguette - it is glued to the wall and also serves as a decor. 
After installing the stretch ceiling, you need to hang up the lighting fixture (or appliances) - here you will need a plastic ring. It is glued to the canvas, and the inner contour is cut out for the future attachment of the chandelier / lamp.
Nuances in the installation of a seamless fabric ceiling
Above given instructions to install the stretch ceiling with their own hands made of PVC, but after all, there are also fabric covers, seamless - are there any features of working with them? There is! And, you need to know them, so that the result of work is ideal:
- when attaching a stretch fabric ceiling of a seamless type, you do not need to warm up the room - you must agree, this is a definite plus;
- the profile, installed along the perimeter of the ceiling, must be bought with the notation "increased strength";
- we begin to stretch the seamless ceiling from the center of the surface - a kind of cross is formed, from the middle of which the web is stretched to the corners;
- for a qualitative stretching of the seamless fabric ceiling, a special spatula will be needed;
- after stretching, the edges hanging from the profile are necessarily formed - they are simply cut off with a knife.

Note: if after installation of a stretch fabric seamless ceiling the folds were formed by their own hands, it is possible to use a heat gun or a construction hair dryer - a directed hot / hot air jet quickly solves the problem.
How to dismantle the stretch ceiling with your own hands
Dismantling of the finishing material in question may be necessary if the wiring is faulty (remember - did we fix it to the ceiling?) Or in case of fluid accumulation between the material and the overlap (for example, the neighbors were flooded). In any case, the process of dismantling can be carried out by hand, without the invitation of specialists. Step-by-step instruction:
- get rid of the decorative ceiling skirting;
- heat gun or building hair dryer warm up the film;
- carefully pull out harpoons from the profiles (they directly "press" / fix the cloth) in the corners of the coating;
- the same thing is done around the perimeter - we remove the harpoons.

In the process of dismantling the stretch ceiling from PVC, you will need to constantly heat the film - this will prevent loss of elasticity and damage to the material.
If the described process is to be carried out with a stretch fabric ceiling, then there is no need to use a heat gun, but there may be certain difficulties in pulling the linen filled into the profile - this material firmly "mates" with the glazing bead or clip.
After dismantling and eliminating the problem, you will have to repeat the procedure of installing the stretch ceiling yourself with your hands again.
The finishing material for the ceiling surface is perhaps the most reliable for today. If it is properly operated and periodically carried out "hygienic procedures", then for a long time no repair or replacement will be necessary.
In this article, let's talk about how to install your own stretch ceilings, and what can prevent you from doing it or vice versa.
2.
3.
4.
5.
6.
7.
Required Tools

In order to perform the installation of a stretch ceiling with your own hands, you will need the following tools:
- Cross-type and flat screwdriver, screwdriver with bent work surface;
- Pliers (conventional and elongated);
- Roulette (conventional or laser);
- Water level;
- Level meter;
- A marking cord or other strong cord;
- Hacksaw (for metal or wood);
- A hammer;
- Insulating tape or reinforced tape;
- Thermo gun (electric or gas);
- Special clips for hanging PVC linen
Here is listed the minimum amount of tools that will be needed when installing the stretch ceiling with your own hands. For example, if you plan to install ceilings in a bathroom in which tiles are already installed, then it is better to use a drill instead of a perforator with special nozzles for drilling ceramics.
Determine the area of the canvas and the size of the baguette in running meters

Since the installation of a stretch ceiling you will be made with your own hands, you will also have to determine the dimensions of the canvas yourself and also have to do it yourself. To measure, you will need a tape measure, which needs to measure the exact distance between the corners of the room. If you use electronic roulette, then you can do it yourself, and if it's normal, then use the help, because you can not make mistakes in size.
For simplicity and accuracy, draw a shape of your room on a sheet of paper. The drawing will be useful in the process as well as when you decide to do It is necessary to mark the doors. Measurements should be started on the left side of the entrance to the room. For greater convenience, it would be nice to designate each corner with a letter. After that, we start measuring the first corner on the left side of the doors. Measure the length of the walls at the very top, at the ceiling. This is a mandatory condition, not at the bottom or in the middle of the wall, namely at the top, since the difference in size can reach several centimeters.
We measure between all the corners, and also measure the diagonal of the ceiling. The diagonal should also be measured from the first corner (left of the door) to the opposite corner. You have all the necessary dimensions for the fabrication of the canvas.
Now it is worth paying attention to a few points. If it is planned to use beech baguettes, the ordered canvas should be stockpiled. And when purchasing PVC film with a harpoon, the size should be as accurate as possible, otherwise the film will become very difficult to stretch. So, in the case of using a cloth with a glazing bead, it is possible to adjust the canvas in size, ie, to cut off excess, then it is impossible to adjust the film with the harpoon. That's why this method of installing tension ceilings remains in demand, plus it is cheaper. One downside is that removing and installing the film in place will be quite problematic. Therefore, it is worth considering this feature when choosing the installation method.

And in order to determine how many meters of linen you need, you should determine the perimeter of the room, adding up the amounts of the parties.
Set the level of stretch ceiling and baguette

You should start by finding out the lowest angle in the room. You need to retreat from the ceiling the required distance and make a mark on the wall. What distance to retreat to solve to you, the smallest dimensions should be such that you could easily use a drill or perforator at the very ceiling. Also do not forget that you can. On this mark it is necessary to note the level in other corners of the room.
Then you need to take a marking cord with paint or another strong cord. The ends of the cord should be attached in accordance with the marks on the walls. It is necessary to pull it, the cord should not sag. After that, the cord simply needs to be pulled and released and with the paint on the wall there will be a clear band for the future fastening of the baguette.

Begin fixing the baguette to the walls from the corners. With the help of a hacksaw on metal from the back side of the baguette in the middle, it is necessary to make an incision. The front side is always longer than the back side. During incision it is necessary to try not to catch the front side, tk. it can crack during bending. Then quietly begin to bend and everything, corner is ready. It is still possible to make angles with the help of the method of fitting and filing corners, but these methods are laborious and long. But the decision behind the choice of method, of course, is yours.
Next, you need to drill holes in the baguette with a gap of 10 cm, and at the corners and bends of 8 cm. Aluminum and plastic are perfectly drilled with an ordinary drill for metal. Then you should attach a baguette along the line on the wall, which was beaten earlier, and with the help of a drill or a drill we drill holes in the wall. They are clogged with dowels and screwed screws. Do not overdo it when you tighten the screws; plastic can burst. If an aluminum baguette is used, then such a problem does not threaten.
After the baguette is installed on the wall, you need to do the processing of its joints along the entire perimeter of the ceiling. Sharp edges and edges in plastic baguettes are cut with a knife, and in aluminum they are smoothed over with a nail file. The face sides of baguettes need to be joined with ordinary tape. This is necessary so that during the installation of the blade does not damage it.
We provide fastening for chandelier

We offer you to consider one of the simplest versions of the device of luminaires when installing a stretch ceiling with your own hands. You need to take a wooden bar or metal profile for gypsum board. Using a cord for marking, beat off two diagonals and determine the center of the ceiling. In the case of lack of wiring, we bring it to the future lamp.
Use holes in the ceiling. In the bar, holes for the screws are also made. Diameter you choose yourself, the main thing is that the mount was rigid and reliable. Then the bar is screwed to the ceiling. In this case, the level of the surface of the bar should be at the same level as the baguette.
In the case of a metal profile, the situation is similar. It is attached to an anchor. Similarly, the center is designated, holes for the dowels are drilled, fixed to the ceiling. The surface should also be flush with the baguette. Sharp protruding edges or burrs should not be, they need to be cut off or treated with a bulgarian. If they are not processed, then there is the risk of breaking the PVC linen.
In this way, the chandelier mount is made. In the case of spotlights, the situation is slightly more complicated, but it is also possible to carry them out. If you use spotlights, then be sure to check out. For the socle, you can mount from a metal profile or from other materials, for example, using anchors. The main thing to remember is that the installed lamps should not exceed 50 watts.
How to bypass pipes and other communications
The surface of the ceiling is not always free of communications. There may be pipes of the ventilation system, heating, etc. We need to perform so that the canvas can grab communications, for example, a pipe. To do this, take a piece of any plastic, about 4 mm thick and cut out the insert for the diameter of the pipe. The shape of the hole does not really matter, but the main thing is to make sure that the hole under the pipe does not come close to the pipe, but slightly larger than the pipe. And then from the side with which the canvas will be introduced for the pipe, the workpiece made of plastic must be cut. It is necessary to remove all burrs and sharp corners.
After that, you should start the heat gun and warm up the existing cloth. After warming, we unfold the canvas, and we engage the corners using special clamps. A little ahead of the events, let's say that the installation of the stretcher must always start from the corners and go to the middle of the wall.

It is necessary to warm the side of the canvas where the pipe is. With a stretched canvas on it with a pencil, note the center of the pipe. Then, the angle at which the mark is made is removed and the mark retreats 1 cm. This indentation should be done to stretch the fabric, since after the end of installation, the first mark will move to the side just about 1 cm from the harpoon should also retreat 1 cm.
Prepared plastic amplifier with the help of super-glue must be glued on the previously produced markings. The adhesive should be applied evenly over the entire surface of the plastic. In the internal radius (inner circle) of the amplifier, you need to cut the canvas into several parts, but in such a way that at least four triangles can turn out, maybe more. The film needs to be wrapped on an amplifier and also glued.
Also need to paste the insert between the plastic on the canvas and the harpoon. If there is a piece of cloth, then you can paste it. Be sure to check that everything is well glued. Next, cut the cloth and harpoon according to the existing label. Then we hold the film and amplifier for the existing pipe and, everything, your bypass is ready.
By the same principle, you can bypass any obstacle. You need to make an amplifier that will not allow the canvas to tear due to gluing. When performing the marking, it is necessary to take into account that when the canvas is heated, it will expand, and therefore make indents 1 cm.
We mount the canvas from PVC

Installation of the tension flow with your own hands should always begin with warming up the blade. The heat gun can not be brought close to the film, otherwise there is a risk of damaging it. The entire surface should be warmed evenly to 60 ° C.
After warming with a spatula we proceed to the installation of the linen. The fastening of the film should always start from the corners. The spatula grasps not the film, but the harpoon and we put it into the grooves of the baguette. In the case when the bagate is a beak, then it is necessary to insert the canvas in the baguette and install a bead or wedge, it all depends on the system used.
After the corners are wound up, one can start the canvas from the middle of the walls. After this, it is necessary to start fixing from the middle of the remaining unstrung edges. Following this principle, it is necessary to wind the fabric along the entire perimeter of the ceiling.
If there are irregularities somewhere, then it's okay, just heat this place with a heat gun and the surface will be leveled. If a harpoon fastening system is used, then the installation of the blade is finished, and if a staple is used, then you need to cut off excess pieces of cloth.
After installing the canvas, you only need to hang the chandelier, and also make a masking tape or a cap on the baguette. You at your discretion can choose other options for decorating, for example, skirting. Before cutting the canvas to install the chandelier, do not forget about the amplifier, cut out a circle of plastic and glue it to the installation site.

In fact, the installation of a stretch ceiling with your own hands is quite feasible operation, the main thing is to do everything in order and not to hurry. First, learn how to perform installation of single-level ceilings, and then you can mount and complex multi-level ceilings. How does the installation of stretch ceilings look like in the video below.
Video. Mounting the tension ceiling with your own hands
The article provides step-by-step instructions on how to prepare and install a stretch ceiling. You will learn how to properly mark the room and install the profile, warm up and mount the ceiling cloth. The article will tell you what the preparatory work is and how to install the lamps.
In order to install a tension ceiling with your own hands , you will need a tool:
- Control and measuring: measuring tape, gon.
- Marking: marker, paint line, level (preferably laser).
- Manual: plastic spatula, knife.
- Power tools - impact drill, screwdriver.
- Special: heat gun.
Installation of any ceiling - work at height. Provide in advance a way of convenient access to the working surface - goats, scaffolding, stairs.
The canvas has several options for mounting - cold, hot and with heating at the end. In our case, a material is selected that provides for installation with heating (hot mounting). The ceilings are installed directly in several rooms, which allows you to consider various options for surface preparation.
Markup
The ceiling level must be determined in advance, according to the design. The horizon must be marked at the level of the face of the web. The perimeter mounting profile will pass along this line.
Preparation
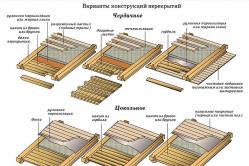
Walls should be smooth and reliable - the flexible profile will repeat irregularities, depressions, defects. If the ceiling is wooden, and the floor above it - residential, you should fill the membrane, fiberglass or polyethylene on the blackboard. Not exploitable floors can not be isolated.
Mounting the profile
The profile is installed in the usual way - on self-tapping screws or dowels on the markings. Before the installation of the profile, all work on the preparation of walls and their strengthening at the installation site must be completed.
It's better when decoration goes into the niche of the ceiling, than when it does not reach. It is extremely undesirable to leave any work other than painting and pasting wallpaper after installation - there is a risk of accidentally damaging the canvas. The seams of the tiles must be stained.

How to bypass the corners of the profile
To avoid the formation of sharp edges of the profile when traversing the inner and outer corners, it is better to do angular trimming as follows:
- Hacksaw for metal to cut the bar, which will be adjacent to the wall.
- Bend the profile in the desired shape, press and install the fastener.
- Thus, the angle will be smooth, smooth and safe for the fabric.

How to install intermediate profiles
The conjugation of the planes can also be covered with a cloth, but for this it is necessary to mount an independent (without wall-fixing) suspension base, on which a special mating profile will be installed.

The point of intersection of planes is determined in advance and in place. Then from the points of intersection on opposite walls you need to pull the cord and install a base over it.

The intermediate profile installed on the base must exactly match the level with the wall profile.

In this way, you can frame * rather complex multi-stage areas.

* The profile for fixing the stretch ceiling is sometimes called "baguette" and in this connection, the term "obegetit" can be heard from the masters - this means "tie", "profile", "set profile".
Mounting fixtures
Lighting Devices are selected in advance, and the mounting base is installed until the web is stretched.
Attention! The thermal power of the luminaires should not exceed the equivalent of a 40-watt incandescent lamp. The incandescent lamps themselves are prohibited (or extremely not recommended) by the manufacturers of canvases because of the risk of deformation of the stretched ceiling.
Choose standard LED lights. When installing the built-in lighting devices, only one rule should be observed: the reverse (not the front) plane of the decorative cover must coincide with the plane of the cloth.

Along with the installation of lighting points, the installation of power grids is carried out.
Attention! All wires must be laid in the corrugation.
All the preparatory work is completed - sound insulation of sewer pipes, sealing foam slits, sealing joints, etc.
For "hot" installation has the exact dimensions, taken in advance from the premises and embedded in the material during manufacture. The room in which work is carried out, it is necessary to warm up the heat gun to +30 ... 35 ° С in advance, and drafts must be blocked.
Installation is carried out in three stages.
Stretching
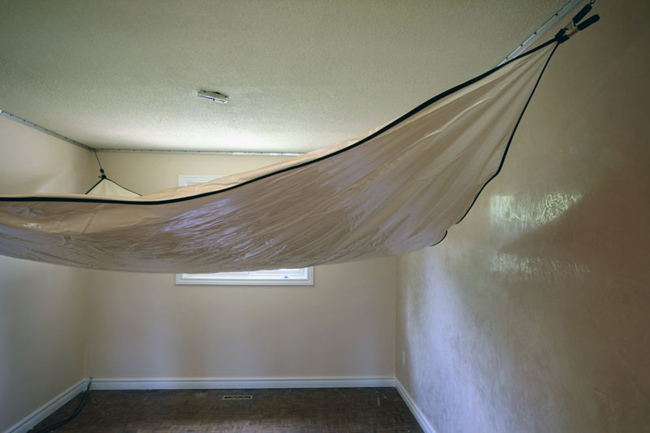
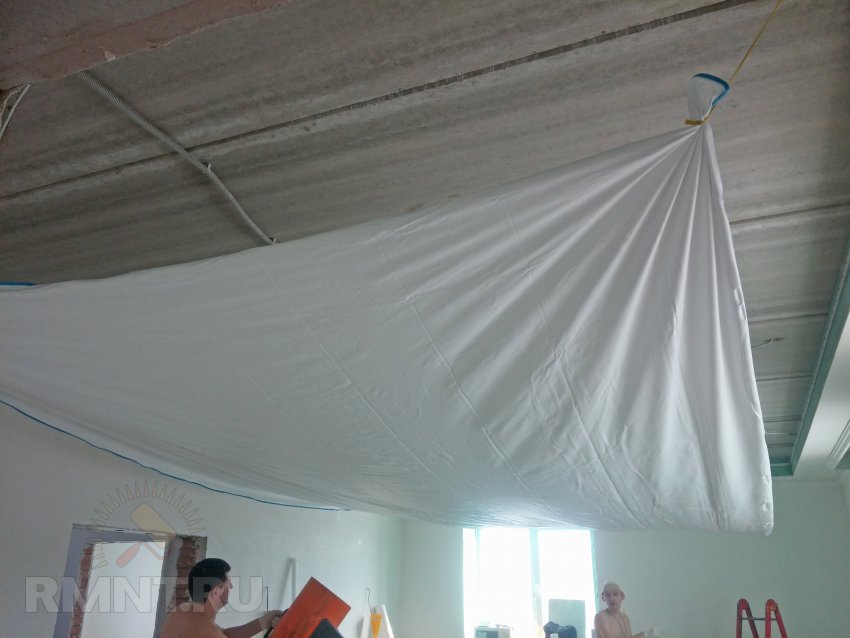
The canvas is hung from corners on temporary fastenings - "crocodiles" or simply ropes.

This is necessary in order to warm it up in a hanging position - folded or lying on the floor, it heats up unevenly. After the suspension, a thermal gun enters the case. Hot air should evenly warm the entire canvas.
Attention! Do not overheat the canvas! It can deform completely. Ready-to-install canvas to the touch between warm and hot, but does not burn hands.
The canvas, ready for fitting, looks like this:

Fitting
After a general warm-up, you can start point stretching. For this purpose, any pre-angle section of 2x2 m is heated up. Then the sheet is inserted into the profile with a plastic spatula.

First of all, opposite angles are pulled. The plots are also warming up before this.

Then it is necessary to fill the canvas in the profile with a uniform pitch of 200-300 mm.

Final filling
All the remaining areas fill in the profile.
Installation of small sections of inclined planes is carried out in the same sequence. The difference is that they do not have to be heated as large as they are easier to stretch.

The final view of the finished stretch ceilings:

The cost of the "hot" ceiling starts from 5 y. e / m 2 per material and 7 y. e / m 2 per work. At the same time, the price depends heavily on the complexity of the construction and the manufacturer of the canvas (they are of different qualities). Ceilings of "cold installation" - much easier to work - they do not need to warm up with a heat gun and it is quite possible to install a house master alone.
Vitaly Dolbinov, rmnt.ru
It has long ceased to be considered a luxury, and yet five to six years ago it was an expensive pleasure. In addition, the technology of the installation was kept secret by the masters. Today, almost any newcomer in this business will be able to do his own work.
This article details the rules of calculation and installation of PVC film (PVC). Glossy and matte ceiling paintings have an affordable price, and a wide color palette of produced material will help to transform the interior of any home.
In addition, the ceiling membrane made of PVC protects the room in case of flooding from above. Water from under the ceiling is easy to remove, and the cloth after the heating will take the same shape.
With his hands is determined by the following plan of action:
- Measurement and calculation of ceiling linen and accessories
- Installation of a wall profile - baguette
- Installation of lighting wiring and fixing of chandelier and spotlight fixtures
- PVC web tensioning
- Installation of lighting devices

The ceiling of PVC protects the apartment from the flood
To measure tension ceilings with your own hands is a very important operation. It will demand from you the utmost precision and diligence. First of all, take a blank sheet of paper and draw a plan of the room on it (top view). Be sure to display all the protruding parts (pilasters) and grooves (niches, bay windows).
Each corner is designated by the letter of the Latin alphabet, starting with the lower left corner (A, B, C, D ...). Measure all walls of the room and transfer the dimensions to the drawing. Be sure to measure the diagonals. They also indicate on paper.

Fastening of stretch ceiling PVC is made on a special profile or baguette harpoon type. To the edge of the ceiling cloth, a flexible harpoon is welded. Getting into the groove of the baguette harpoon, it clings to the ledges of the walls (like a harpoon or a fishing hook).
Baguette is made of aluminum or plastic. The length of the rail is 2 m. To calculate its number, it is necessary to add the length of all the walls of the room.

Installing the baguette
This procedure is no less responsible than the measurement of the ceiling. On how well the fastening is fixed, it will be able to retain the stretch of the canvas or not. Before installing the wall profile, the walls are marked out.
It is important to know! The stretch ceiling can be lowered 3 cm from the existing ceiling. If point lighting devices are used, the level of the web is lowered by at least 12 cm.
Markup is convenient to carry out by applying the laser level. If it is not there, then the usual watery (transparent hose with two graduated flasks filled with water) will come off.

According to the marked marks on the walls, the horizon of the future ceiling is beaten. This can be done with a painting paint tape (cord with blue in a plastic case). The marking is finished, the baguette is fastened to the walls with dowels and screws. The fixing interval should be no more than 10-15 cm.
At the joints of the two baguettes, the fixing step should be no more than 2 cm. If the baguette was cut, this place must be cleaned from the burrs with a file or sandpaper.

Important to remember! You can not dock the baguette in the corners. All joints are transferred to straight walls. In the corners, the baguette is cut from one side and bent at the required angle.
Wiring and lighting devices
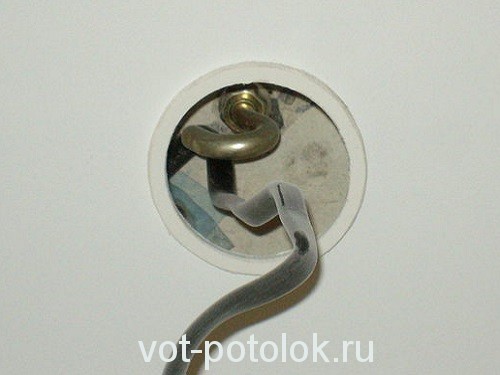
To install the chandelier in the center of the room you can apply a mounting hook. To do this, a hole is punched in the concrete overlap with a perforator and a piece of reinforcement with a diameter of 10 mm and a length of 20-30 cm is inserted into the hollow of the plate. A chandelier hook will be suspended thereafter.
You can also use self-tightening anchor bolts with a hook. If the chandelier is a bill of lading, then it is necessary to put a plywood embedded part in its place of attachment. On a rectangular piece of plywood with a thickness of 10 mm at the corners are attached direct suspensions for gipsokartonnogo ceiling.

Suspensions are bent in the form of a letter D to the desired height and fastened with dowels to the ceiling. Then, after stretching the fabric, the chandelier is erected, but more about this later.
The wiring is laid in a plastic corrugated hose and fixed to the ceiling with clamps. In the points of connection of the lighting points, loops of wire length of 25-30 cm are produced. Adjustable struts of spotlights are also mounted to the ceiling with dowels.
Suspension of ceiling cover
The room is heated with a special gas (propane) gun. The temperature is controlled by a household thermometer (it must be at least 60 degrees C). From the room it is recommended to remove products made of low-melting plastic, living plants and an aquarium.
Previously, the cloth is laid out on the floor, and then the clips (crocodiles) are fixed in two opposite corners. The first corner is basic (it is marked in the instruction that comes with the canvas). Heat the heated cloth with a trowel in the groove of the baguette until the harpoon snaps, catching on the projections of the walls. Below is the scheme for filling the ceiling.
When the cloth cools down, it will stretch and you can install lighting devices. The location of the chandelier or anchor hook is felt by hand and a special plastic glue is glued on its place with special glue. After 4-5 minutes inside the ring, cut out the film with a sharp knife and remove the loop of the light wire.
The chandelier is hung on the hook and connected to the power supply. After that, a cup of chandelier is attached under a stretch ceiling. For the overhead chandelier, glue a large thermo ring, and after removing the film, fix the mounting plate of the chandelier to the plywood with self-tapping screws. Installation is completed and if there are questions, then on this video the installation of the stretch ceiling with their own hands is shown in great detail.