Antipyretics for children are prescribed by a pediatrician. But there are situations of emergency care for fever, when the child needs to give the medicine immediately. Then the parents take responsibility and apply antipyretic drugs. What is allowed to give to infants? How can you bring down the temperature in older children? Which medications are the safest?
It is interesting, first of all, for those who plan to repair and update the ceiling coating, especially the fabrication of the stretch ceiling. To properly choose the right canvas, you need to know about its varieties and methods of production, as well as the installation technology.
Types of stretch ceilings and methods of their manufacture
The fabric for stretch ceiling structures can be made of polyvinyl chloride (PVC) or synthetic fabric with polyurethane impregnation. We will learn how they are made and what their properties are.
In the modern decoration of living quarters, a wide distribution was made of PVC sheets. It is made from a mixture of bulk polyvinyl chloride, supplied in the form of granules, coloring pigments, plasticizers and various additives, giving the material certain performance properties. The mixture, when heated to high temperatures, turns into a viscous and ductile mass, which is then rolled out on the machine to the state of a thin polymer film.

Table №1. Characteristics of the resulting polyvinyl chloride web.
| Name | Value |
|---|---|
| Density, kg per 1 m2 of cloth | 0,18-0,32 |
| Thickness, mm | 0,15-0,35 |
| Width, mm | 1000-5000 |
| 100 | |
| Reflectance coefficient | 5% - matte canvas, up to 70% - glossy |
| Ability to expand,% of original length | Up to 200-220 |
| Minimum permissible temperature, ° C | -5 |
| Maximum permissible temperature, ° C | +65 |
At first, the dimensions of the room are determined, in which the customer needs a stretch ceiling. PVC sheets are cut and sewn on a special machine with each other to get the canvas of the desired length and width. Then it is rolled up, packed and sent to the customer.
The PVC film itself is divided into several subtypes by its texture.

The choice of colors for PVC ceilings is limited only by the wishes of the customer and the available pigments. In addition, PVC film is very elastic, strong enough and includes a flame retardant impregnation that does not allow the material to ignite.
But it also has a disadvantage - it is sensitive to high or low temperatures. In a room where the thermometer's column falls below zero, the PVC sheet becomes brittle and brittle. And at very high temperatures the material expands and sags. This property adds to the owners of apartments hassle when installing suspended ceilings from PVC and lamps with incandescent lamps.
An alternative to polyvinylchloride is a polyester web with the addition of polyurethane. Like any other fabric, this material is made on a loom. Then polyester is impregnated with polyurethane. This is done to add the material to the elasticity, the properties to shrink when the temperature rises and other performance characteristics improve. The resulting fabric web is rolled into rolls and sent for further indoor installation.
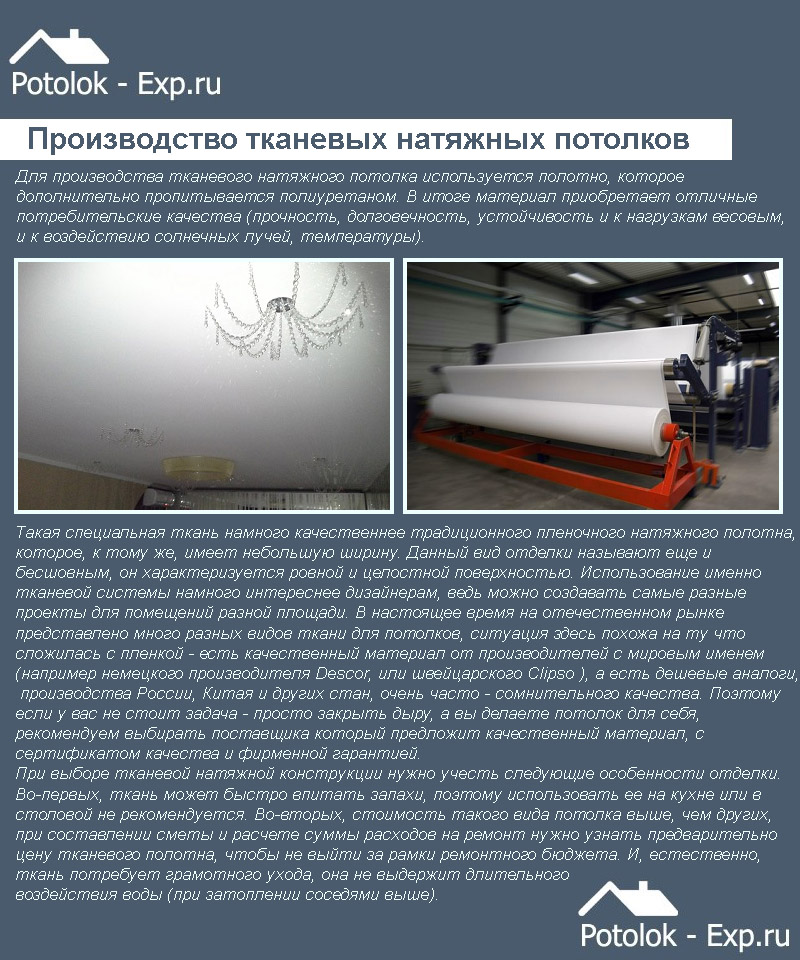
Unlike PVC, stretch ceilings made of polyester are seamless. The material is originally supplied in rolls 4-5 meters wide, which is quite enough for most living rooms. And for larger areas, a special profile is used, which closes the edges of the fabric sheets of the tension ceiling structure.
Table number 2. Characteristics of polyester with polyurethane impregnation.
As can be seen in the table above, the main advantage of this material is the ability to maintain high performance even at very low / high temperatures, which makes the polyester web a good choice for a stretch ceiling in a non-residential environment. However, the choice of color and texture will be limited, in addition, the creation of complex and multilevel structures is difficult.

With regard to watertightness, the fabric stretch ceilings retain only a part of the water, and everything else penetrates through the material in the form of small drops, so the material does not provide full protection from flooding from above.
Video - Types of stretch ceilings
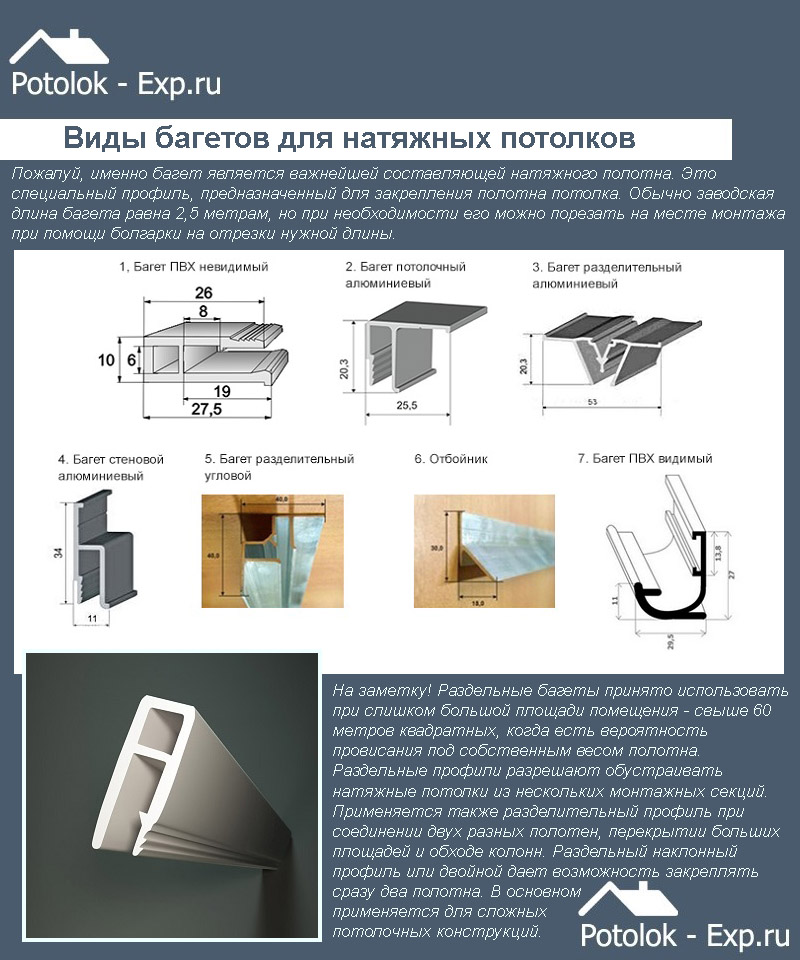
Types of baguettes and their manufacture
In addition to the fabric, a skeleton is required to install a stretch ceiling structure, which holds a polyvinyl chloride film or a synthetic fabric. This skeleton consists of special profiles, also called baguettes. They are extruded from durable plastic or aluminum.
In addition to the material, the baguettes are classified by two more features: the fixing point and the type of fasteners. In the first case, they are divided as follows.
- Ceiling profile - a baguette made of plastic or aluminum is attached to the surface of the rough ceiling.
- Wall profile - the baguette is fixed at the top point of the wall.
- Universal profile - the baguette can be mounted to the wall, as well as to the draft ceiling.
With regard to fasteners, the most common are the following methods.

On the ceiling or wall, all types of baguettes, regardless of the material or design, are installed using screws and dowels.
Selection of materials and tools
Now, knowing how and from what the components of the stretch ceiling are made, we learn what it takes to have a successful installation. Let's start with drawing up the list of necessary tools.


The next step is to select and purchase the material. Here nothing unexpected - these are the baguettes, which were described above, and the material of the stretch ceiling. And then you need to make a small addition. When choosing it, take into account not only the temperature in the room, its area and the danger of flooding neighbors from above, but also an important aspect, such as installing ceiling lights.
It was mentioned above that a polyvinyl chloride film can be stretched and sagged when in contact with a lamp with a halogen lamp or an incandescent lamp. In this situation, you should either give preference to another material (polyester cloth), or replace heated lighting fixtures with LED lights.
Now we describe the three main stages of installation of tension ceilings; to those concerns:
- preparation and marking;
- installation of baguettes;
- montage of cloth.
Preparation and markup
The process is as follows.

Make measurements of height from floor to ceiling in the corners of the room, make notes and, if necessary, recordings. In addition, you can make measurements in the middle of each of the four walls.
Compare the numbers to each other and note the difference in the height of the ceiling in different corners of the room. On average, it is 1-5 centimeters. The height of the stretch ceiling should be 30 millimeters less than the height of the ceiling at its lowest point. The value can be changed if spotlights are planned to be installed.
Using the level, roulette and pencil draw a line on which to install the baguette. Make sure that it is parallel to the floor and is at the same height from all points.
Prepare the surface. From the rough ceiling and walls, you should remove the remnants of the old finish - pieces of plaster, paint or wallpaper. All kinds of cracks and holes must be sealed. Do not forget to plaster the ceiling and treat it with a primer with an antiseptic agent, so that the fungus or mold does not start over the tension cloth.

If you plan to insulate or soundproof the ceiling, do so before fixing the baguettes. The same applies to wiring and other communications.
Installation of baguettes
The next stage is especially important, since its durability depends on the durability and reliability of the stretch ceiling and how smooth and smooth the surface will be.
A profile made of aluminum or plastic is installed on pre-drawn lines. To the wall (or ceiling), it is attached using screws or dowels. The gap between them is chosen based on the strength of the walls, the material of the ceiling and the possible load on the moldings, but in most cases the distance between the holes is 6 to 10 centimeters.

It should be borne in mind that it is not easy to carry out installation of baguettes - someone should help and hold them. In extreme cases, the profile can be glued to the surface of the walls or ceiling, and only then drill the holes for the fasteners, insert and tighten the screws.
Installation of the cloth
Now you should proceed to the last and most important stage - the installation of the canvas. The process will be considered for stretch ceilings made of polyvinyl chloride.

Table number 3. Installation of film tension ceilings.
| Steps, illustrations | Necessary actions |
|---|---|
| Use a heat gun to warm up the room to + 40 ° C. This temperature should be maintained throughout the entire installation process so that it does not cool down and does not stretch ahead of time. |
| Open the package with PVC film. Do this in a clean place with clean and dry hands. |
| Select the "base angle" of the film, heat it and heat the entire canvas with a heat gun to the temperature specified on the instructions supplied with the package (usually around + 70 ° C). |
| Set the clip-crocodile on the profile in one corner of the room. This can be done with a strong rope. |
| Clamp it to the base corner of the canvas and pull it up, to the ceiling. |
| Repeat the two previous steps with the opposite angle of the stretch ceiling, then the remaining two. Do not forget to heat the canvas with a heat gun. Be prepared for the temperature in the room to be very uncomfortable. |
| Carefully remove the clamp from the base corner and detach it from the profile. You can not drop the base angle down. |
| Then, using a corner blade, gently insert the base corner into the baguette, fix the PVC film there with a corner blade. |
| Repeat the previous two steps with the remaining corners of the canvas. Track how well they are secured with a harpoon, wedge or clip. |
| Now straight segments of the stretch ceiling are attached to the baguette. For this, a straight blade is used, with which a PVC film is inserted into the profile. |
| Track whether there are any folds and irregularities, and also how tightly and smoothly the canvas is pressed against the baguette. If there are defects, then heat the area with a heat gun, align and tighten the fasteners. Deficiencies need to be corrected quickly, so that the suspended ceiling does not have time to freeze with them. |
| Places of joining PVC film and baguette are closed with a ceiling skirting board. |
| If you plan to install spotlights - install sealing rings and cut a hole for the luminaire inside. Be especially careful, as correcting defects will then be extremely difficult or even impossible. |
| The last check of the stretch ceiling and cleaning of the room from the debris accumulated during the installation completes the work. |


Before you finish the article, it's worthwhile to tell you about how to properly install the spotlights on the suspended ceiling. The process is divided into two parts. The first half is performed before the tension of the cloth. Imagine it in the form of sequential actions.
- Calculate how many lights you will need. On average, one copy covers 1-2 square meters of the room.
- Mark on the draft ceiling places where future lighting is planned.
- Post the wiring to each marked point. For fire safety purposes, place the cables inside the PVC corrugated casing.
- With the dowels, fix the adjustable racks on the ceiling. Each consists of two U-shaped guides and a ring fixing the luminaire. Preliminarily adjust the racks slightly above the surface of the future stretch ceiling - so you do not interfere with the installation of the panel.

The second part of the process is performed after the stretch ceiling is ready. We remind you that before starting work you need to turn off the electricity supply!

Accurate adherence to the installation technology and a weighted approach to material selection will provide a beautiful and perfectly flat stretch ceiling that will last you many years.
Video - Installation of stretch ceiling
The theme of today's article will be a stretch ceiling, or rather it: varieties, advantages and, of course, installation. Well, first let's deal with you, what is so special in this kind of ceilings.
Stretch ceilings are made of polyvinylchloride (such a PVC film) or from a fabric on a polyester base, fixed in a special profile. At first glance, everything is very simple, however, the process of installing a stretch ceiling contains many of its subtleties and complexities. Let's go directly to the answer to the question: what is so good stretch ceiling.
Advantages of stretch ceilings
First, the stretch ceiling allows get a really flat (almost ideal) surface. Installation of a false ceiling is associated with a large amount of work aimed at eliminating various defects. Among them: careful installation of gypsum boards on the level, then sealing of seams and cracks on the surface, and, of course, putty fixing points. Of course, it's very difficult to get an ideal ceiling surface with so many finishing works, but it's practically impossible for a layman. Stretching the same ceiling is a solid cloth, on which there are no signs of installation. The truth here can also be objected, since the design cloth also consists of welded sections of the film, but the places of soldering of the canvas are practically invisible. But, despite this, there is a choice, as there are seamless stretch ceilings.
Secondly, the installation of a stretch ceiling at all not a troublesome occupation. For example, let's take process of installation of a false ceiling from plasterboard about which we wrote in the last article: work with gypsum boards is accompanied by a lot of dust and various construction debris. In addition, the room to be cleaned simply needs to be cleaned of all furniture and other interior items, which, you see, creates not only great inconvenience, but also takes a lot of effort and time. And then the process of installation of the suspended ceiling requires a lot of time for all the works: mounting the frame from the profile, bending the gypsum board, filling the joints and fixing points, priming, painting, etc.
All this does not apply to stretch ceilings: for mounting the stretch ceiling it is enough to mount a kind of frame, which is fixed only around the perimeter of the room, warm up the room, stretch and fix the ceiling board.
If we talk about the service life, the stretch ceiling will give odds to anyone else. Guarantee of stretch ceiling from the manufacturer from 15 years, whereas the situation with suspended ceilings is much worse with a guarantee of up to 15 years. One of the main advantages of the stretch ceiling is the resistance to shrinkage of new buildings (as the house is known to shrink, from which cracks form) that for a suspended ceiling is equal to a catastrophe. It is also worth mentioning cases with floods of neighbors from above. When this happens in a room with a suspended ceiling - there is a complete replacement, but the tension ceiling moisture is absolutely not terrible. Stretch ceiling can bend under the weight of water right up to the floor, which you can see in the picture and yet not suffer. Strength of a stretch ceiling from PVC makes 100-120 kg on 1м2. The collected water is very easy to deflate, and the canvas will take its original position, as if nothing had happened. And also it is worth noting that the stretch ceiling does not collect condensate, which makes it possible to use it in rooms with high humidity.
Stretched ceiling has great functionality. It has good thermal insulation and excellent sound insulation, suitable for installation in the hall, and in kitchens or in bathrooms, as it is fireproof, allows you to mount any lighting equipment from bulky chandeliers to miniature spotlights. And also the stretch ceiling is ideal for rooms with low ceilings: when installing a false ceiling, it is taken away more than 10 cm from the total height of the room, whereas when installing a stretch ceiling only 5 cm.
We just listed the functional advantages of stretch ceiling, but also do not forget about their aesthetic appeal. To this end, manufacturers produce films of a variety of colors (by the way: the color of the PVC film does not fade with time), textures (natural wood, marble, metallic, etc.), and the surface is not only matte, but even glossy, famous designers use this material to visually increase the space of the premises.
But, despite this diversity, the most beautiful form of stretch ceiling design is a reception called the "starry sky" effect. This effect of a stretch ceiling is obtained in two ways: the first - using light guides and a light generator or the second - using LEDs.
The first way is that the light guides are sent to the places of the supposed stars, and light is supplied by means of a light generator. It is possible to tinker a little and make more elegant starry sky effect for this it is necessary to attach the lens to the light guides (Swarovski crystals ...) In the end we get just a fantastic effect with.
The use of LED "starry sky" also has both strengths and not very ... With the help of the controller, you can create different dynamic pictures such as celestial flicker or movement, which is impossible in the first case. However, even when using the first type of "starry sky" on optical fibers, there are advantages, for example, a design, which turns out to be waterproof, which makes it possible to use it in rooms with high humidity.

Minuses
As you know, there is nothing ideal, this applies to stretch ceilings. Such a ceiling is quite easy to damage with a sharp object. But a more significant drawback of the stretch ceiling at the moment is its price, which is virified from a few tens to several hundred dollars per 1 square meter. Well, probably, the last, but not less important drawback of stretch ceilings is the complexity of their installation and the need for special equipment.
Mounting the tension ceiling with your own hands
Before installing the ceiling, you need to clarify a few points:
1. Stretch ceilings come from PVC film and fabric based on polyester;
2. It is undesirable to use lighting devices with a power of more than 45 W, otherwise they will heat the ceiling, from which it will lose its elasticity and elasticity.
Now we will consider one of the easiest ways to install a stretch ceiling - when there are no protruding pipes of communications coming out of the ceiling or different projections from the room. And for fixing the ceiling film we will use a special baguette profile.
To begin with, it is necessary to determine the lowest angle in the room and from it already produce a further installation of the stretch ceiling. For this we use the hydro level, we find that we need an angle, we recede 2-3 centimeters for the convenience of fastening the baguette (it all depends on the curvature of the ceiling and its differences). Further in the same way, it is necessary to note the zero level along the entire perimeter of the room. After the zero-level line is ready you can proceed to the next stage.
At the next stage we measure the corners in the room - this is necessary for qualitative joining of the profile-baguette in the corners. For this we use a special folding protractor.
There is a zero level, all the necessary measurements have been completed - you can move on to fixing the profile. But before proceeding directly to the installation of the profile rail, it must be prepared. There are two possible ways:
- In the first case, the rack must be longer than the width of the room - in this case, the edges of the rail are sawed at an angle equal to half the corner of the room by a measured protractor;
- In the second rake should be shorter than the width of the room - in this case, one corner of the rail is filed under half the value of the corner of the room, and the second one at 90 degrees (in order to clearly adjoin the second section of the profile). Next, we take the missing section of the profile and proceed with it as well, just skew for the opposite corner. Two pieces of the profile are properly glued with glue.
Then the profile rail is attached to the wall at the intended zero level using dowels or screws. As a result, we need to get a room with an attached profile on the wall along the perimeter of the room.
Now with the help of heat gun or a fan heater, we warm up the room to a temperature in the altitudes of 45-50 degrees. And only after reaching the required temperature can unwind the ceiling PVC film.
When finished with all the preliminary preparations, you can proceed directly to the stretching of the fabric. The installation of the web starts with the base angle (as a rule, it is marked on the film by the manufacturer), then we fix the opposite diagonal angle and so on. As soon as 4 corners are fixed, you can proceed to fixing the sides, their mounting is made evenly from corners to the center. It is worth noting that for a qualitative and easy installation of a stretch ceiling its canvas should be heated to 55-65 degrees. As we have already said, this order of ceiling mounting applies only to PVC-based ceilings. If you are mounting a fabric stretch ceiling based on polyester, then order is slightly different - first attach the sides, and then proceed to the corners.

Thus, we briefly reviewed the progress of the stretching of film and fabric on the ceiling, and now let's take a closer look at the types of tensioning ceilings.
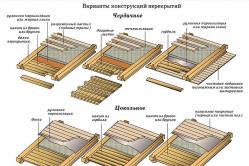
Harpoon suspended ceiling fixture
Typically, this type of fasteners are used only for mounting ceilings based on PVC film. He got his name due to the type of fastener on the end of the film in the form of a harpoon. The baguette in this case is an aluminum profile. This type of fasteners is the main one for PVC film ceilings, but apart from this, the staple method is also popular, because of its cheapness, but nevertheless it is not so reliable.
Harpoon fastening of PVC film

1 - Harpoon;
2 - Baguette;
3 - Ceiling PVC film;
4 - Base ceiling;
6 - Wall of the room.
Static ceiling tension fixing
With this type of fasteners use a U-shaped profile with a wooden bead which clamps the ceiling fabric. As we have already said, this method of mounting is cheaper, but less reliable.
With this type of fastener, a U-shaped aluminum profile and a wooden bezel are used, which clamps the ceiling liner. As already mentioned above, this method is used in our spaces to reduce the cost of the installation of ceilings.
The disadvantages of this method of fastening include:
- Over time, a wooden bead can pop out of the groove;
- And to securely fix the film you need to have enough experience.
Staple fastener PVC film
4 - Base ceiling.
After the ceiling sheet is installed only the finishing touches are left, such as: install a decorative insert that hides the ceiling fixing system and make installation and installation of lighting fixtures (chandelier or spotlights). When everything is clear with decorative inserts and plugs, then with the installation of lighting devices is far from it.
To install a chandelier on a stretch ceiling, you will need a plastic ring slightly smaller in diameter than the decorative base (lining) of the chandelier (so that it hides the ring). This ring should be glued to the film in the previously designated location of the chandelier. Once the glue dries completely, you can safely cut through the hole in the ring without fear of rupture of the blade and attach the chandelier to the base ceiling.
Ceiling on a fabric basis In the future it will be possible to paint with acrylic paints, creating various effects, for example, sea waves or clouds, etc.
We hope that our article will help you to make a stretch ceiling yourself, without any problems.
Installation of stretch ceiling "Clipso"
Stretched ceiling - this is a fairly common solution for finishing ceilings. It can be made of a fabric made of polyester or PVC canvas. The selected type of cloth is fixed to the ceiling by means of a special profile. This design looks quite simple, however, the stretch ceiling with its own hands and its execution technology has its complexities and nuances that should be taken into account.
Modern versions of the stretch ceiling can be considered relatively simple in performance, while they have high operational properties and beautiful appearance. Especially harmoniously the stretched ceiling looks in rooms with a large area and high ceiling, but in a small area should refrain from this way of framing, as this can visually reduce the room. In order to carry out video lessons on your own, you will simply need them, since for this process you need a maximum of knowledge on this topic. In addition, you should familiarize yourself with all the tricks of the work and all the materials that will be needed in the finishing process. 
What are the advantages of a stretch ceiling?
Choosing a way of finishing for the ceiling, many doubt whether the stretch ceiling will satisfy all the needs and preferences of the owners. This is due to the fact that not everyone knows about the unconditional advantages of this method of finishing the ceiling. Stretch ceiling has the following advantages:

These advantages of this method of decoration are confirmed by those who independently performed suspended ceilings, whose reviews are mostly positive and testify that the process itself is completely understandable and uncomplicated. All this indicates that the suspended ceilings are very practical, convenient and have a special aesthetics. You can make sure of this by viewing the stretch ceilings of the bedroom photo.
Mounting Hardware
Accessories for stretch ceilings must be prepared in advance, so that during work everything needed is at hand. This will help make the installation process faster and easier. To install a stretch ceiling, you need these tools:

From materials it is necessary to have:
- cloth (from fabric or film). The selection of material is necessary based on personal preferences. Fixing the canvas will be slightly lower than the ceiling in the room;
- special profile - baguette. The baguette can be made of aluminum or plastic. In this case, the plastic profile is characterized by a lower cost, and aluminum is considered to be more durable. It is necessary for securing the tension web, which is attached to this profile. To understand how much it should be purchased, perform measurements of the perimeter of the room;
- screws and dowels. This material should be purchased with a small margin, since the strength of the entire structure depends on how often the fastening will be made;
- materials for noise insulation and sound insulation if necessary. If present, you should take care of the purchase of such materials in advance, as they fit into the gap between the stretcher and the main ceiling in the room.
Types and types of stretch ceiling
Before acquiring material for a stretch ceiling, you need to understand what kind of canvas is and what the features of each kind are. The stretch canvas is of two types:
In addition to such a separation, there is also a huge variety of colors, structures and cost. According to these parameters, the material should be selected only on the basis of financial possibilities and desires, however, it should be noted at once that you should not buy the cheapest canvas, as it may prove to be substandard.
An important point: when purchasing material, you should take into account the height of the ceiling in the room. In the event that there is a need to visually increase the room, then you need to choose a material with a shiny surface. The mirror effect of such a cloth will visually increase the height of the ceiling.
In addition, the stretch ceiling can be different in type of construction. There are the simplest stretch ceilings, which are performed in one level. In addition, there are also multi-level stretch ceilings, which contain in their design two, three or more levels. Multilevel designs assume the creation of a framework of several levels with the help, therefore accordingly their implementation is much more complicated and long-term. Below are the multi-level stretch ceilings of the photo and stretch ceilings for the kitchen photo made by own hands.
Installation of stretch PVC ceiling
As a rule, the surface on the ceiling has many defects. It is uneven and sometimes even cracked. Therefore, first of all, in order to fix the profile smoothly, you need to make a markup. It is best to make the markup in this way:
- it is necessary to measure the height of all corners in the room and leave marks on them. Due to this, it is possible to detect discrepancies and sometimes the difference can be more than five centimeters and above. When marking at corners, you need to take into account the distance that will go from the ceiling of the room to the stretcher. This distance must be made at least three centimeters. In the event that point lights are installed in the suspended ceiling, their dimensions should be taken into account, since they must be placed in the space between the ceiling and the cloth;
- on the perimeter of the room you need to draw an even line, then to fix the profile on it. To do this, you should use the level, it should be understood that this stage is extremely important, since the whole structure depends on this.
We fix the profile
After the layout of the room has been completed, you should proceed to secure the baguette to the walls. The profile is fastened by means of screws and dowels. Between them there should be a distance of not less than 8 centimeters. Of course, at first it is better to fix the baguette near the walls. Also, make sure that the first screw is not at a close distance from the edge of the profile. At this stage, you also need to take care of the lighting. If the fixtures have already been purchased, then when mounting the profile, their dimensions must be taken into account, since after mounting the canvas, they can no longer be attached. 
Installation of the cloth
In order to qualitatively make a stretch ceiling, first of all, you should warm up the room in which the work will be done. It is necessary that the temperature in the room reached forty degrees. To do this, you can use a special device, which is called a heat gun. It can either be purchased at a specialized store or rented there.
Installation of stretch ceiling is carried out in several stages:

If in the course of work on the web creases are formed, they must be leveled, preheating the canvas. The final stage of installation of a tension ceiling is the installation of fixtures, which are installed on the racks beforehand, and after the tension of the web under them holes are cut. In order to visually see how to make a stretch ceiling with your own hands, the video must be viewed, since it shows the process of work, starting from the first stage. Installation of fabric stretch ceiling is carried out using the same technology as PVC linen, but the fabric does not need heating.
How to stretch the stretch ceiling with your own hands video
The times when after each leak on the ceiling there were rough divorces and yellowish streaks, they vanished into oblivion. With the advent of stretch designs, we no longer have to whitewash the ceiling every five years. A quality ceiling coating will last several decades and fully justify the money spent.
How and where to choose?
The main suppliers of stretch ceilings are France and China. Chinese products are much cheaper (from 120 rubles per square meter), but its quality is questionable. The ceilings of French manufacturers have passed many inspections and have International quality certificates, but the cost of such ceilings averages 450-500 rubles per square meter.
When choosing a canvas for the catalog, please note that it will have a darker shade than the one shown in the picture. So, choosing a canvas of delicate peach color, you can get a ceiling of bright orange color. The only way out here is to apply to the finished surface of the blade of the scraper or to place in the interior of several bright details that will be combined with the bright color of the ceiling and distract attention from it.
As for the manufacture of the ceiling, it is best if the whole structure is made in the factory. This also applies to welding seams, because to carry out this work directly on the site requires bulky equipment and special skills to work on it, and the quality of the seams in this case will be much lower.
As for the manufacture of the ceiling, it is best if the whole structure is made in the factory. This applies to welding seams, because to carry out this work directly on the site requires bulky equipment and special skills to work on it, and the quality of the seams in this case will be much lower.
Benefits
In addition to high decorative qualities, stretch ceilings have the following advantages:
- Uncomplicated operation. This ceiling is easy to wash (read the article about it), it attracts less dust than ordinary whitewash.
- Fire safety and environmental friendliness. The cloth is anti-allergenic, does not release toxins when heated and does not burn.
- Strength and moisture resistance. When leaking, the film ceiling can withstand up to a hundred liters of water, and after removing the PE, the film should be bent, dried and secured back.
- Stretch ceiling can be dismantled several times, while the view of the film does not change.
disadvantages
- Sensitivity to temperature changes. This applies to film ceilings that crack at too low a temperature and sag at high (over 60 degrees).
- High vulnerability is also a minus of PVC film, which is easily damaged by sharp objects. Even the outflow of champagne cork is capable of making a hole in the ceiling.
- Installation of film ceilings in large rooms is not possible without the docking of several cloths, due to which seams are formed. The output here is the installation of polyester fabric instead of PVC film.
Types of stretch ceilings
Stretch ceilings differ in:
- material of manufacture: film or fabric;
- structures: single- or multi-level;
- texture: glossy, matte, satin;
- chromaticity: monophonic, with photographic printing, artistic.
The basis of film and fabric ceilings serves polyvinyl chloride. Only in the first case, a single web (film) is used, and in the second case it is made of interwoven PVC yarns.
Glossy surfaces can only have film ceilings. Fabric ceilings are characterized by a matte surface or texture under satin (semi-matt).
The most rich palette of shades (more than 40) have glossy ceilings. That's why they are most often installed in the living room. Approximate cost of 1 square. m from 390 rubles.
In the bedroom, the hallway, the nursery and in the rooms where for some reason it is impossible to install a glossy ceiling (for example, in a well-lit room such a ceiling will give glare), set up half-matt (satin) and matte fabric ceilings. The cost of 1 square. m. from 120 rubles. Although the color palette of such paintings is limited by pastel shades, it is possible to make the ceiling brighter with photo printing. The cost in this case will increase, but with the correct such a ceiling will be the highlight of the room.
In spacious rooms with high ceilings, you can install two- or, as well as ceilings with a wavy surface, in the form of a cone or dune, etc. The structure consists of a gypsum board base on which the canvas is fastened. Such designs are the most expensive and cost from 2000 rubles per square meter. m.
Mounting technology
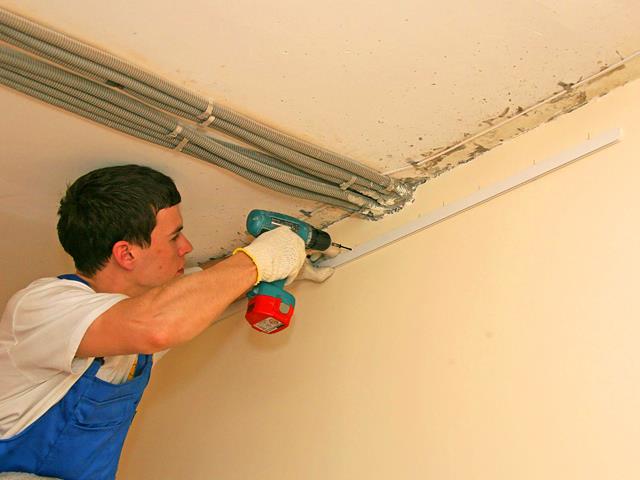
Installing the tensioning structure is not that difficult. The only nuance is that to install a film ceiling, you will need gas or electric gun.
![]()
If the room is small, then you can do with an electric gun, the heating area of which, depending on the type, is from 14 to 180 square meters. m. The gas gun is a more powerful but less secure unit and is only used in large rooms.
Yet, beginners themselves should not to take up work with heat guns, but to establish a fabric ceiling is quite possible and with your own hands with a partner. The assembly process consists of the following steps:
- Carrying out of measurements.
- Installation of profiles (for installation of profiles for gypsum board can be read in).
- Mounting racks for fixtures.
- Fastening of a cloth.
- Mounting fixtures.
From the tools you will need:
- Laser level.
- Roulette.
- Punch.
- Dowels-nails.
- Putty knife.
- Aluminum profile.
- Cloth.
- Plastic rings.
- Glue "Kosmofen".
It is not necessary to take out all the furniture for measuring and assembling the structure. It is enough to organize access to any point of the ceiling for at least half a meter, that is, to take out only high furniture. When installing a film ceiling, you need to remove those items that do not tolerate large heat.

What is the attachment of the stretch ceiling.
Next, we measure the ceiling, i.e., measure each of its four (or more) sides. If you plan to install a film ceiling harpoon method, then from the received sizes it is necessary to take away on 5-7 see from each party, t. To. During installation the film all the same will be stretched.
Width of fabric
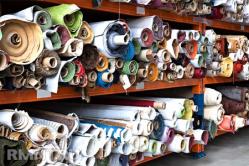
Buy materials for stretch ceiling can be in any company that sells construction materials. Fabric fabrics are produced in rolls and have a width of 3.1, 4.1 or 5.1 meters, film ceilings are also released in rolls up to 5 meters wide. But this width is not always enough to cover large areas. And then it is required to weld several cloths, which are performed by specialists in the factory on high frequency current machines (HDTV).

Fabric fabrics are produced in rolls and have a width of 3.1, 4.1 or 5.1 meters, film ceilings are also released in rolls up to 5 meters wide.
As for the manufacturer, here are the most well-known manufacturers of stretch ceilings:
- Arridel - a French company that produces matt, satin, glossy or stylized under various surfaces for stretch ceilings. The cost of 300 to 1570 rubles per square. m.
- Elegranto - another producer from Europe (Belgium), which produces more than 20 shades. The cost of products, which varies between 245 and 350 rubles per square meter. m., allows you to install suspended ceilings to people with an average income.
- C-Light - a Russian company whose paintings differ not so much in aesthetic properties as in practicality. The cost of 250 rubles per square. m.
- DEXFORT - a Chinese company that produces beautiful and inexpensive paintings. The cost of 120 rubles per square. m.
When choosing a canvas, consider the features of the room. So, the ceiling of dark color, installed in a small room, will make it even smaller. But a dark insert in the center of the light ceiling will give the room a depth and visually lift the ceiling.
Installation by steps
Installation begins with the preparation of the ceiling and the removal of the old whitewash. If the ceiling is not prepared, then whitewash will fall off and will be noticeable on a thin film.
After that, fixing for spotlights and fixing under a chandelier are established. As mortgages use bars, which with the help of dowels fasten to the ceiling on a previously planned scheme. On them they start up the wiring, and in the places of the supposed fixtures make holes, the diameter of which is equal to the diameter of the point light. Later on these holes are installed with thermo rings and fixed fixtures. The chandelier is attached to a hook mounted in the main ceiling, or they perform the installation of a wooden mortgage in the manner indicated above.
How to pull?
After preparing the surface, proceed to install the fabric in the profile. When installing the film, the room temperature should be 40 - 60 degrees. Heat the film gradually, slowly unfolding the roll.
First, we attach the canvas in the corners, and from them we are already moving to the center. Mounting is carried out in one of 4 ways:
- Harpoon. Throughout the perimeter of the canvas, the frame is made in the factory by the hook type (harpoon), by means of which the web is automatically stretched and fixed in the profile.
- Staggering. In this case, the canvas is fastened with a glazing bead in the U-shaped profile.
- Cam. The canvas is attached to the baguette with the help of the protrusions resembling a fist, one of which is movable. In this case, one protrusion is squeezed out and passes the web between it and the fixed projection.

First, we attach the canvas in the corners, and from them we are already moving to the center. Mounting is carried out in one of 4 ways.
If it is needed circumvent communications (pipes, risers), then this is done even before the canvas is inserted into the baguette. Cut the canvas at right angles from the riser to the edge, and in place of the pipe in the canvas, make a cross-cut. Next, gently, without exerting extra effort, insert the edge of the fabric into the profile and secure the special plastic ring from the underside of the film to the riser.
Similarly, the bypass of the hood is performed. It is necessary to remove the hood pipe, attach a plastic nozzle to it and install it back. If you do not use a sandwich tube, but a conventional corrugation, you will need a thermal insulation in the form.
Having finished with a ceiling, we fix fixtures. To do this, glue to the previously planned places with the help of the adhesive "Kosmofen" (cost 80-230 rubles per 20 grams) glued plastic rings, which will not allow the canvas to heat up and crawl. After the glue dries, inside the rings we cut out the holes and install the fixtures.
The use of plastic rings is good because they do not allow you to cut through the excess in the canvas. But still there was such an oversight, then you can fix the situation only by installing a defective false ventilation or a larger lamp.
How much are the services of a specialist?
The installation price of the tensioning structure depends on the area of the room, the number of corners, luminaires and the type of attachment. The average cost of installation 1 square. m. linen from 300 to 500 rubles. Installation profiles - 80 rubles per running meter, as much will cost installation of a decorative insert. The installation of the design and the point light is 300 rubles, and the installation of the mounting for the ceiling chandelier is 600 rubles.
As for corners, their number does not affect the cost of installing the canvas in a standard 4-coal room. If there are more than 4 corners in the room, then each "extra" angle increases the cost of installing the canvas.
Video instruction with a bypass pipe
Installation of a stretch ceiling is a very costly business. Therefore, some still want to know how to make a stretch ceiling yourself. So, this article is designed to help everyone who wants to try to do this type of repair of the ceiling by themselves.
Instruments
Do without the following list of necessary tools can not be done, because the work in this case will not be performed correctly and qualitatively:
- Heat gun. It is necessary for heating the linen and the room to the required temperature
- Hammer drill
- A hammer
- Gas bottle
- Screwdriver
- Level
Care should be taken when handling the gas cylinder! Incorrect operation can lead to an explosion of gas in the room, so it is better to read safety precautions before starting work.
In addition to the tools listed above, you will also need some consumables. Their number is calculated independently, depending on the size of the room and the amount of work.
- Self-tapping screws. With their help, the profile will be fixed. You should know that it's better to choose medium-sized screws to keep it as good as possible.
- Baguette. It is thanks to them that the canvas will be fastened. It can be plastic and aluminum. The first is cheaper, the second one, although it costs more, but it is stronger and will last longer.
- Soundproof materials (if necessary). Since the suspended ceilings do not possess the ability to muffle sounds, it is possible to lay mineral wool in the inter-ceiling space, for example.
Although the process of installing stretch ceilings is not so complicated, it may still require the help of another person. That is why it is advisable to involve someone as assistant.
Selecting the type of ceiling
The next stage of repair is the selection of suitable material by type and texture. Structure, quality, color - all this is chosen at this stage. Conditionally, we can distinguish two types of material used in the installation of a stretch ceiling:
- PVC film. Usually it is attached using a harpoon, a staple or a wedge method. The first of them experts consider the most reliable, but it is more complicated than the rest.
- Fabric cloth. Perfectly suitable, if self-fastening will be performed using the cam method.
Synonym for the word "cheap" is not always "quality", so when choosing a manufacturer of fabrics for stretch ceiling, it is important to consider the country that produced it. The material from China is best avoided at all.
Installation
 Installation of the stretch ceiling begins with the marking of the wall. This is necessary in order to determine the unevenness of the ceiling and to correctly install the structure.
Markup
First, each wall is measured. During the measurement, marks are set and it can be noticed that in some cases a difference of several centimeters of the height of one or another angle is possible. The installation should be carried out at a level where all the corners will be at the same height. At the same time, it is important to take into account the fact that for the installation of luminaires it is necessary to make the construction lower by several centimeters.
Profile fixing
After marking, the supporting profile must be attached to the walls. The most qualitative attachment is possible when using the optimum number of screws. To facilitate the work process, it is possible to glue the baguettes in advance with glue to the walls.
Also at this stage, the wiring of electrical cables and the preparation of a recess for the luminaires along the width and length are carried out. After finishing the fixing of the profile, it will not be possible to do this already.
Installation of panels
The ceiling itself can only be made if the room is warmed up properly. Only when this condition is fulfilled will it be possible to stretch the fabric qualitatively. The required room temperature should reach forty degrees.
 Self-fixing should be carried out in the following sequence:
- The material is unpacked only with clean hands. Then one of the edges of the canvas is attached to one side of the baguette. In this case, it is preheated with a heat gun.
- Further, the angle opposite to that already fixed is fixed. You can do it yourself or ask an assistant. The crepe is made with a special soft clamp to prevent a possible cut.
- The rest of the corners are fixed, after which the whole ceiling is heated. Thanks to uniform heating, the film becomes more elastic, so you can remove one of the clips and start inserting a special blade into the baguette. It is important to hold the cloth until at least a few clamps are removed. Otherwise, it can pop out of the profile.
- Mounting of all angles is carried out according to the principle described above. Itself is very difficult to make the installation of the ceiling at this stage, since it will be difficult to fill the canvas in the baguettes in the future. At this stage, the help of another person will be more important than ever.
- After the corner fixation has been made, all sections of the web are fixed in a straight line using the previously used blades. Those areas on which the seams are located are attached to two locks. The gaps between them are separated and fixed with locks. It's much easier to make a stretch ceiling if you first acquaint yourself with the video.
- Stretch ceilings on their own it is important to do so that there is no in the process of working any wrinkles. They should be smoothed, not postponing for later, since after doing this it will be more difficult.
- Next, you should carefully check all the connections and attachments, while the room is not cooled, and the stretch ceiling fabrics do not stretch
- Installation of ceiling lights is the last stage. They are fixed in advance on special racks, and already after the tension of the cloth for them holes are cut out. It is very important to do everything carefully and carefully, otherwise the work will have to start anew.
Watch this video and you will discover many interesting facts about stretch ceilings.
Removing wrinkles can only be done if additional warming up of the canvas has been carried out previously. Their smoothing is performed in a circular motion with the palm of your hand.
After finishing all the work, the guides are hidden using a special tape that replaces the ceiling skirting
Seamless ceilings
This fabric is a one-piece tissue cutout. The most important advantage is that they can not be heated by the gun when they are installed. Installation of profiles is the same, only it is necessary to use baguettes of the most durable materials.
The feature of installing a seamless ceiling is that the tension is not from the corners, but from the middle of the wall. Then the installation is made from the center to the corners. The excess edges that will hang down are cut with a knife.
Since the heating is not used, the folds formed can be smoothed out with an ordinary building hair dryer.